Learn how to prepare and start prints on S series printers, including the S3, S5, S6, S7, and S8.
Starting a print on an UltiMaker S series printer involves more than just loading a model and pressing “go.” First, your 3D model needs to be prepared in UltiMaker Cura (desktop or cloud) by converting it into a printable file (slicing) with the right settings and configuration. Once sliced, the print job can be sent to your printer either over the network, via the cloud, or using a USB drive. With the correct materials and configuration selected on the printer, you're ready to start your print with confidence.
This article contains the following topics:
- How to prepare a print in UltiMaker Cura desktop
- How to prepare a print in Cura Cloud
- Setting up the right printer configuration
- Pre-print checks
- Sending the print file
How to prepare a print in UltiMaker Cura desktop
UltiMaker Cura is a powerful and user-friendly desktop slicing application. It is free to download and use. Prepare your 3D model for print in minutes with recommended settings; simply choose speed and quality settings, and you can start printing. Or switch to the Custom mode, which gives over 400 settings for granular control.
Tip: For the best printing results, always use the latest version of UltiMaker Cura. For more information about using UltiMaker Cura and system requirements, please see the Cura section of the support pages.
1. Add your printer
When you use Cura for the first time, complete the first-run experience. If you sign in to your UltiMaker Account, you can add any printers already connected to your Digital Factory workspace. If your UltiMaker S series printer is not connected yet, set it up via the Digital Factory option on the printer, or add the printer manually from the list of non-networked printers.
If you're already working with Cura, but want to set up a new machine, click on the Printers panel in the interface, and select Add printer. If you are signed in with your UltiMaker account and have already connected your new printer to your Digital Factory workspace, it will be added to Cura automatically.
2. Prepare your print
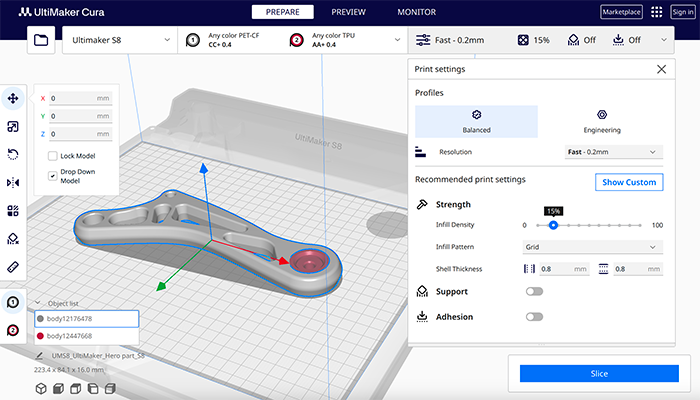
Start by loading a 3D model (or several). You can click the folder icon to load a file from your computer or a Digital Factory project, or drag a file onto the build plate. Next, in the Configuration panel, select your print cores and materials. Use the Adjustment tools on the left side to position, scale, and rotate the model as desired. Select your intent profile, resolution, and desired settings in the Print settings panel on the right side. You can now press the Slice button in the action panel.
Tip: Always check the Preview mode to see how the model will be printed. This helps validate your printing strategy and prevent unexpected problems.
3. Start the print
After slicing, you can start the print via the action panel. Send your print job via cloud if the printer is connected to the Digital Factory, via network if the printer is connected via LAN, or save the file to a USB drive for printing with offline printers.
Note: When printing via USB, always ensure to safely eject the USB device to prevent corrupting print files.
How to prepare a print in Cura Cloud
Digital Factory's Cura-powered cloud slicer lets you prepare and optimize 3D models from anywhere. Slice files directly in the cloud and send them to your UltiMaker printers with ease — no installations needed. Enjoy the trusted precision of Cura with the flexibility of cloud access, streamlining your 3D printing workflow like never before.
Tip: First set up your workspace and printers in the Digital Factory for a fully cloud-based workflow. However, you can also use Cura Cloud without connecting any printers and save to USB instead.
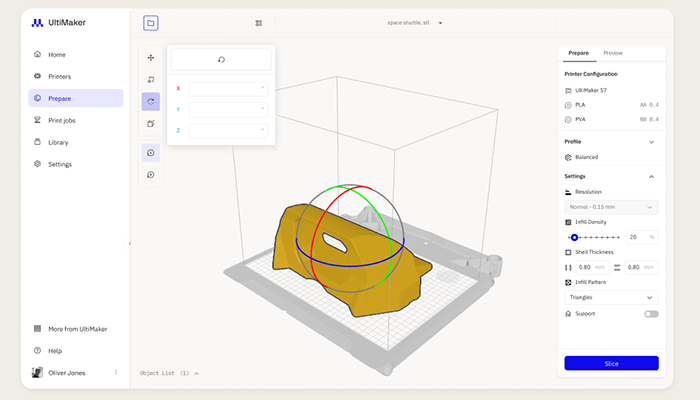
In your workspace, select the Prepare section on the left side to open the Cura Cloud slicer. Click the folder icon in the top bar to import a 3D file (from your computer or a Digital Factory project). On the right side, select your printer and configuration. Underneath, you will find a profile selection and several basic settings that can be adjusted. If needed, you can move, rotate, or scale your model with the tools on the left side.
Click the Slice button to process the model. Afterward, the Preview mode will be opened to show a print visualization. If you're happy with the results, press Queue to send the print directly to a printer. Alternatively, save the print file to a Library project for later or download it for offline printing.
Tip: For a detailed, step-by-step explanation of preparing a model with Cura Cloud, please visit this article.
Setting up the right printer configuration
Before the print can start (either via network or via USB), it is important that the configuration chosen in Cura matches or is compatible with the printer. This includes the printer type, print cores, and materials.
Selecting the right printer
When sending a print job from UltiMaker Cura, it is important to match it with a compatible printer model. This is relevant if you have multiple UltiMaker S series printers. Print jobs prepared for one printer may also be compatible with other S series models, but not all combinations are supported. The UltiMaker S3 stands alone: jobs prepared for the S3 can only be printed on this model, and it cannot accept jobs from other printers due to its smaller build volume. Print jobs for the UltiMaker S5 and S7 are interchangeable. The S6 and S8 are also interchangeable and can additionally accept jobs prepared for the S5 or S7, though without the benefits of high-speed printing.
Note: It is not necessary (or possible) to manually select and S series accessories (Air Manager and Material Station) to Cura. The relevant settings for these add-ons are always included in the print files, so this will not affect the compatibility.
Print cores and materials
You can send a print job with any configuration to any (compatible) printer, but the print will not start until the printer's configuration matches the chosen settings in Cura. The information about the selected print cores and materials is included in the .gcode or .ufp file. If this matches the printer, the print job can start. If not, the printer will warn you if there is a configuration mismatch and instruct you which material(s) or print core(s) should be changed before you can successfully start the print.
In combination with the Material Station, the printer will check if the required materials are preloaded for the correct extruder. If available, they will be automatically forwarded to the print head at the start of a print.
Tip: Connected printers will automatically show available configurations in Cura for an easier workflow. In combination with a Material Station, all possible configurations are shown.
UltiMaker S series printers support 'any color' selection for UltiMaker materials in Cura (desktop and cloud). If this is selected, the printer will only check the material type and disregard the color. In combination with the Material Station, if multiple colors of the same material are available, the printer will always select the spool that was loaded first.
Note: This 'any color' option is not available for the UltiMaker S3.
Pre-print checks
For optimal reliability and increasing your print success rate, it is recommended to perform the following checks before starting a new print.
Build plate
Ensure that the build plate is correctly installed. Printers with a flexible build plate (S6 Flex, S7, and S8) have a build plate detection sensor that prevents print jobs from starting if the build plate is not installed. However, always ensure it is properly aligned to prevent leveling issues. Printers with a glass build plate (S3, S5, and S6 Glass) do not have such a sensor. Never start a print without the glass build plate in place, as this will damage your printer.
Additionally, ensure that the build plate is properly cleaned and, if necessary, that an adhesive is applied correctly.
Tip: See an overview of the recommended adhesion methods per material and build plate type here: What type of glue should I use for build plate adhesion?
Print cores
Besides ensuring that the correct print core types are installed in the print head, also check that:
- The nozzle tips are clean. Any blobs of material or bits of carbonized filament stuck to the nozzles may cause problems with the active leveling process or get stuck in your print.
- The print cores are not blocked. If your previous print showed signs of underextrusion or was interrupted by extrusion errors, this indicates that there might be a (partial) clog in the print core. Clean the core(s) using the hot and cold pull method. If the previous print used a very different material type, you may want to clean the core preventively.
- The print core combination is calibrated. For dual-extrusion prints, it is important that the two materials align well. Run an XY calibration if the printer indicates this is missing.
- The nozzle cover is placed correctly and in good condition. The nozzle cover protects the print cores from cold airflow from the fans, and against backflow of material into the print head if something goes wrong. Regularly check the nozzle cover and never start a print if this part is missing.
Tip: Not all the points listed above have to be checked before every print. As a general recommendation, always follow the advised schedule for preventive maintenance.
Sending the print file
As mentioned above, the UltiMaker S series printers support several different ways of starting a print. Here is a short summary:
| Printing via cloud |
When working with the Digital Factory, you can benefit from additional features. If the printer is set up in your workspace, you can prepare print jobs via Cura Desktop or Cura Cloud, and send them directly to your printer.
In Cura Desktop, ensure you are signed in. After slicing, press the Print via cloud button in the action panel and select your printer. In Cura Cloud, press Queue after slicing.
Tip: You can also store files in a Library project, and start the print via your Digital Library.
|
|---|
| Printing over local network |
You can also print over your local network using UltiMaker Cura Desktop. The UltiMaker S series printer must be connected to the same local network as your computer, and connected via Cura.
After slicing, press the Print over network button in the action panel.
|
|---|
| Printing via USB |
If your S series printer is not connected to the network, use the USB workflow to start a print. Prepare your print in UltiMaker Cura (Desktop or Cloud). After slicing, you can save the file (.gcode or .ufp) directly to a USB drive, or save it to your disk for later. Insert the USB device into the port at the front of the printer. In the main menu, select the print job from the list on the display.
Note: Ensure to always safely eject the USB device to prevent corrupting print files.
Tip: You can still use Cura Cloud to prepare print jobs, even without connecting a printer to your workspace. Simply download the file after slicing.
|
|---|
That's it! You are now ready to prepare and start print jobs on your S series printer. For additional information, see the related articles linked below, or contact support.
Related articles


