UltiMaker print cores should be cleaned periodically for optimal print results. Material can sometimes get stuck inside the nozzle and degrade. This can cause extrusion problems or even completely block the print core. Some materials are more prone to degradation and blocking the nozzle, such as PVA and composite materials.
The most efficient way to clean the inside of the print core is by applying hot and cold pulls. This method is recommended as preventive maintenance based on the number of printing hours, or when switching between materials that have very different colors and/or printing temperatures. It can also be applied as corrective maintenance in case of extrusion problems.
Hot pulls are used to get the biggest parts of degraded material out of the print core and are necessary when a print core is clogged. With a cold pull, the remaining small particles will be pulled out, ensuring the print core is completely clean on the inside.
UltiMaker cleaning filament is recommended, but other (non-flexible) materials such as PLA can also be used (on some models).
Tip: This article describes how to perform the hot and cold pulls to clean print cores, but a similar process can be used to clean the nozzle of the UltiMaker 2 series, UltiMaker 2+ series, and the UltiMaker 2+ Connect.
Caution: It is never recommended to insert a needle into the tip of the nozzle during the cleaning process. This easily causes burns and may cause damage to the print core. This is especially true for the ruby insert in the CC Red and DD print cores. On the AA+ core, this can damage the internal channels.
The specific print core cleaning steps depend on the printer model. Select your UltiMaker 3D printer type and follow the instructions below:
Factor 4
The UltiMaker Factor 4 has a direct drive feeder in the print head. This allows for an automated print core cleaning procedure.
Caution: The cleaning process involves high temperatures. Never touch the nozzles while they are hot, and avoid placing your hands below the nozzles while inserting filament, as hot material may drip and cause burns.
Preparation
- Navigate to the print core cleaning procedure: In the Options menu, go to Maintenance → Print head → Print core cleaning.
- Select the print core you want to clean: print core 1 or print core 2. If you want to clean both print cores, you can repeat the process for the other print core after finishing the first one.
- Push down on the white collet press cover and pull the Bowden tube (for extruder 1 or 2) out of the print head.
Hot pull
The first step is the hot pull. This can be performed repeatedly, until the majority of the degraded material has been removed.
- Manually insert the cleaning filament into the print head until it is gripped by the feeder.
- The printer will heat up the print core, (try to) extrude some material, and then pull back the filament. This can take several minutes.
- When this is finished, remove the stick of cleaning filament from the print head.
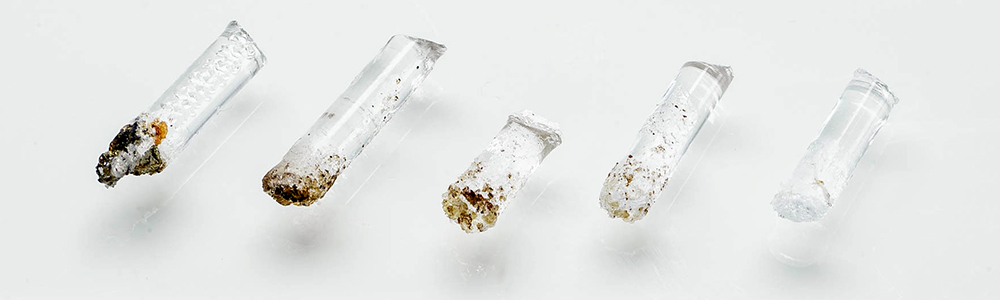
- Inspect the filament tip. If there is dirt or carbonized filament on the tip, cut it off and redo the hot pull.
- Repeat these steps until the filament tip comes out clean.
Cold pull
If you are satisfied with the results of the hot pulls, proceed to the cold pull(s). During this step, the nozzle temperature will be lowered to fully remove all degraded material from the inside of the nozzle. You can perform this once, or repeat this step until the result is successful.
- Manually insert the cleaning filament into the print head until it is gripped by the feeder.
- The printer will heat up the print core, push the filament fully into the print core, cool down the print core, and then pull back the filament. This can take several minutes.
- When this is finished, remove the stick of cleaning filament from the print head.
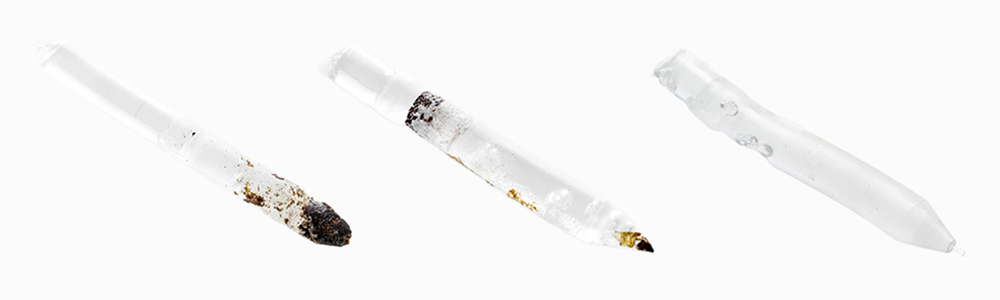
- Inspect the filament tip. If there is dirt or carbonized filament on the tip, cut it off and redo the cold pull.
- Repeat these steps until the filament tip comes out clean.
Reassembly
When the inside of the nozzle has been cleaned successfully, reinsert the Bowden tube. Firmly push the tube into the corresponding slot.
You can now continue with cleaning the other print core, or start another print.
S series
Preparation
- Navigate to the print core cleaning procedure: In the Options menu, go to Maintenance → Print head → Print core cleaning.
- Select the print core you want to clean: print core 1 or print core 2.
- Select the material you want to use for cleaning: Cleaning filament or PLA filament.
Note: Cleaning filament is strongly recommended for this procedure; cleaning with PLA filament may not always give optimal results. On the UltiMaker S6 and S8, only cleaning filament can be used (no material selection option).
- Wait for the printer to heat up the print core and retract the filament until its end is visible in the Bowden tube.
- Remove the Bowden tube from the print head. First, remove the clamp clip and then push down on the tube coupling collet while pulling the Bowden tube upwards, out of the print head. Confirm to continue.
Note: The print head will move to the front-right corner to prepare itself.
Tip: If the material is not retracted, there is a chance that the material has been ground down and is stuck in the feeder. In this case, remove the material manually as described here.
Safety notes
Caution: Read the following important safety notes and follow all instructions during the cleaning procedure.
- Use pliers when handling filament to avoid injury if the material breaks unexpectedly.
- Make sure the print head is positioned at a comfortable working height, ideally below shoulder level.
- The cleaning process involves high temperatures. Never touch the nozzles while they are hot, and avoid placing your hands below the nozzles while inserting filament, as hot material may drip and cause burns. Consider wearing protective (thermal) gloves to prevent injury.
- During the hot pull, use a quick but steady upward motion. Avoid sweeping or flinging movements, as this could cause small flakes or drops of hot filament to scatter. While the risk is minimal, wearing safety glasses is recommended to protect your eyes from any unexpected residue.
Hot pull
The first step is the hot pull. This will be performed repeatedly, until the majority of the degraded material has been removed.
- Insert the filament into the print head until you feel some resistance.
- Hold the filament with pliers and gently apply pressure to the material for ±1 second so that it extrudes from the print core or until it cannot be pushed any further, and directly pull the filament out with a quick, firm pull.
- Cut off the tip of the filament that you have just pulled out.
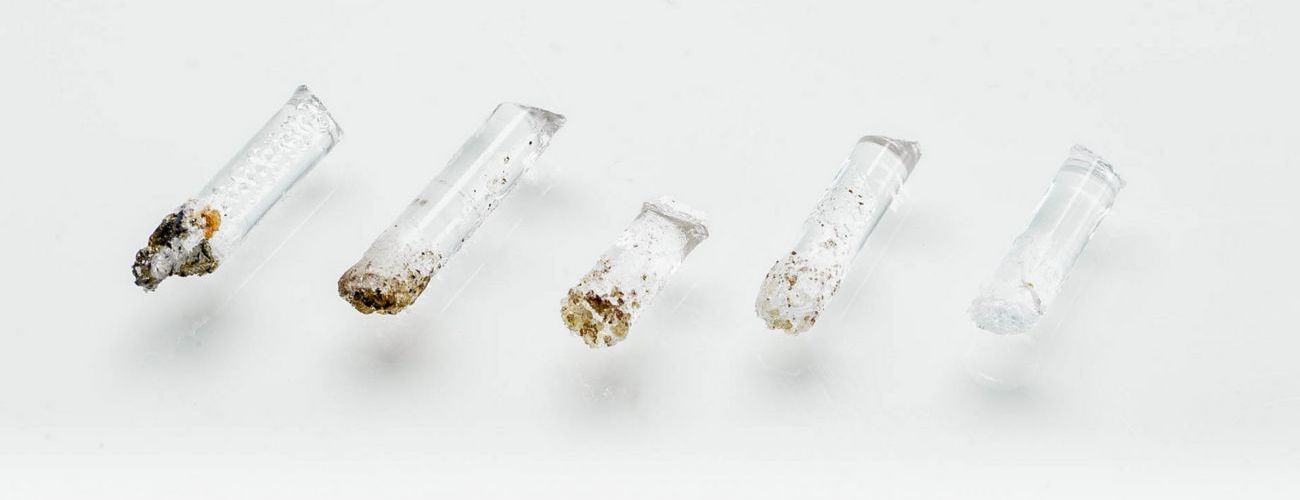
- Check the color and shape of the tip of the filament and compare it with the image below. The goal is to have a clean tip.
- Repeat this procedure until there is no more degraded material visible on the tip of the cleaning filament. The tip of the filament should look as clean as on the right in the example below.
- Once the tip of the filament is clean, manually flush some filament through the print core with pliers and take it out again. Confirm to continue.
Cold pull
If you are satisfied with the results of the hot pulls, proceed to the cold pull(s). During this step, the nozzle temperature will be lowered to fully remove all degraded material from the inside of the nozzle. You can perform this once, or repeat this step until the result is successful.
- Insert the filament into the print head until you feel some resistance.
- Hold the filament with pliers and gently apply pressure to extrude some material. Press Confirm to continue.
- Maintain pressure on the filament with the pliers for the duration of the progress bar.
- Release the filament and wait until the print core has cooled down.
- Grab the filament with pliers and pull it out with a quick, firm pull. Press Confirm to continue.
Inspect the tip of the filament and see if it has a clean, cone-shaped tip like the example to the right. If so, Confirm to continue. If there is still too much degraded material visible in the material tip, repeat the hot or cold pull.
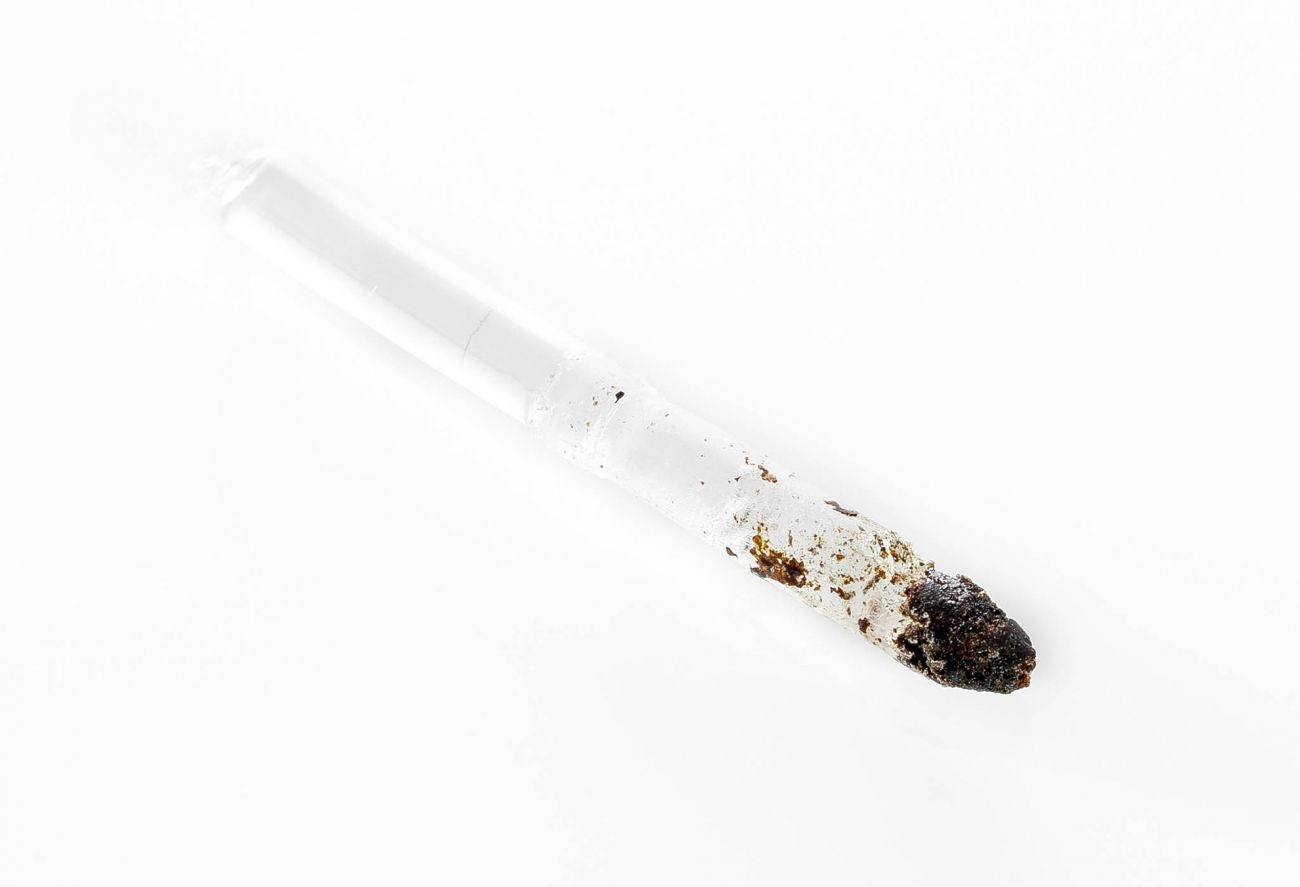 | 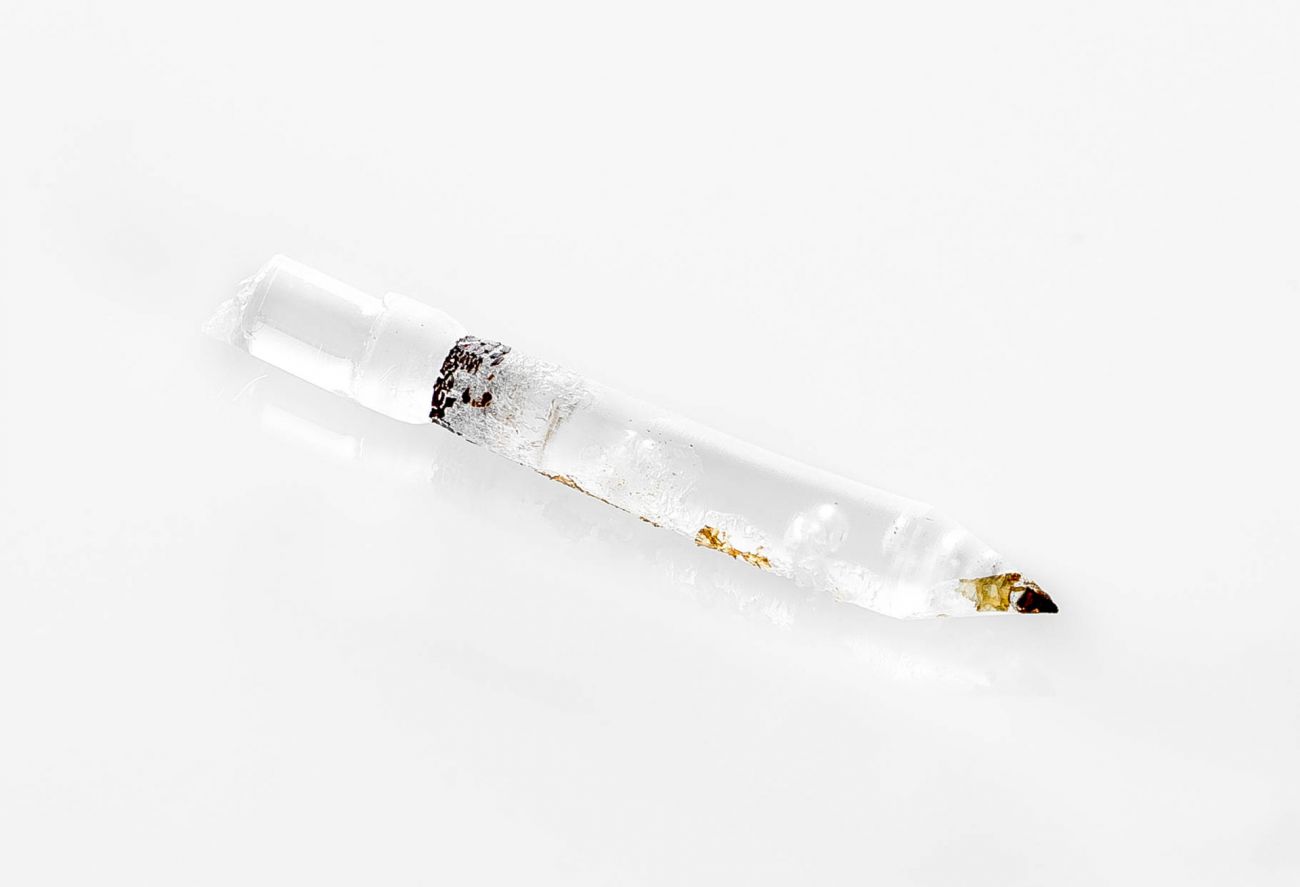 | 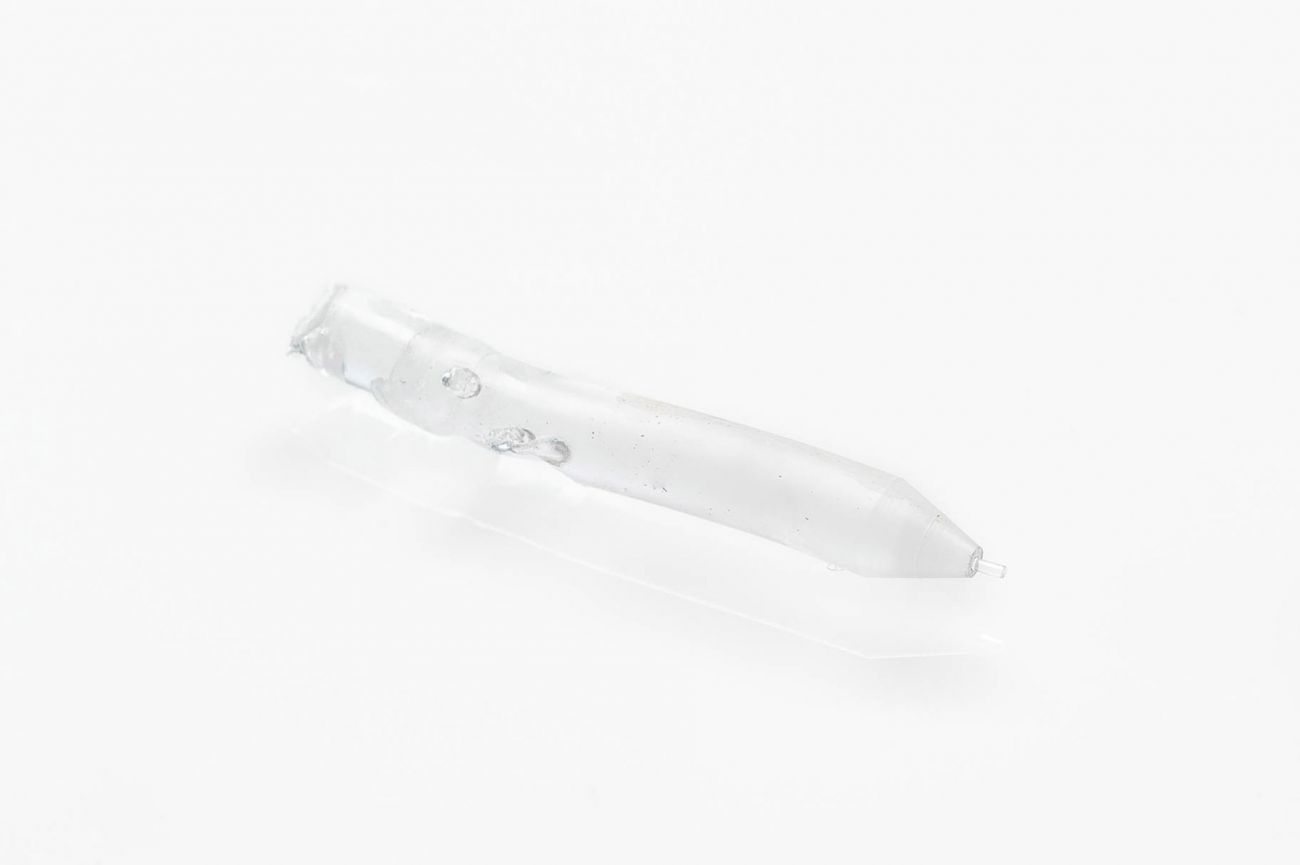 |
| Too much carbonized material, repeat the hot pull. | Almost clean, perform one more cold pull. | The tip of the filament is completely clean, proceed to reassembly |
Reassembly
When the inside of the nozzle has been cleaned successfully, reinsert the Bowden tube so you can continue printing.
- Insert the Bowden tube into the print head.
- Secure the tube in place with the clamp clip. Confirm to continue.
- Wait for the printer to finalize the cleaning procedure.
UltiMaker 3
Preparation
- Navigate to the print core cleaning procedure: Go to System → Maintenance → PrintCore.
- Select the print core you want to clean: print core 1 or print core 2.
- Select the material you want to use for cleaning: Cleaning filament or PLA filament.
Note: Cleaning filament is strongly recommended for this procedure; cleaning with PLA filament may not always give optimal results.
- Wait for the printer to heat up the print core and retract the filament until its end is visible in the Bowden tube.
- Remove the Bowden tube from the print head. First, remove the clamp clip and then push down on the tube coupling collet while pulling the Bowden tube upwards, out of the print head. Confirm to continue.
Note: The print head will move to the front-right corner to prepare itself.
Tip: If the material is not retracted, there is a chance that the material has been ground down and is stuck in the feeder. In this case, remove the material manually as described here.
Safety notes
Caution: Read the following important safety notes and follow all instructions during the cleaning procedure.
- Use pliers when handling filament to avoid injury if the material breaks unexpectedly.
- Make sure the print head is positioned at a comfortable working height, ideally below shoulder level.
- The cleaning process involves high temperatures. Never touch the nozzles while they are hot, and avoid placing your hands below the nozzles while inserting filament, as hot material may drip and cause burns. Consider wearing protective (thermal) gloves to prevent injury.
- During the hot pull, use a quick but steady upward motion. Avoid sweeping or flinging movements, as this could cause small flakes or drops of hot filament to scatter. While the risk is minimal, wearing safety glasses is recommended to protect your eyes from any unexpected residue.
Hot pull
The first step is the hot pull. This will be performed repeatedly, until the majority of the degraded material has been removed.
- Insert the filament into the print head until you feel some resistance.
- Hold the filament with pliers and gently apply pressure to the material for ±1 second so that it extrudes from the print core or until it cannot be pushed any further, and directly pull the filament out with a quick, firm pull.
- Cut off the tip of the filament that you have just pulled out.
- Check the color and shape of the tip of the filament and compare it with the image below. The goal is to have a clean tip.
- Repeat this procedure until there is no more degraded material visible on the tip of the cleaning filament. The tip of the filament should look as clean as on the right in the example below.
- Once the tip of the filament is clean, manually flush some filament through the print core with pliers and take it out again. Confirm to continue.
Cold pull
If you are satisfied with the results of the hot pulls, proceed to the cold pull(s). During this step, the nozzle temperature will be lowered to fully remove all degraded material from the inside of the nozzle. You can perform this once, or repeat this step until the result is successful.
- Insert the filament into the print head until you feel some resistance.
- Hold the filament with pliers and gently apply pressure to extrude some material. Press Confirm to continue.
- Maintain pressure on the filament with the pliers for the duration of the progress bar.
- Release the filament and wait until the print core has cooled down.
- Grab the filament with pliers and pull it out with a quick, firm pull. Press Confirm to continue.
Inspect the tip of the filament and see if it has a clean, cone-shaped tip like the example to the right. If so, Confirm to continue. If there is still too much degraded material visible in the material tip, repeat the hot or cold pull.
| | |
| Too much carbonized material, repeat the hot pull. | Almost clean, perform one more cold pull. | The tip of the filament is completely clean, proceed to reassembly |
Reassembly
When the inside of the nozzle has been cleaned successfully, reinsert the Bowden tube so you can continue printing.
- Insert the Bowden tube into the print head.
- Secure the tube in place with the clamp clip. Confirm to continue.
- Wait for the printer to finalize the cleaning procedure.


