|
Note: This article contains information about the UltiMaker 2.85 mm PVA material. Similar quality cannot be guaranteed with third-party filaments. This material can be used on the Factor Series, S Series, and UltiMaker 3, but is not compatible with the Method, Sketch, or Replicator.
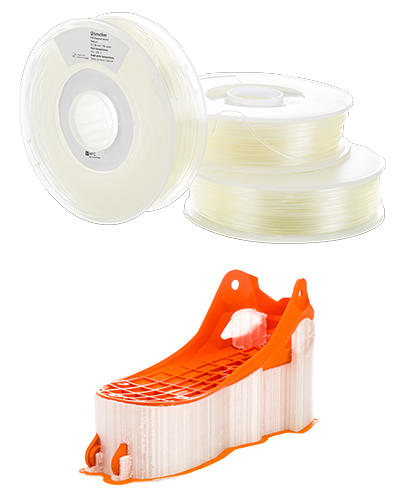
UltiMaker PVA (polyvinyl alcohol) is a 3D printing material commonly used to create water-soluble support structures to achieve complex geometries. PVA can be used on dual-extrusion UltiMaker printers; it gives you more design freedom and reduces post-processing efforts.
UltiMaker PVA comes in a 'natural' color, and is available in two spool sizes: 350 g and 750 g.
Tip: Correct handling of PVA is key to success. Full details can be found in the UltiMaker PVA leaflet that is included in the box with each spool. Dry PVA before printing for the best results, store spools properly when not in use, and do not exceed the recommended 1-year shelf life.
|  |
In this article:
- Compatibility: Information about printer, print core, and dual material compatibility
- Printing recommendations: Overview of the advised temperatures, adhesion, and environment
- Support removal: Tips on how to remove PVA support structures after printing
- Maintenance and troubleshooting: Advice for printer maintenance and material storage
- Health and safety: Important information about printing safely with UltiMaker PVA
|
Related articles for UltiMaker PVA:
|
Compatibility
PVA is specifically developed for dual-extrusion prints, which means that it is supported on the UltiMaker Factor 4, UltiMaker S series, and UltiMaker 3. PVA is printed with a BB print core.
| Printer | Compatible print cores |
|---|
| UltiMaker Factor 4+ | BB 0.4, BB 0.8 |
| UltiMaker Factor 4 | BB 0.4, BB 0.8 |
| UltiMaker S6 and S8 | BB 0.4 |
| UltiMaker S3, S5, and S7 | BB 0.4, BB 0.8 |
| UltiMaker 3 series | BB 0.4, BB 0.8 |
Printer and print core compatibility notes
- UltiMaker PVA has optimized settings for the Pro Bundle (including the Air Manager and Material Station). This ensures a good end-of-filament and end-of-print experience in the Material Station and an optimal build environment with the Air Manager. Please make sure to use the latest version of UltiMaker Cura and keep the printer's firmware up to date.
- The UltiMaker S6 and S8 are not compatible with the BB 0.8 print core; this print core cannot be selected in Cura.
- UltiMaker PVA is used as a support material for dual-extrusion prints; no print profiles are developed for single-extrusion printers. PVA may be used experimentally on the UltiMaker 2 series, for example, for mold making.
Dual material combinations
We have extensively tested preconfigured UltiMaker Cura profiles for optimal results when printing PVA support structures in combination with a build material on the UltiMaker Factor, S, and 3 Series. Below is an overview of the compatibility of PVA with other UltiMaker build materials.
| Supported | Experimental | Not supported |
- PLA
- Tough PLA
- PETG
- Nylon
- CPE
- PET CF
|
|
|
Notes on not supported combinations:
- PC and PP: The use of UltiMaker PVA in combination with PC and PP is not supported due to insufficient adhesion between PVA and these materials, which will most likely result in print failure. It is not possible to slice for PC/PVA on Factor Series due to the different build volume temperatures.
Notes on experimental combinations:
- ABS and CPE+: Using PVA as a support material is only possible for small prints. Larger prints may show warping in the build material. It is not possible to slice for CPE+/PVA on Factor Series due to the different build volume temperatures.
- TPU 95A: Dual combinations with TPU 95A may result in stringing and blobs on the surface of the print. Pre-dry the TPU for better results.
- PPS CF: PVA is experimental, as this may cause jamming issues with some prints, and PVA must be loaded into extruder 1.
Note: No compatibility is listed for the support materials PVA and Breakaway, as dual extrusion combinations with two support materials are not applicable.
Printing recommendations
PVA is, due to its nature, not easy to print. Please follow all recommendations listed on this page to increase the success rate when using PVA as a support material.
Tip: Always use the latest version of UltiMaker Cura and make sure that your 3D printer is updated with the latest firmware version to include the correct material profile for UltiMaker PVA.
Cura profiles
UltiMaker Cura has several different profiles available for PVA, ranging from 0.06 to 0.4 mm layers. Because PVA is a support material, the availability of intent profiles and resolutions depends on the selected build material. Additionally, the selected printer and print cores (for both PVA and the build material) affect the number of selectable profiles.
Enabling support
To generate support structures for your model that can be printed with PVA, the support option must first be enabled in UltiMaker Cura. In the Print settings panel, toggle the switch for Support.
In the recommended viewing mode, you can choose some options for support:
- Extruder: If you want to print with PVA, ensure that the correct extruder is selected for the support structure.
- Type: You can choose between two types of support structures: Normal (creates straight blocks underneath overhanging areas) or Tree (creates branches that can curve around the model).
- Placement: You can also select where support structures can be placed: everywhere, including on top of the model, or only touching the build plate.
Note: When using Normal support with Touching Build Plate placement, it is possible that not all overhangs are properly supported. Always check the Preview mode before printing.
Temperatures
UltiMaker PVA prints at a temperature of 215–225 °C, and a build plate temperature of 60 °C is required when printed as a single material. If PVA is printed as a support material, simply use the build plate temperature required for the accompanying build material. For prints with TPU 95A, the build plate temperature is increased to 60 °C when combined with PVA, for more reliable results.
Tip: The temperatures are automatically set correctly based on the printer, print core, build material, and profile you select in UltiMaker Cura.
Adhesion
UltiMaker PVA adheres well to the heated build plate. However, the adhesion method may differ based on the accompanying build material.
It is advised to apply a thin layer of glue (included in the accessory box of your UltiMaker) to the glass plate for the best adhesion when printing PVA. Glue is recommended for most materials on the glass build plate. The flexible build plate does not require any glue for most materials.
Tip: Please see the recommended adhesion method overview for all materials and build plate types.
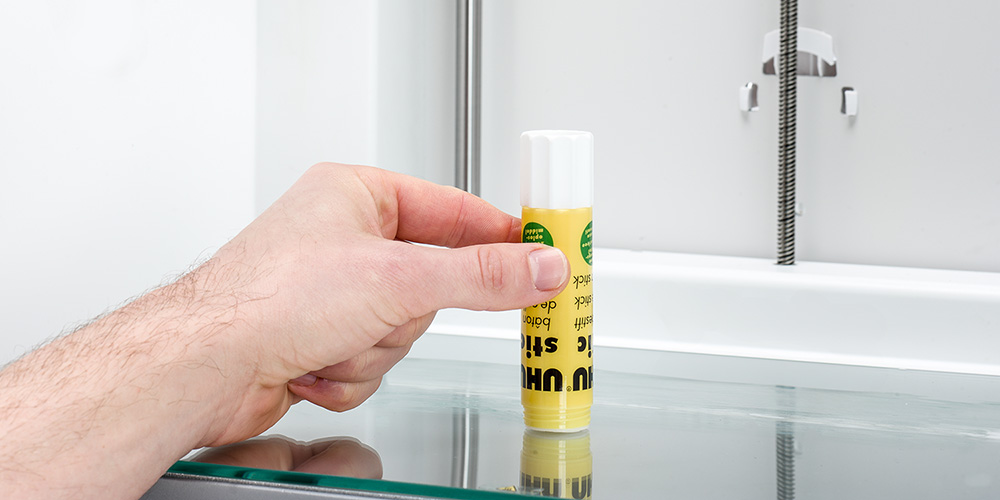
For most materials, also in combination with PVA, the default adhesion type is a brim. A brim is made of extra lines printed around the perimeter of the first few layers of your model to ensure successful adhesion to the build plate.
By default, the brim is printed with the same material as the model or support structure it touches. You can override the adhesion extruder to print the entire brim with PVA. This makes the brim and print removal much easier. Changing the adhesion extruder must be done in the Custom mode. In the Build Plate Adhesion section, set the Build Plate Adhesion Extruder to the one with PVA material selected.
|
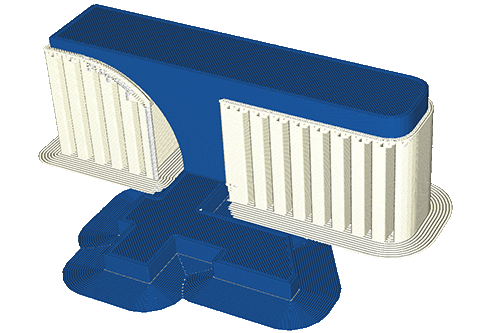
Adhesion extruder not overridden: The brim is printed with the build material around the object and with PVA around the support structure.
|
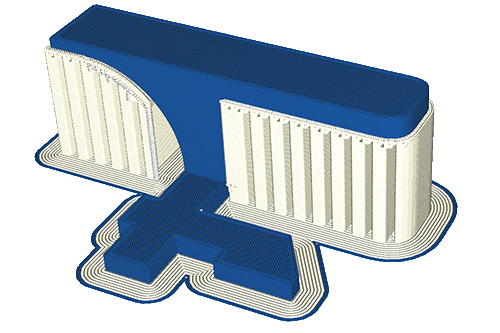
Adhesion extruder overridden: The brim is now printed with PVA. There is a line with the build material around the brim to properly prime the extruder (similar to a skirt).
|
To remove the part from the build plate after printing, always first let the plate cool down. Most prints can be removed easily from the glass build plate after it has cooled. If the part is still stuck, carefully use a tool such as a scraper. Alternatively, place the build plate with the print and PVA support structures in water. For the flexible build plate, placing it in water or using tools is not recommended; simply bend the plate to detach the part.
Print environment
PVA must be handled correctly after unpacking the spool. Once opened, the PVA filament will absorb moisture from the ambient environment. To minimize this, print in a room with an ambient temperature below 28 °C and a relative humidity below 50%.
Note: Low environmental humidity is still recommended even in combination with the Material Station. Although the humidity inside the Material Station chamber is controlled, the PVA material is still susceptible to moisture in the Bowden tubes, as it feeds to the print head.
On Factor Series, it is not recommended to print PVA in combination with a material that requires a higher build volume temperature. This may cause the material to become too flexible, which may lead to jamming problems.
Note: Combinations with CPE+ and PC are blocked in Cura (unable to slice) because these require a build volume temperature that is too high for PVA. Do not increase the build volume temperature manually to enable slicing as this may damage your printer.
Advanced print settings
The material profiles in UltiMaker Cura have optimized settings for UltiMaker PVA. Depending on the application and model type, some specific PVA settings can be tuned. These settings can be found in Cura's Custom mode.
- Horizontal expansion. The support horizontal expansion setting in UltiMaker Cura creates an offset of the support and makes the support area wider than the object. This ensures constant extrusion and makes the support sturdier, which is especially important in small areas of the model. Lowering the value of this setting decreases the amount of PVA and the printing time, but can also lower the print reliability.
- Support pattern. The default support pattern for 'Normal' support is set to ZigZag to allow consistent and reliable extrusion, as well as quick dissolution. Alternatively, for less complicated models, the support setting can be changed to Gyroid to speed up dissolution even more. For a sturdier structure, you can select Triangles.
- Gradual support and support density. The gradual support infill steps and the gradual support infill step height will stepwise increase the support density so that less support material is used near the build plate and more PVA is used near the supported object. This uses less material, although too many steps may cause unstable or unreliable support structures.
- Support interface. The support interface creates a few solid layers of support below the supported model to ensure a smooth bottom surface. The support interface density and support interface thickness can be lowered to decrease material consumption and for faster dissolution.
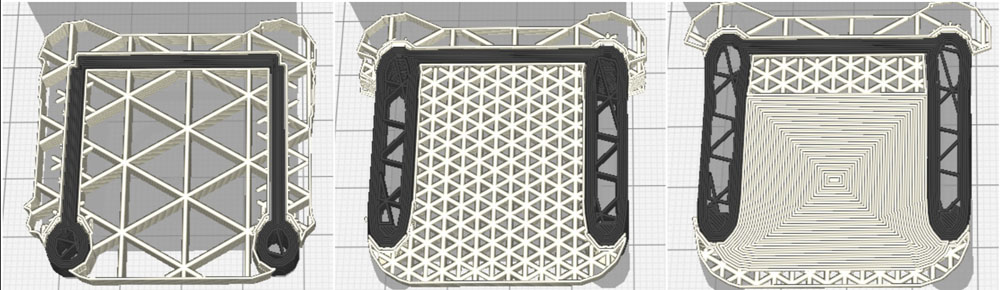
UltiMaker PVA support structures from bottom to top layers, showing from left to right: horizontal expansion and low support density due to gradual infill, increased support density close to the object, and the support interface layer.
Tip: Learn more about UltiMaker Cura's custom support settings in this article.
Support removal
PVA support structures can be removed easily by dissolving the PVA in water and leave no trace afterward. Dissolving PVA can take up to several hours.
Tip: Experience quicker and easier post-processing when using PVA support material with the UltiMaker PVA Removal Station. The PVA Removal Station removes PVA up to 4× faster compared to motionless water. Learn more here.
- Submerge the print in water to let the PVA dissolve.
- Rinse the print with clean water to remove any excess PVA.
- Let the print dry completely.
- Dispose of the wastewater.
Note: PVA is a biodegradable material. However, please check local regulations for more comprehensive guidance on wastewater disposal.
It is possible to use the water for more than one print, but this might extend the dissolving time. Through repeated use, water becomes saturated with PVA. For the quickest result, fresh water is recommended.
Tip: For detailed instructions on removing PVA support structures, visit this article.
Maintenance and troubleshooting
For the best results with UltiMaker PVA (as with any material), apply general maintenance to your UltiMaker printer(s). Find the recommended preventive maintenance schedule for your printer type here:
Print core cleaning
The BB print cores must be cleaned regularly to prevent blockages in the nozzle. As PVA is a soluble material, it tends to degrade. Scheduled cleaning of the BB cores helps prevent problems and increases the print success rate. Clean the print cores every 400 printing hours using the hot and cold pull procedure, or apply the same process as corrective maintenance in case of nozzle clogs.
Dry the material
PVA is packaged with a low moisture content to ensure a good out-of-the-box experience. However, when the filament is subjected to moisture, the filament should be dried at 50 °C for 10–20 hours. Wet PVA will feel soft and sticky, and may cause popping and crackling sounds during printing. The PVA structures will look milky instead of transparent and show excessive oozing. Wet PVA will not extrude very well and is prone to clogging.
Drying the material is recommended when prints with PVA show the symptoms listed above, if the material feels soft, if it has not been used for a while, and when the spools have not been stored properly/
Tip: Learn more about drying materials in this article, or see this article for advice specific to PVA. For the best results with UltiMaker PVA, pre-dry the material before use.
Material storage
To prevent moisture uptake, spools of PVA must always be stored properly when not in use. Immediately after printing, always store the spool in a resealable bag with the supplied desiccant. PVA must be stored in a cool and dry place, and out of direct sunlight.
Load the material
For a reliable loading process, especially when using the Material Station, ensure the filament has a clean, pointy tip. Use cutting pliers or wire cutters to remove any bent or damaged sections from the end of the spool, then cut the filament at an angle. A double cut will create a sharp tip that feeds smoothly.
Before loading the filament, check if it feels very brittle (easy to snap off a piece at the end of the spool), too pliable (very easy to bend the filament), or sticky. If it feels brittle, snap off a length of filament.
Health and safety
UltiMaker PVA is safe to print when using the recommended temperatures in the UltiMaker Cura profiles. To ensure a comfortable and healthy working environment, we recommend 3D printing in a well-ventilated area.
Tip: For more information, download the safety data sheet for UltiMaker PVA here.
Caution: Although PVA uses moderate temperatures for both the nozzles and build plate, never reach inside the printer while it is in operation, and never touch heated components.


