To keep your UltiMaker 2+ Connect in optimal condition, we recommend the following maintenance schedule, based on 1,500 printing hours per year.
Tip: If the usage frequency is higher, we recommend performing more frequent maintenance on your printer to ensure optimal printing results.
| Every month | Cleaning the printer | Keep the UltiMaker 2+ Connect clean for optimal printing results. This includes the glass plate, nozzle, Bowden tube, and the inside of the printer. |
|---|
| Lubricate the axles | Apply a small drop of oil to the X, Y, and Z axles. Move the print head and build plate to equally distribute the oil. |
| Every three months | Check for play on the axles | The X and Y axles in the frame should only rotate, not move back and forth. Firmly attempt to move the axles individually. |
|---|
| Check the tension of the short belts | The short belts attached to the X and Y motors should be tight to correctly transfer the movement to the print head. |
| Lubricate the lead screw | Apply a small amount of grease to the lead screw of the Z motor. Move the build plate up and down to equally distribute the grease. |
| Retighten the hot end isolator | Insert the hex screwdriver into one of the holes of the hot end isolator and fully tighten it. This prevents material from leaking between the hot end components. |
| Every year | Clean the feeder | Small filament particles can gather on the feeder’s knurled wheel. Unload the material and open the feeder to clean the inside with a small brush. |
|---|
| Lubricate the feeder gear | Remove the feeder from the back panel to access the feeder gear. Clean it first, then apply a small amount of grease to the gear. |
| Check the Bowden tube | Materials can slightly scratch the inside of the Bowden tube and the ends of the tube can get damaged by the tube coupling collets. It is advised to replace it after one year of printing. |
| Air Manager | Replace the Air Manager filter | The Air Manager filter is a consumable item. It should be replaced after 1,500 printing hours. |
|---|
Tip: For more detailed information about how to perform all these maintenance actions, click the links in the table above.
Maintenance schedule in UltiMaker Digital Factory
The printer overview in UltiMaker Digital Factory also contains the maintenance schedule. This allows you to mark tasks as done once maintenance has been performed and you will be notified when actions are due.
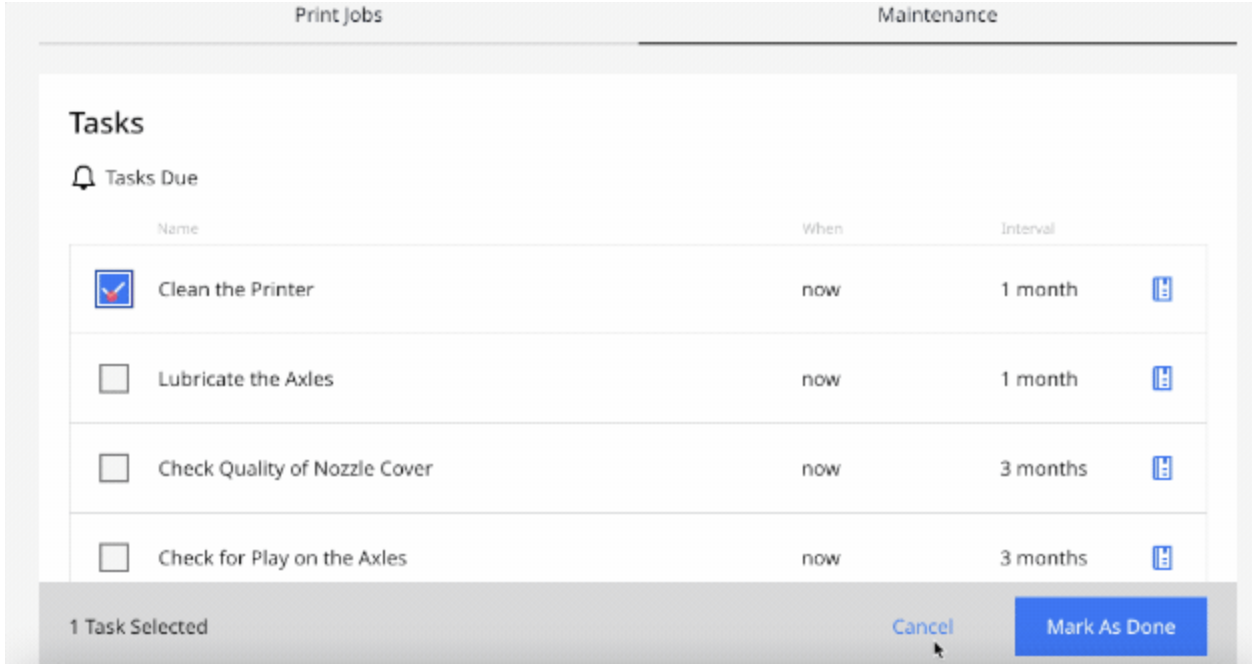
Sign in to Digital Factory and connect your printer to get access to this feature and improve your maintenance workflow.
Important notes
Maintenance actions shall only be performed by an adult. Carefully follow the provided instructions.
Where possible, ensure the printer is turned off before performing maintenance. Otherwise, if the printer is connected to the Digital Factory, ensure the UltiMaker 2+ Connect is unavailable to accept new print jobs from starting remotely through the Digital Factory.
When maintenance processes require heating up the nozzle, take precautions and use personal protective equipment such as (thermal) gloves. Risks and recommendations are mentioned in the instructions.
Tip: For most maintenance actions, it is required to remove the Air Manager cover and/or front enclosure in order to reach the parts of the printer.


