The timing belts in the Factor Series XY motion system, or gantry, control the movements of the print head. These should be tight to ensure optimal accuracy of the printed parts. Regularly check the belt tension and retighten them for the best results.
All belts in the gantry system contain spring-loaded tensioners for ease of use and a quick maintenance process. You will only need to loosen and retighten some screws, and the belt tension will automatically be adjusted.
Retensioning the belts: When and why
Tight belts are critical for accurate movement of the print head, directly impacting part quality and dimensional accuracy. Over time, belts may stretch, or certain actions can affect their tension. If the belts become slack, this can not only cause imprecise prints, but may also lead to more serious issues, such as X beam misalignment (see: Skewed X beam) or homing errors (see: ER303).
Retensioning the belts is simple and is recommended in the following situations:
- After installation: Retension the belts after installing the printer. During shipping and storage, the belts may release some tension after factory adjustment. To ensure accurate results, reset the tension and firmly press in the belt wedges before starting your first print.
- Regular maintenance: For consistent print results and to prevent issues, retighten the belts as part of regular maintenance for Factor 4. Perform this at least every three months, or every 750 printing hours.
- Gantry adjustments: If maintenance, modifications, or repairs are performed on the XY motion system, also reset the belt tension. When removing the gantry from the printer, always hold the frame (never press down on the belts), as pressure can shift the tensioners. If this happens, reset the tension before resuming use.
Tip: Resetting the belt tension is quick and simple (see instructions below), and has a significant impact on print quality and machine reliability. When in doubt, it is always safe to retension the belts; more frequent adjustments will not cause harm, and are preferable to insufficient tension.
Requirements
To perform this maintenance action, you need a Torx 20 screwdriver. This is included in the Factor Series Maintenance Kit. As the belt tension will be correctly adjusted automatically by the hardware components in the gantry, no special skills, other tools, or calibration equipment are necessary.
Ensure you have access to and good visibility of all parts of the gantry, but the gantry does not need to be removed from the printer.
Caution: Turn off the printer or ensure that the UltiMaker Factor Series printer is unable to start new print jobs sent remotely via the Digital Factory.
Instructions
For this maintenance action, you will loosen and retighten the screws on the tensioners for both the Y belts, the X belt, and the short belt connected to the Y motor. All of these tensioners have tolerance indicators to check if the tension is still within specification.
While performing the steps below, ensure that the print head is not positioned against the sides of the gantry. This can negatively impact the function of the spring-loaded tensioners. If necessary, manually move the print head toward the middle of the gantry system.
Additionally, after loosening the tensioner screws indicated below, lightly pull the belt or manually push the tensioner. Check if the tensioner moves and is automatically pushed back when releasing it. This confirms that the tensioner is loosened correctly.
Note: Do not try to manually adjust the tensioners before tightening the screws. This will not improve the accuracy of the gantry system and may even introduce skew.
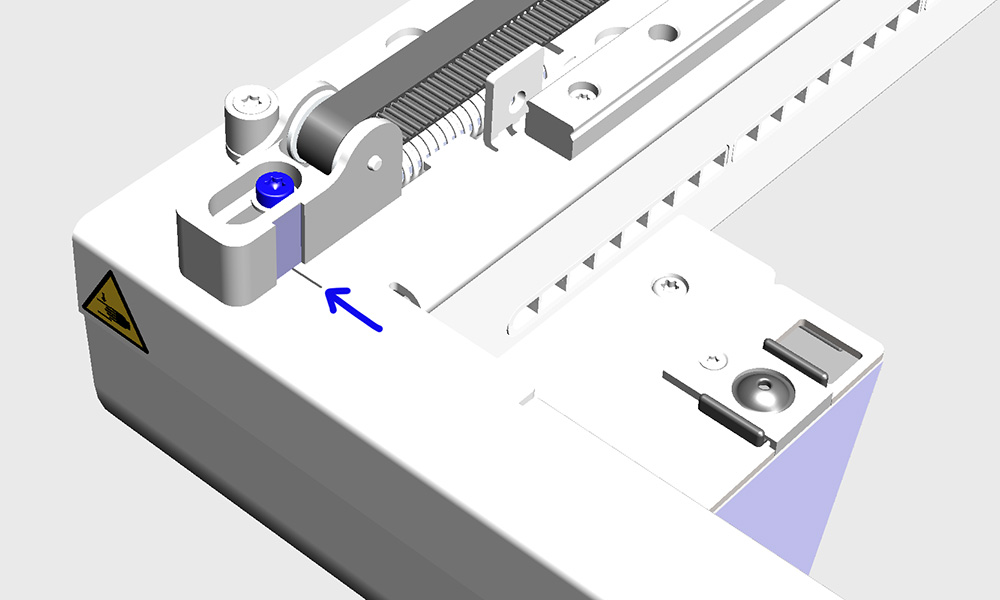 | 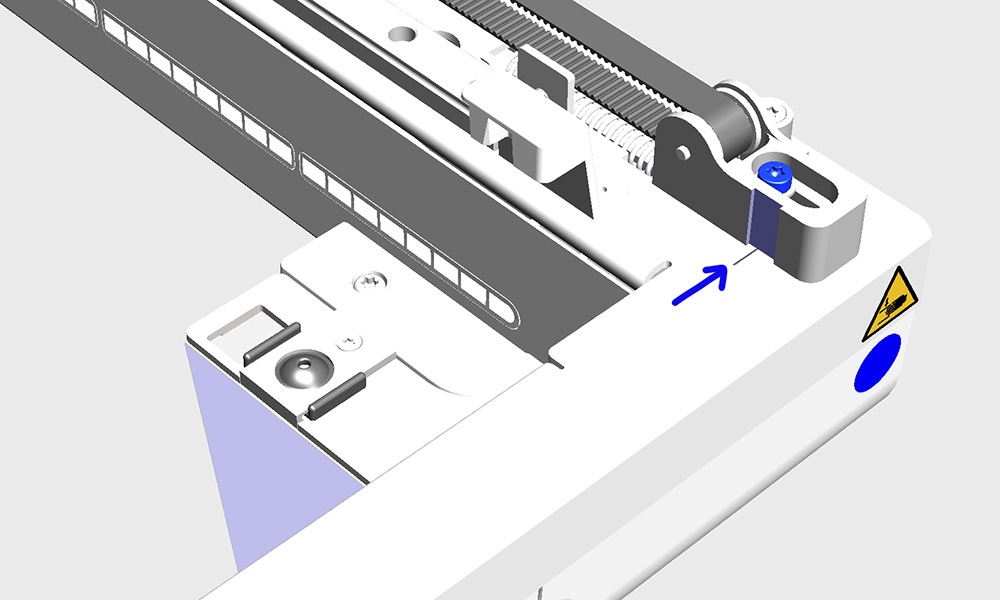 |
Left Y belt
Loosen the screw in the Y tensioner in the front left corner. The belt will automatically retighten itself. Check that the indicator line on the gantry is within the tolerance indicator on the Y idler. Tighten the screw again. | Right Y belt
Loosen the screw in the Y idler in the front right corner. The belt will automatically retighten itself. Check that the indicator line on the gantry is within the tolerance indicator on the Y idler. Tighten the screw again. |
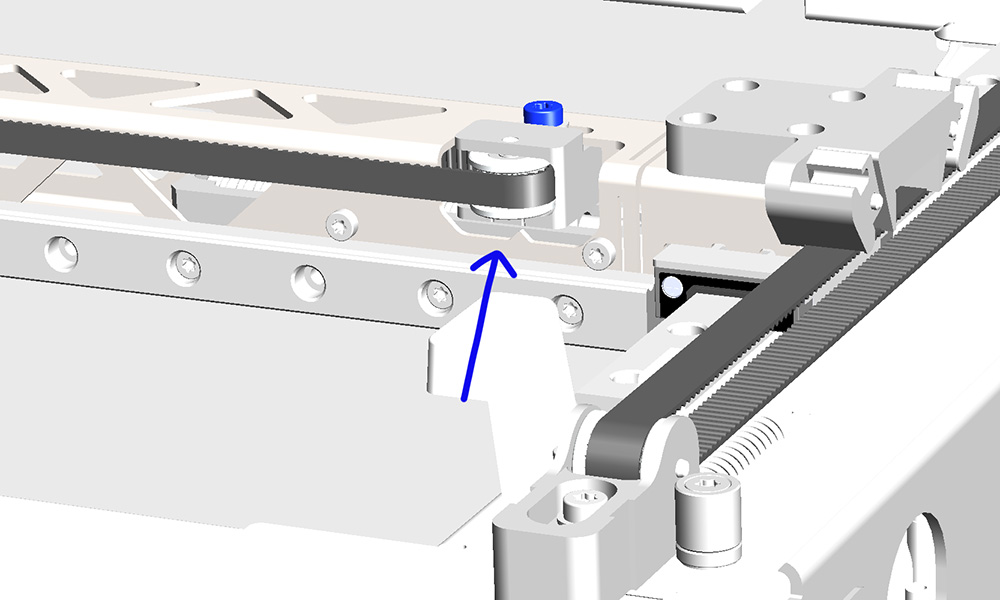 | 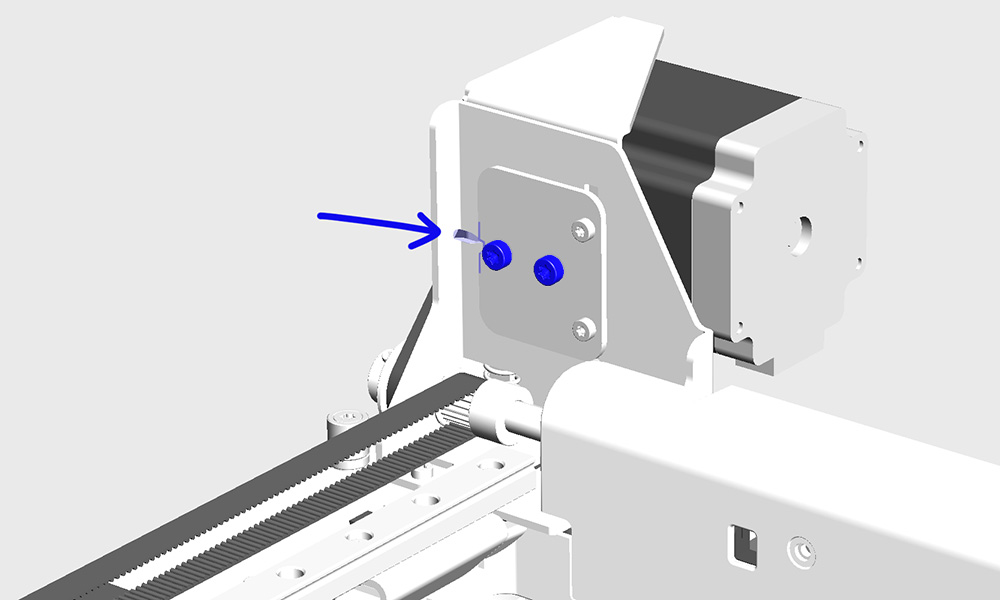 |
X belt
Loosen the screw on the right side of the X beam, just behind the pulley. The belt will automatically retighten itself. Check that the indicator arrow on the X beam (at the front) is within the tolerance indicator on the pulley bracket. Tighten the screw again. | Short Y motor belt
The Y motor belt is on the left side of the gantry, in the back corner, but the tensioner is inside the Y motor bracket. Move the X beam to the front to ensure you can reach the coupling plate. Loosen the two screws in the middle of the coupling plate. The short belt will automatically retighten itself. Ensure that the indicator arrow on the motor bracket is within the tolerance indicator on the coupling plate. Tighten both of the screws again. |
All the belts are now re-tensioned. Before resuming operation, ensure that you have retightened all of the screws on the tensioners. You can print if they are still loose, but this could introduce skew or other inaccuracies, especially at higher speeds.
Belt wedges
The long belts are open-ended and secured with a wedge on each side. To prevent the belts from losing tension over time, the wedges must be firmly pressed down. For optimal reliability, especially for the Y belts, compressing the wedges may be needed.
Note: This is only needed once (not a regular maintenance action), and is recommended for any Factor 4 printer in use since before August 2025, or after replacing the belts. For Factor 4 Plus, it is only needed after replacing the belts.
First, loosen the screw in the Y tensioners to activate the springs. Then push down on each individual wedge to fully seat it. You can simply use your thumbs, or, if pressing with your thumbs is uncomfortable, you can use a blunt, non-damaging tool (such as the handle of a screwdriver) to assist. Do not use clamps, pliers, or any sharp or striking tools, as these may damage the component. A force of 80 N is recommended, but if a force gauge is not available, simply push down as hard as possible. Afterward, tighten the tension screws again.
Tip: From August 2025, the Factor Series maintenance kits contain a wedge press tool which ensures the right amount of force.
Tip: For the best results, it is recommended to run the Gantry calibration via the printer menu after retensioning the belts. This calibration will measure XY movements and compensate for any offsets or skew during the print process. If there was a big difference in belt tension after performing the retensioning maintenance action, these motion values may have changed.
Note: If one or more of the belt indicators fail to fall within the range, the belts may need to be replaced, or there is an issue with the spring-loaded components. In this case, further troubleshooting is required. Please contact support.


