This error can occur on the UltiMaker Factor 4. It indicates a problem with one of the optical limit switches. The title of the error on the printer's display will indicate which of the switches has a problem (X, Y, or Z).
Note: In previous firmware, the optical limit switch errors were numbered incorrectly. This was fixed in firmware 10.1.0.
If you see ER304 on the display of your printer with the title "Optical switch activation error", please visit the ER303 page instead and update the firmware to the latest version.
Affected system
Factor 4 contains limit switches to help determine the 'home' (or '0') position of the print head and build plate. The switches are optical, and are expected to be activated following a home command.
The X and Y switches are located in the gantry and set the home position for the print head (in the back left corner). The Z switch is located at the bottom of the build chamber; at the back underneath the build plate. It sets the home position for the Z stage (at the bottom of the chamber).
Issue
If this error appears, Factor 4 detects a switch activation when this is not expected, or the switch is not released when this is expected. Normally, when the print head or Z stage move to their home position, they will activate the optical switch (or the switch is already activated if the print head and/or build plate are already at the home location). The print head or build plate will then move back slightly and do a second, slower, more accurate home movement. If no release is detected before the second activation, ER304 can appear.
Possible root causes can include a defective or disconnected optical switch, something blocking the switch, or loose pulleys or belts (for X/Y). See the detailed troubleshooting steps per root cause below.
Troubleshooting
The recommended troubleshooting steps depend on which of the switches is affected. The display will indicate this when the error appears. Select the affected switch below and follow the steps:
Tip: If the accordions do not expand when you click on them, please refresh the page.
X switch
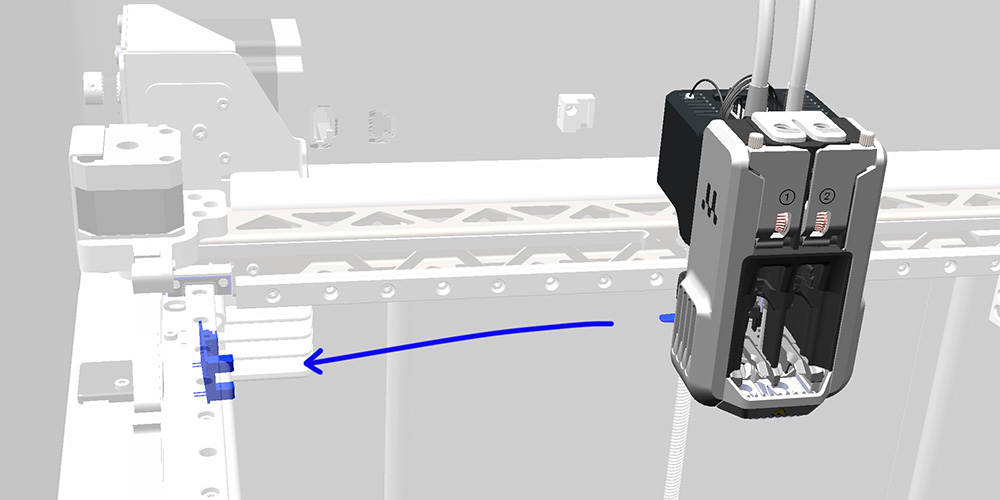
The X switch is located on the left side of the gantry. It is activated by a small tab ('flag') on the left side of the print head housing.
Potential root cause
|
Troubleshooting steps
|
|
Obstructed switch
|
Check if there is any object or debris stuck in the sensor. This will constantly keep the switch activated, even though the movements of the print head are accurate.
Manually move the print head toward the right side of the gantry so that you can access the limit switch. Closely inspect the switch and, if necessary, carefully remove any objects or debris with tweezers and/or wipe the switch clean with a cotton swab.
|
|
Oil on sensor
|
Check if excess lubrication from the linear guide rails has dripped onto the sensor. This could affect the functionality, causing the sensor to register as activated. This is one of the most common causes of ER304 affecting the X switch. Move the print head to the right of the build volume to access the sensor and clean it carefully but thoroughly.
Using compressed air (anti-dust spray) is the best way to clean the sensor and solve the issue. Spray from a distance of 20 - 30 cm (8 - 12 in) and aim at the inner surfaces of the black optical sensor (indicated in the right picture). Alternatively, use a cotton swab or microfiber cloth lightly dampened with isopropyl alcohol and wipe the inner surfaces clean.
|
|
Loose belts
|
If the belts are very loose, the movement of the print head may not be accurate. The print head may not properly move away from the X switch in the expected timeframe, or it may not move at all.
Check and retension the belts as described in this article: Factor 4 - Belt tension
|
|
Loose pulleys
|
If one or more of the pulleys in the gantry system are loose, the movement of the print head may not be accurate. The print head may not properly move away from the X switch in the expected timeframe, or it may not move at all.
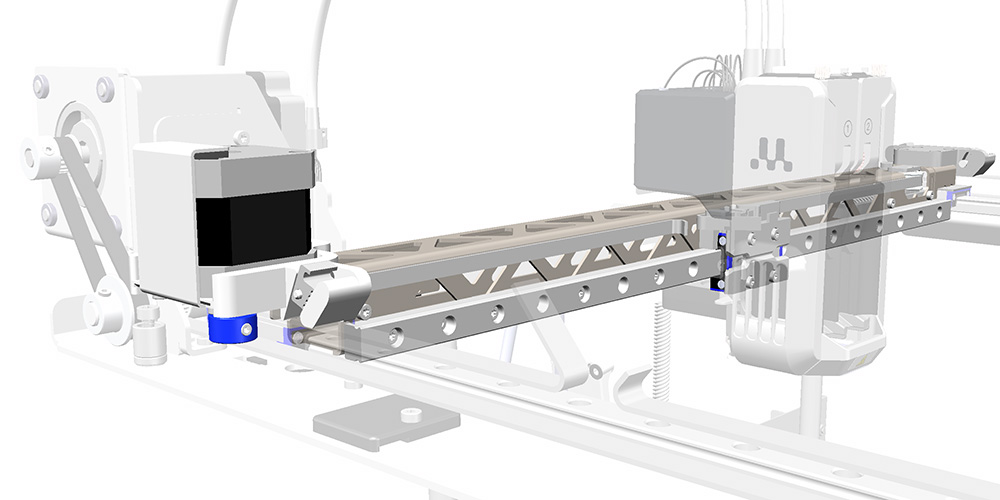
For the X switch error, particularly check the pulley connected to the X motor. This is located on the left side of the X beam. Tighten the set screw if this is loose.
|
Y switch
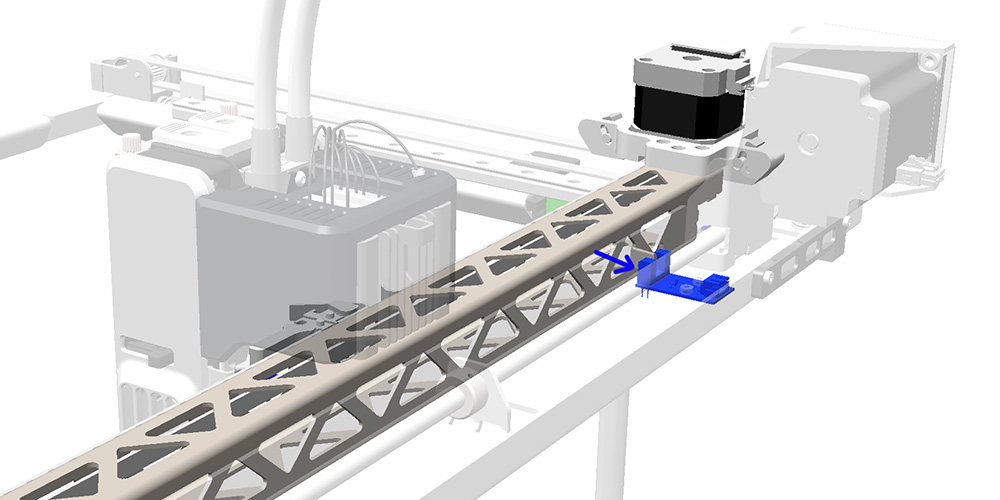
The Y switch is located at the back of the gantry, on the left side of the cover. It is activated by a small tab ('flag') at the back of the X beam.
Potential root cause
|
Troubleshooting steps
|
|
Obstructed switch
|
Check if there is any object or debris stuck in the sensor. This will constantly keep the switch activated, even though the movements of the print head are accurate.
Manually move the print head toward the front of the gantry so that you can access the limit switch. Closely inspect the switch and, if necessary, carefully remove any objects or debris with tweezers and/or wipe the switch clean with a cotton swab.
|
|
Loose belts
|
If the belts are very loose, the movement of the print head may not be accurate. The print head may not properly move away from the Y switch in the expected timeframe, or it may not move at all.
Check and retension the belts as described in this article: Factor 4 - Belt tension
|
|
Loose pulleys
|
If one or more of the pulleys in the gantry system are loose, the movement of the print head may not be accurate. The print head may not properly move away from the Y switch in the expected timeframe, or it may not move at all.
For the Y switch error, particularly check the pulleys connected to the Y motor and the motion shaft. This is located on the left side of the X beam. Tighten the set screw if this is loose.
|
Z switch
The Z switch is located at the bottom of the build volume, underneath the build plate.
Potential root cause
|
Troubleshooting steps
|
|
Obstructed switch
|
Check if there is any object or debris stuck in the sensor. This will constantly keep the switch activated, even though the movements of the build plate are accurate.
Manually move the build plate upward so that you can access the limit switch. Keep it in position or place a large spacer underneath the Z stage (15 - 20 cm) to keep it in position. Closely inspect the switch and, if necessary, carefully remove any objects or debris with tweezers and/or wipe the switch clean with a cotton swab.
|
|
Blocked lead screw
|
If the lead screw of the Z motor is very dirty or there are pieces of filament stuck in it, this could prevent the build plate from moving correctly. The build plate is in the lowered position by default (due to gravity), meaning the switch is activated. If the build plate cannot be raised due to a blocked lead screw, ER304 may appear. Clean and relubricate the lead screw, as described in this article.
Tip: Always keep the bottom of the build volume clean. Pieces of filament etc. can be wiped into the bottom tray bin, which can easily be removed to empty out.
|
|
Defective or disconnected Z motor
|
Check if the Z motor still moves when activated. Use the Move build plate option in the Maintenance menu. If the error shows again straight away without being able to observe any movement, try raising the build plate manually just before selecting Raise or Lower. Although the build plate will lower by itself due to gravity, you should be able to hear the Z motor if it is engaged.
Note: Make sure to keep hands clear of the build volume after using the Move build plate option.
If the Z motor is unresponsive, it may be disconnected or defective. Further troubleshooting requires some disassembly and potential part replacement. Please contact support or your local reseller for further instructions or information about services.
|
|
Defective or disconnected Z switch
|
If the back cover panel of the printer has recently been removed, it is possible that the Z sensor was accidentally disconnected. If so, remove the back cover panel again to reconnect it. If the back compartment was not accessed recently, this root cause is very unlikely.
If none of the other troubleshooting options have helped to resolve the Z switch error, the switch itself may be broken. Please contact support or your local reseller for further instructions or information about services.
|
Need further support?
If the information provided on this page has not helped to resolve the issue, please contact support. When submitting a support case, ensure you have your printer's serial number ready. Note the error code and the steps already taken. Additionally, save your log files and share them with support.


