With a Material Station, loading and unloading materials is quick and simple, and can be done from the front. The materials will be pre-loaded into the Material Station and will be automatically forwarded to the print head when a print is started.
Tip: The S series Material Station is compatible with the UltiMaker S5, S6, S7, and S8. The combination of the printer and the Material Station is also called the "Pro Bundle".
Loading material
Loading a new spool of material into the Material Station can be done at any time, even during a print.
| Prepare the spool | Before loading a material, always check the filament tip. Use wire cutters (included in the accessories) to cut off the end of the filament, ensuring a short, sharp tip. |
|---|
| Place the spool | Open the Material Station door. This will automatically open the Configuration menu on the printer's display. Place the spool into an available material bay with the NFC tag on the left side. If there are no available bays, unload a spool first. |
|---|
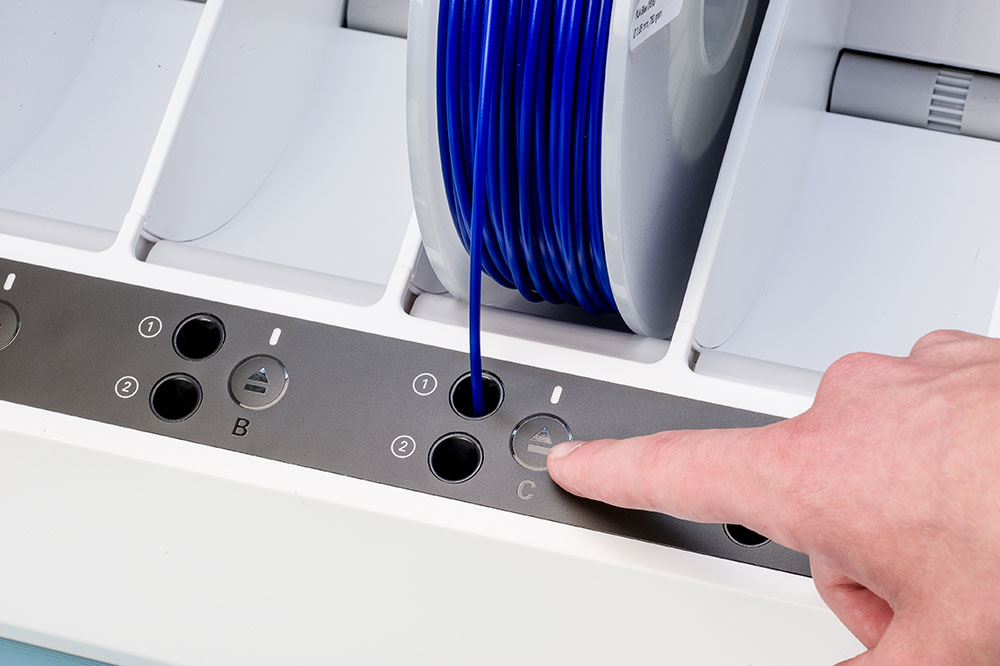
| Insert into entry port | Take the end of the filament and insert it into one of the entry ports. This will guide the material to extruder 1 or extruder 2. Push until you feel the prefeeder grip the filament. |
|---|
| Material type | Wait until the Material Station detects the material type. When using a third-party material, you can manually select the material type. Learn more about syncing material profiles here. |
|---|
The new material is now pre-loaded. It will remain inside the humidity-controlled Material Station until it is required for a print. The Pro Bundle will then automatically load the material to the print head.
Tips for loading materials
- NFC detection. UltiMaker and UltiMaker Certified materials contain an NFC tag so the Material Station will automatically recognize the material type. For this to work optimally, ensure that the NFC tag is on the left side when placing the spool and place the spool on the left side of the bay, closest to the NFC reader. Additionally, load new spools one at a time to prevent mixups of NFC signals.
Note: If the Material Station does not detect any material at all or detects the wrong material type or color, try loading the spool again. If necessary, reload all UltiMaker material spools one by one. If the issues persist, please contact support and share your log files.
- Material and print core compatibility. You can load the material into either extruder. When pre-loading, it is not important that the material is compatible with the currently installed print core. However, when a configuration change is needed for a new print job, replace the print core before the print can start.
- Stiff or brittle materials. It is recommended to load stiff or brittle filaments (such as PVA) in an extrusion path with the fewest curves to reduce stress on the filament. For extruder 1, place the spool in bay A, and for extruder 2, place the spool in bay F.
- Third-party material profiles. When working with third-party materials, it is recommended to sync the material profiles to the Pro Bundle before loading spools. Learn more about syncing profiles for Marketplace materials or custom materials.
- Generic materials. If you do not have specific profiles, you can choose one of the generic material profiles in the list, such as 'PLA'. Note that you will not be able to select a color. Multiple generic spools with different colors will be recognized as the same material by the Material Station. In UltiMaker Cura, you cannot select which material bay you want to use for printing; the Material Station will always select the first loaded spool of that material type. Learn more here.
Unload material
After a print, the filament first be parked above the print head for a certain period (two hours for most materials). This is done to speed up the loading process if another print job is started that requires the same material(s). When the parking duration period has passed, or the next print job is started that requires different materials, the spool will automatically rewind back into the Material Station. It will return to its pre-loaded state.
Removing a (pre-loaded) material spool from the Material Station can be done in seconds. This can be done at any time, when the printer is idle or during printing (with different materials). You can remove a spool when it is empty, if you need to make room for a different material, or if you want to use the spool on a different printer.
Tip: It is recommended to timely remove empty spools from the Material Station. When end-of-filament has been detected, a length of material remains (about 2 meters). It is possible that this does not coil back on the spool neatly.
If you want to unload the spool that was used for the previous print job and the material is still parked above the print head, you must first remove the print and select Confirm removal on the display. You can now select the spool in the Configuration overview and press Unload. The spool will now rewind back into the Material Station.
Gently open the glass door of the Material Station. Press the eject button of the corresponding material bay to eject the pre-loaded filament. Remove the material spool from the material bay and store it according to the recommended storage conditions.
Note: The materials in use during a print are blocked from unloading; you cannot manually unload a spool, even in a paused state.


