This article applies to the UltiMaker 3 and S series printers, which use two print cores in the print head and feature a unique nozzle lifting system.
The switch bay enables the second print core to be lifted and lowered. The switch bay (left) is the white bracket on the right side of the frame, which changes the position of the lift switch (right) in the print head.
It is important that print core switching functions well for active leveling and a correct nozzle alignment in dual-extrusion prints. In some cases, the nozzle switching may fail, which will lead to active leveling errors, or failed prints. This article explains what can cause the switching to fail and how to resolve this for different scenarios.
Incorrect calibration
The lift switch is already calibrated at the factory. In some cases, it might be necessary to recalibrate the position of the switch bay. It is recommended to do the lift switch calibration after certain repairs or maintenance actions, such as replacing the electronics, a firmware recovery, replacing one or more of the sliding blocks, or realigning the axles. In some cases, rough transport may also have misaligned the lift switch calibration.
If the print head seems to miss the position of the switch bay, first recalibrate this with the lift switch procedure. Open the Preferences menu (gear icon) and go to Maintenance → Print head → Calibrate lift switch and select Start calibration. Follow the instructions on the display, or visit this page for more information.
Tip: Since firmware version 8.1.0, S series printers will show a recommendation to perform the lift switch calibration if the same height is detected for both print cores during the active leveling process.
Print head movement
If the issues persist after performing the lift switch calibration, or when the lift switch test at the end of the calibration fails, check the movement of the print head. It may not be moving accurately. This can be due to several reasons:
| Dry axles / shafts | The axles of the gantry and the shafts through the print head should be smooth, not dry. Dry axles can increase friction, causing inaccuracies in the movements of the print head. Lubricate the axles in the frame and the shafts in the print head with machine oil about once a month, or when they feel dry. |
|---|
| Misaligned print head | The shafts that go through the print head should be perpendicular. If they are at an angle, this can cause print quality issues such as dimensional inaccuracy or, in extreme cases, cause the print head to miss the switch bay. Realign the axles if this is the case. |
|---|
| Loose short belts | The short belts transfer the movements of the X and Y motors to the print head. If the belts are too loose, print head movement may not be accurate. Check the tension of the short belts ;every three months, and adjust the X and/or Y motor to increase the tension when necessary. |
|---|
| Loose pulley | The belts are connected to the pulleys on the motors and on the axles. If the pulleys are loose, the print head can skip steps. Check if all the pulleys in the frame are fixed in position and tighten them where necessary. Also check the pulleys on the X and Y motors. To do so, you will have to temporarily remove them from the frame. |
|---|
Interfering objects
When the movements of the print head are accurate, but the print head still does not correctly reach the switch bay, there could be something blocking the print head. Check for any interfering objects on the build plate or in the gantry system.
On the UltiMaker 3, UltiMaker S3, and UltiMaker S5, make sure that the build plate clamps are correctly closed and not bent upwards, especially at the back of the build plate.
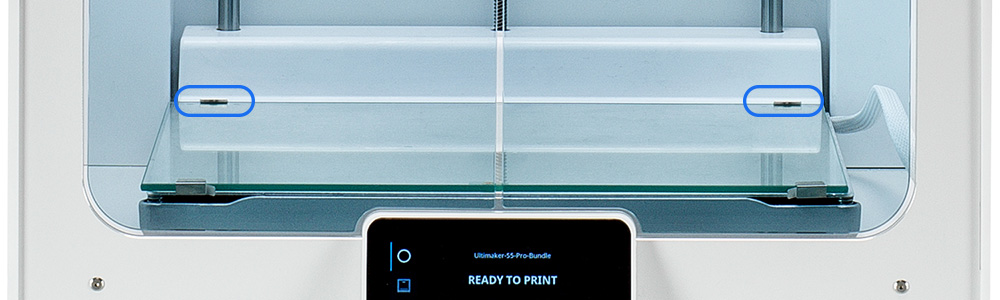
These clips can be damaged if the glass build plate is not removed correctly. Never tilt or lift up the plate if it is still placed in the clamps at the back. If these clamps are bent, and in particular the one in the back right corner, this can prevent the print head from reaching the switch bay. This will not occur during the active leveling process due to different movements of the print head, but will cause problems with nozzle switching during the first layers of the print.
If the clamps are bent, remove the glass plate from the printer and press down on the metal clamp until the front is lower than the back. This ensures that the clamp has a good grip on the glass build plate. If the clamps are broken or severely deformed, please contact support or your local reseller for replacements and further instructions.
Switch function broken
If the print head movements are accurate and it consistently reaches the switch bay, but the print core in slot 2 does not lift and lower properly, there could be a problem with the switch mechanism inside the print head. The lift switch consists of three plastic parts and a spring. In some rare cases, the spring has become dislodged and stuck in the top ring.
To check this, manually move the switch to the front and back and see if the print core lifts and lowers as expected. If it does not, the print head must be partially disassembled to fix this.
Remove the print head from the gantry and take out the sliding blocks. Remove the Bowden tubes and the four long screws that hold the print head housing together. Take off the top parts of the print head housing, disconnect the print head cable, until you reach the lift switch parts. Take them out of the head and clean them, reposition the spring, and then reassemble the print head.
Tip: For more detailed instructions, download this repair manual. It refers to the UltiMaker S5, but similar steps can be taken for the UltiMaker 3, UltiMaker S3, and UltiMaker S7.
Need further support?
If the problems continue after reading the advice and taking the steps on this page, or when you need replacement parts to resolve the issue, please contact support or your local reseller.
Please include all relevant information, such as the steps already taken, photos and/or videos, and your printer's log files.


