In certain cases, a complete reset of the UltiMaker Factor Series printer is necessary to resolve problems. For example, when the printer is failing to boot up correctly and the display is stuck on the UltiMaker logo.
Always first try rebooting the printer to resolve the problem. Turn off the printer and disconnect the power cable. Leave the cable disconnected for at least 10 seconds before reinserting the cable and turning on the printer again. If the printer is still stuck in the boot-up process, a full reset is needed. Follow the instructions on this page to perform a firmware recovery.
Note: This page contains files and instructions for Factor 4 and Factor 4 Plus. Ensure you use the correct file for your Factor Series printer model and do not use this file for other printer types. For reset instructions for other UltiMaker printers, please see these pages: S series, UltiMaker 2+ Connect, and UltiMaker 3 series.
Caution: Always check local regulations. In some countries, such as Australia, only certified staff are allowed to remove the cover (back cover panel for Factor Series printers) for equipment with a built-in power supply. Contact support or your local reseller for further information.
Getting started
Caution: Always take ESD precautions when exposing the electronics at the back of the printer. Handling the electronics in an unsafe way can cause damage to the machine. Contact support or your local reseller if you do not have access to ESD precautions, such as an ESD bracelet.
To perform a firmware recovery for Factor 4 or Factor 4 Plus, you need the following:
- Hex screwdriver 2 mm
- Supplies for working ESD safe
- Micro SD card (1 GB minimum, 32 GB maximum). Warning: Will be erased
- Computer with Micro SD card reader
- Recovery image file (see below)
Tip: Ensure you have sufficient space to access and work behind the back of the printer. If the Factor Series printer must be moved or rotated, do this safely.
Recovery images
Use the correct file for your Factor Series printer model and your preferred channel:
Note: The Factor 4 versions are not compatible with the Factor 4 Plus, and vice versa. Ensure you download the correct file.
Prepare the SD card
Next, prepare the SD card with the firmware recovery image. You cannot just move the file to the card, but you need a disk imager tool. There are different processes for Windows and Mac:
| Windows | MacOS |
|---|
- Connect your micro SD card to your computer.
- Download and install the Win32 disk imager tool:
https://sourceforge.net/projects/win32diskimager/ - Open the Win32 disk imager tool.
- In Win32 Disk Imager Tool:
- Select the file ‘um-restore-[version-number].img’.
- Select your SD card drive number.
- Press Write.
- Wait for the process to finish completely.
- Safely remove the Micro SD card from Windows.
Note: To restore the SD card after completing the firmware recovery, follow the steps below:
- Insert the Micro SD card into the computer.
- Right-click it, and select Format.
|
- Connect your Micro SD card to your computer.
- Download, unzip, and install the ApplePi-Baker app:
http://www.tweaking4all.com/software/macosx-software/macosx-apple-pi-baker/ - Open the ApplePi-Baker application.
- In ApplePi-Baker:
- Select the SD card in the list of available devices on the right.
- Click Restore Backup and navigate to the ‘um-restore-[version-number].img’ file.
- Wait for this process to finish.
- Safely remove the Micro SD card from MacOS.
Note: To restore the SD card after completing the firmware recovery, follow the steps below:
- Insert the Micro SD card into the computer.
- Open Disk Utility.
- Select the SD card and select the Erase tab.
- Select the desired file format and select Erase…
|
Tip: Other disk imagers can be used as well, if you have your own preference.
Firmware recovery instructions
The recovery process consists of the following steps:
- Removing the cover and inserting the SD card
- Recovery process
- Removing the SD card and reassembly
Carefully follow all the provided instructions to ensure that the recovery procedure is performed correctly and the printer is properly configured afterward to continue printing.
1. Insert the SD card
 |  |  |
|
Power off the printer
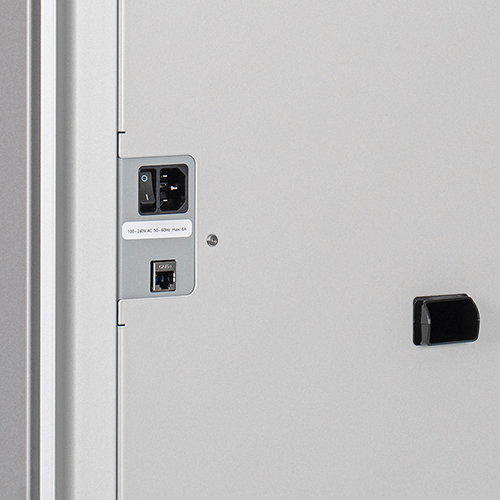
Turn off the printer using the power switch at the back and disconnect the power cable.
|
Remove the back cover panel
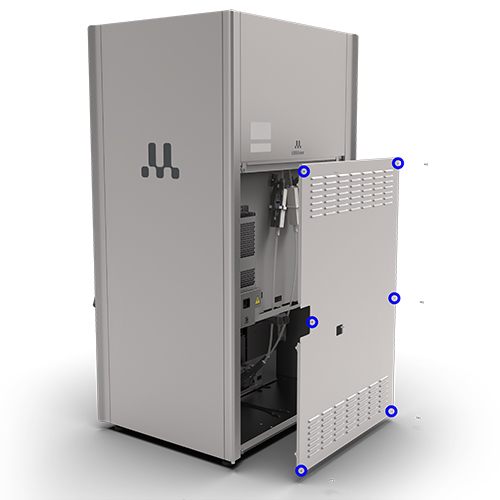
Use the Hex 2 screwdriver to remove the six M4×10 bolts that secure the back cover panel. Carefully move the panel away from the printer and place it aside.
|
Insert the SD card
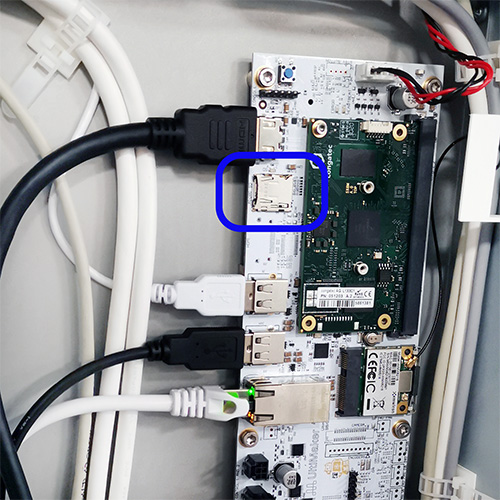
Insert the Micro SD card into the slot at the top left side of the mainboard (as seen from the back), underneath the HDMI cable.
|
Tip: While the cover panel is removed, note down the Z spindle calibration value. This is an 8-digit number (0 or 1 with 7 decimals) shown on a sticker on the back panel of the printer. You will need this value later, as the firmware recovery will reset all factory calibrations.
2. Recovery process
With the SD card in place, reconnect the power cable and turn on the printer with the power switch.
Note: It is officially recommended to (temporarily) place back the cover panel before reconnecting the power cable. Do not touch the electronics, power supply, or any connections while the printer is powered on.
When the printer is turned on, the firmware recovery process begins automatically. Wait for the process to complete and do not turn off the printer during this time. The printer's display will show Installation complete when it is finished.
3. Reassembly
Now that the firmware recovery has finished, you can remove the SD card again. Take the following steps.
Note: If you leave the SD card in the mainboard, the firmware recovery will happen every time the printer is booted up.
- Turn off the printer again and disconnect the power cable.
- Push on the Micro SD card to eject it from the slot in the mainboard.
- Place the back cover panel against the printer and ensure that the hold for the bolts and the gap for the power entry are correctly aligned.
- Insert an M4×10 bolt into each of the holes and use the Hex 2 screwdriver to secure them.
- Reconnect the power cable and turn on the printer again.
If the recovery process was successful, the printer will now boot up again normally.
Note: If the printer is still stuck on the UltiMaker logo, or the recovery process failed in another way, please contact support for further assistance.
Calibrations
Before you can resume normal operation, several calibrations must be performed. The firmware recovery resets all printer settings and calibrations, including those performed at the factory.
Note: The printer's runtime statistics will not be reset.
- Z spindle calibration: This sets the offset of the Z motor lead screw. You need the calibration value that you noted down earlier.
- Lift switch calibration: This stores the position of the switch bay in the front right corner.
- Gantry calibration: This calibration helps compensate for small offsets in the gantry for optimal dimensional accuracy
- Purge location calibration: This stores the position of the print head above the purge buckets. You will need a small mirror.
- XY calibration: This stores the X and Y offset for a combination of print cores
Learn more about Factor Series calibrations and find instructions in this article:
Factor Series - Calibrations
Finished
With the firmware recovery complete and all calibrations performed, the Factor Series printer is ready for normal operation again.
Note: If you get stuck during the firmware recovery or calibrations, please contact support for further assistance. Also notify support if you encounter problems that require a firmware recovery more frequently.


