Product notification
This product has been discontinued, and its end-of-service date has passed. While it is no longer supported, the information on this page remains available for your reference.
|
In certain cases, a complete reset of the UltiMaker 3 or UltiMaker 3 Extended is necessary to resolve problems. For example, when the printer is failing to boot up correctly, and the display is stuck on the UltiMaker logo.
When it is necessary to do a full reset, follow the instructions on this page to perform a firmware recovery.
Note: Only use the UltiMaker 3 firmware recovery as a last-resort option. Handling the electronics and reflashing of older Olimex boards has risks. Because the UltiMaker 3 is discontinued, spare parts may no longer be available.
Getting started
Note: Always take ESD precautions when exposing the electronics at the bottom of the printer. Handling the electronics in an unsafe way can cause damage to the machine. Contact support or your local reseller if you do not have access to ESD precautions, such as an ESD bracelet.
To perform a firmware recovery for the UltiMaker 3 or UltiMaker 3 Extended, you need the following:
- Hex screwdriver 2 mm
- Supplies for working ESD safe
- Micro SD card (512 MB minimum, 32 GB maximum) Warning: Will be erased
- Computer with Micro SD card reader
- Latest UltiMaker 3 recovery image:
Recovery 5.3.0
Prepare the SD card
Next, prepare the SD card with the firmware recovery image. You cannot just move the file to the card, but you need a disk imager tool. There are different processes for Windows and Mac:
| Windows | MacOS |
|---|
- Connect your micro SD card to your computer.
- Download and install the Win32 disk imager tool:
https://sourceforge.net/projects/win32diskimager/ - Open the Win32 disk imager tool.
- In Win32 Disk Imager Tool:
- Select the file ‘um-restore-[version-number].img’.
- Select your SD card drive number.
- Press Write.
- Wait for the process to finish completely.
- Safely remove the Micro SD card from Windows.
Note: To restore the SD card after completing the firmware recovery, follow the steps below:
- Insert the Micro SD card into the computer.
- Right-click it, and select Format.
|
- Connect your Micro SD card to your computer.
- Download, unzip, and install the ApplePi-Baker app:
http://www.tweaking4all.com/software/macosx-software/macosx-apple-pi-baker/ - Open the ApplePi-Baker application.
- In ApplePi-Baker:
- Select the SD card in the list of available devices on the right.
- Click Restore Backup and navigate to the ‘um-restore-[version-number].img’ file.
- Wait for this process to finish.
- Safely remove the Micro SD card from MacOS.
Note: To restore the SD card after completing the firmware recovery, follow the steps below:
- Insert the Micro SD card into the computer.
- Open Disk Utility.
- Select the SD card and select the Erase tab.
- Select the desired file format and select Erase…
|
Recovering the UltiMaker 3
The recovery process consists of three steps:
- Removing the cover and inserting the SD card
- Recovery process
- Removing the SD card and reassembly
See the detailed instructions for each step below:
Insert the SD card
| Power off | Turn off the UltiMaker 3 or 3 Extended using the power switch at the back and disconnect the power cable. |
| Remove Olimex cover |
Gently place the printer on its left side. Manually move the Z stage upward. From the inside of the printer, use the hex screwdriver to remove the two bolts that secure the Olimex cover.
|
| Insert card |
Disconnect the USB cable from the Olimex board to reveal a slot for a micro SD card. Insert the card with the connecting pads facing towards you. Press it until you feel it click into place.
|
| Power on | Reconnect the power cable and turn on the UltiMaker 3 using the power switch at the back. You can leave the printer on its side. |
Recovery process
The recovery process will now start automatically. This will take approximately 2 minutes. The progress is indicated by three LEDs on the Olimex board. See the image and table below:
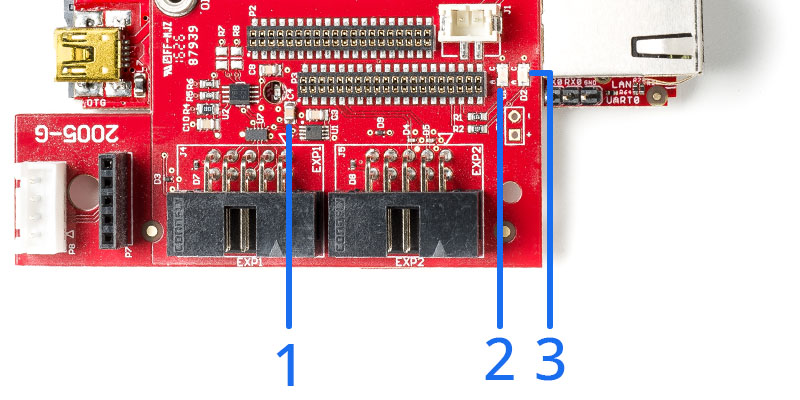
| Step | LED 1 | LED 2 | LED 3 |
| Firmware installation in progress | Slow blink | On | On |
| Firmware installation complete | Off | On | Slow blink |
| Error while installing firmware | Fast blink | Fast blink | Fast blink |
If the recovery was successful, proceed to the next step. If the LEDs indicate that there was an error during the installation, please check if the recovery image was correctly stored to the SD card and try the process again.
Remove the SD card
After the recovery process is complete, the SD card must be removed from the printer again. Follow the steps below:
| Power off | After the installation has finished, turn off the printer again using the power switch at the back and disconnect the power cable. |
| Eject SD card | Remove the SD card from the Olimex board by pressing it; it will click and eject. Next, reconnect the USB cable to the yellow-colored connector above the SD card slot. |
| Power on |
Reconnect the power cable and turn on the printer using the switch at the back. Wait a few minutes for the UltiMaker 3 to power on.
Note: If the printer boots up successfully, proceed to the next step. If the screen remains blank or stuck on the UltiMaker logo for more than 5 minutes, repeat the recovery steps.
|
| Place the cover |
When the boot-up is successful, align the cover with the Olimex board and the slots in the panels. First insert the tabs of the cover into the back panel, then press it into the bottom panel. Ensure that the flatwires to the UltiController fit in the slot at the side and do not get stuck.
|
| Secure the cover |
Insert the two bolts from the inside of the printer and use the hex screwdriver to secure them. Ensure the hex nuts are still placed in the cover, and keep your finger on them when tightening the bolts.
|
| Place the printer upright |
With the cover back in place, you can carefully place the printer in its upright position again.
|
Factory settings
Please note that the firmware recovery has erased all settings, including those set by the factory. All the calibrations will need to be redone. Click the links for instructions:


