In certain cases, a complete reset of the UltiMaker 2+ Connect is necessary to resolve problems. For example, when the printer is failing to boot up correctly and the display is stuck on the UltiMaker 2+ Connect logo.
When it is necessary to do a full reset, follow the instructions on this page to perform a firmware recovery.
Note: Please always check the recovery file on this page. It is not recommended to use older files, as this may cause compatibility problems due to revisions of the electronics.
Instructions
This process consists of three simple stages. You only need a USB drive, a hex screwdriver, and sufficient space to place the printer on its side. The complete process takes about 20 minutes.
1. Prepare the USB
First, place the correct recovery file on a USB drive:
- Download this firmware recovery file (current version 1.5.3).
- Place the file in the root directory of a USB drive.
- Safely eject the USB.
Tip: You can always get the latest recovery file by downloading the latest firmware from this page. Change the .img extension to .tar and expand the file. You will find the omega2.bin file in the contents.
2. Recovery
Next, perform the reset. This part of the process requires accessing the bottom of the printer to press the recovery button, so make sure you have sufficient space.
- Switch off the UltiMaker 2+ Connect.
- Gently place the machine on its left side.
- Insert the USB device containing the recovery file into the USB port at the front of the printer.
- Press the recovery button using the hex screwdriver (or alternative tool). See the image on the right.
- With the recovery button pressed, turn on the printer using the power switch at the back.
- Release the recovery button after about 2 seconds.
Note: The rest of this stage will be completed automatically by the UltiMaker 2+ Connect and no further interaction is required at this stage.
| 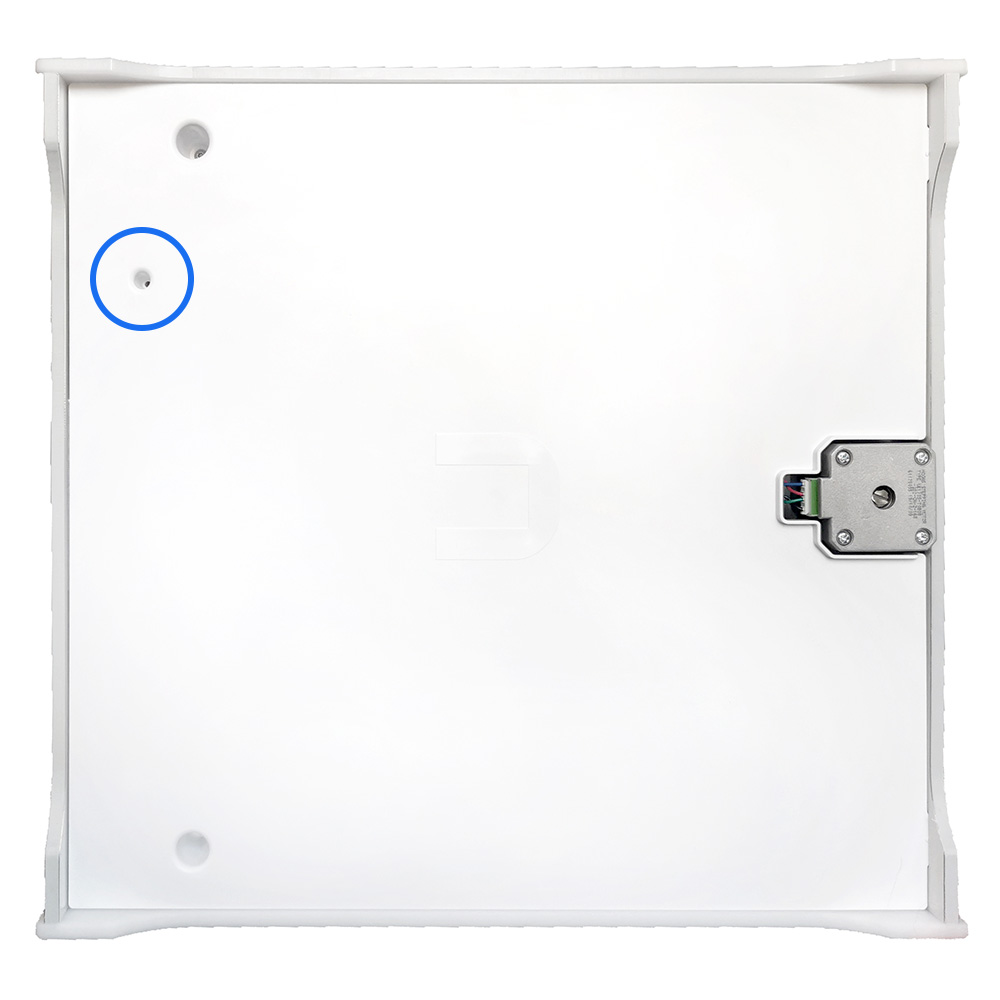 |
The printer will now boot up in recovery mode and reset all settings. This can take about 15 minutes. During this time, the display will remain blank, but it is backlit (this is visible, but not easily). When this is complete, the printer will now boot up normally.
Wait until the Welcome screen appears. Follow the instructions below to resume normal operation of the printer.
3. Complete setup
Using the omega2.bin file from step 1, the printer will now have the latest firmware version installed. If the recovery process was successful, the printer will be completely reset. Follow the steps for first use again before starting your next print.
Note: If you had a spool of material loaded before the recovery, you don't need to reload the material. However, you will need to set the correct material type. The UltiMaker 2+ Connect defaults to PLA Generic.
Need further support?
If the recovery process failed or if you have questions about the steps listed on this page, please contact support so we can assist in further troubleshooting.


