Product notification
This product has been discontinued, and its end-of-service date has passed. While it is no longer supported, the information on this page is still available for your reference.
|
The Extrusion Upgrade Kit allows you to turn your Ultimaker 2 or Ultimaker 2 Extended into an Ultimaker 2+ or Ultimaker 2 Extended+.
With this upgrade, your printer benefits from improved reliability and additional features. This also replaces the parts that are most prone to wear, so after installing this upgrade, you are sure to enjoy more years of carefree 3D printing.
Note: The Ultimaker 2 and Ultimaker 2 Extended have been discontinued, and the Extrusion Upgrade Kit is also no longer available from UltiMaker.
The Extrusion Upgrade Kit contains the following improvements:
- The geared feeder improves extrusion reliability
- The heater block with swappable nozzles gives more flexibility
- The fan bracket with optimized airflow ensures smoother prints
What's in the box
Your upgrade kit consists of several parts. Check if all the parts are included before continuing.
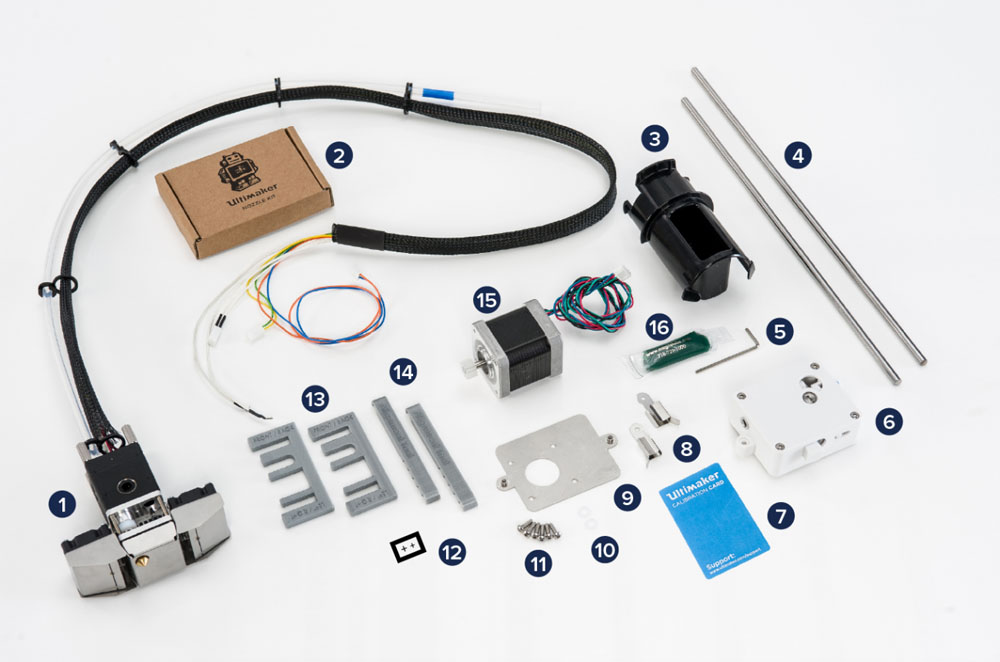
- Pre-assembled print head
- Nozzle kit
- Short spool holder
- Print head shafts (X and Y)
- Hex wrench 2 mm
- Pre-assembled feeder
|
- Calibration card
- Build plate clamps (2x)
- Geared feeder mounting plate
- M3 ring (2x)
- M3x10 mm bolts (6x)
- "+" stickers
|
- Print head (dis)assemble tools (2x)
- Print head alignment tools (2x)
- Feeder motor
- Grease
|
Tip: The STL files for the printed tools are also available at the bottom of this page.
Installation
Installing the Extrusion Upgrade Kit can be done in 30 minutes to one hour. You will replace the print head, print head shafts, feeder, and build plate clamps. In addition to the items in the kit, you will need a flat-sided screwdriver (for the heater wires) and pliers or a 5.5 mm (socket) wrench (for the lock nuts that secure the mainboard cover).
Tip: Before you start, unload the material from your printer.
Follow the steps in the PDF manuals at the bottom of this page (available in English, Dutch, German, Spanish, French, and Italian), or watch the installation video:
Firmware
After installing the new hardware, it is important to update the firmware of your printer before you start printing.
Note: If you do not update the firmware, the feeder will turn the wrong way, preventing you from loading materials or starting a print.
Connect the power cable to the printer and turn it on using the power switch at the back. Connect the printer to a computer or laptop that has Ultimaker Cura installed using the USB cable. Open Ultimaker Cura and select the correct machine in the Printers panel (Ultimaker 2+ or Ultimaker 2 Extended+).
Tip: If you don't have this machine type added to Ultimaker Cura yet, select Add printer and choose the '+' version of your printer from the dropdown list.
If you have the correct machine type selected, click Manage printers in the Printers panel, and then select Update firmware. Wait for the firmware installation to complete. Do not disconnect the USB cable or power off the printer during the installation process. Learn more here:
Updating the Ultimaker 2+ firmware
Bed leveling
After the firmware installation is complete and your printer has rebooted, it is important to relevel the build plate. The new print head with the swappable nozzles will have a different offset to the build plate. Leveling the build plate ensures that your prints will adhere properly to the glass. Learn more here:
Build plate leveling on the Ultimaker 2+
Load material
The final step before you can start a print on your (as good as new!) Ultimaker 2+ is loading material. Despite the new feeder, the process is very similar to the Ultimaker 2. Learn more here:
Loading material on the Ultimaker 2+
Downloads


