When the print head fills up with material during printing, this is known as a flooded print head. This page explains how this can happen, how to prevent it, and what to do if your UltiMaker printer has a flooded print head.
Note: The information in this article applies mainly to the UltiMaker 3, S3, and S5.
Issue description
If something goes wrong during printing, there is a chance that extruded filament accumulates inside the print head. This can cause a large mass of material around the print cores. When this cools down after the print job is finished, this can be very hard to remove and usually impossible without damage to one or more components. Often, the print cores are destroyed.
Several improvements were implemented on the UltiMaker S3 and UltiMaker S5 print heads compared to the early UltiMaker 3 print head. This includes a more reliable nozzle cover, stronger magnets, and better part alignment. Most of these have also been implemented on later revisions of the UltiMaker 3 print heads. Despite these improvements, flooded print heads can still occur, and the UltiMaker S3 and UltiMaker S5 have no detection system for this failure mode.
Note: This issue and the following information is for the UltiMaker 3, UltiMaker S3, and UltiMaker S5.
Other S series printers S6, S7, and S8) feature an open fan bracket detection sensor, which helps to prevent severe damage to the print head. This feature is currently not backward compatible with other S series printers.
Although print failure could also occur on Factor 4, this printer also features the open bracket detection sensor, and the print head is completely different from S series.
The UltiMaker 2 series (including 2, 2+, and 2+ Connect) also have completely different print heads, so this information is mostly not relevant for these models.
|
| 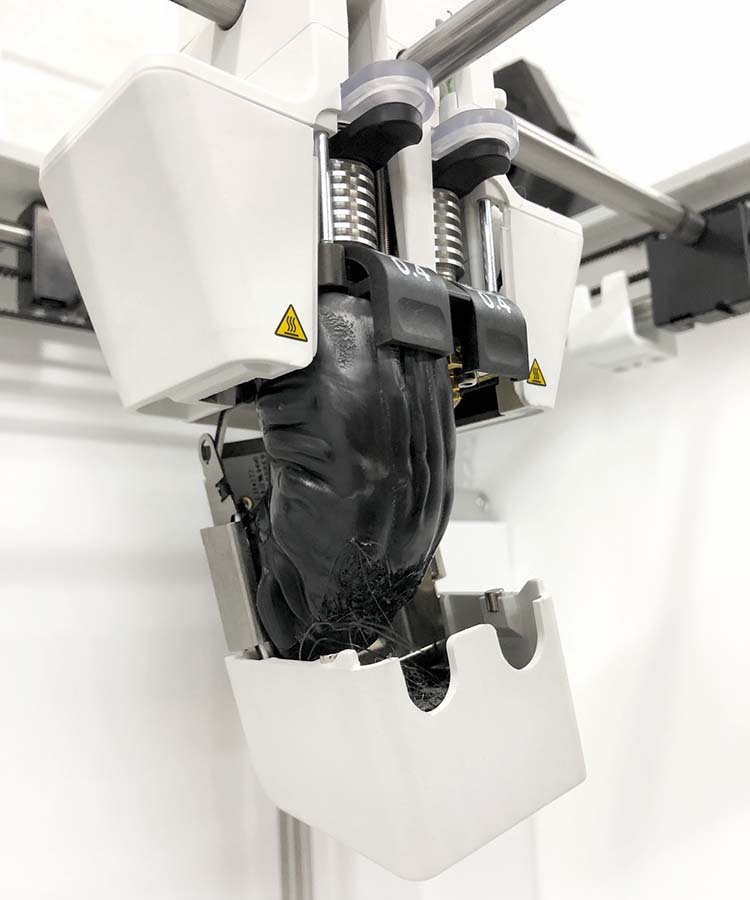 |
Causes and prevention
Below are listed the most common causes of a flooded print head and tips to prevent them. Ensure you familiarize yourself with these best practice tips and perform the recommended maintenance procedures timely and correctly.
Bed adhesion
There is a very high risk of flooding the print head when the print detaches from the build plate.
- Issue: The material is no longer precisely deposited if the printed part does not stick to the build plate. The print can stick to the nozzle instead, causing the bracket to open, or the material can flow back into the head.
- Prevention: Regularly clean the glass build plate to remove filament and glue residue and reapply the recommended adhesion method for the next print job. Check our glue type recommendations or the Marketplace for adhesion advice.
Nozzle cover
A good-quality and properly installed nozzle cover is critical for successful printing.
- Issue: If the nozzle cover is not installed correctly, it can get caught on the print and cause the fan bracket to open. Alternatively, a worn cover that is not replaced in time increases the chance of material backflow.
- Prevention: Never print without the silicone nozzle cover in place, check the quality of the nozzle cover as mentioned in the maintenance schedule, and ensure it is installed correctly. Replace it when it looks worn out. Note that when using the CC print cores and/or high-temperature materials, the nozzle cover should be checked more frequently.
Opening fan bracket
The front fan bracket is kept closed by magnets, but it can open during printing in certain situations.
- Issue: The bracket can fall open during printing if a detached print sticks to it, or if the bracket is not correctly installed after a repair. This can be because the metal tabs of the front fan bracket were bent, or if the front fan is not aligned well against the cover. You can notice this if the fan bracket falls open easily when you manually move the print head around or lower the second print core.
- Prevention: Always check if the bracket closes securely and reliably. Manually raise and lower the second print core using the lift switch to check this. If the metal bracket is bent, push it back into the correct position or replace the front fan bracket assembly if this is not possible.
Note: Some users have chosen to mechanically keep the fan bracket closed, either with tape, rubber bands, or 3D printed clips. Although this is not an official UltiMaker solution, locking the bracket closed is quite effective. However, this does not prevent all failure modes. Make sure to follow all maintenance advice and only use such a clip as an additional safety measure.
In all cases, if you notice a problem during printing, such as poor bed adhesion or an open front fan bracket, immediately stop the print to prevent damage to the printer. When printing remotely, it is recommended to regularly check the print progress via the camera in UltiMaker Digital Factory.
Solutions
Depending on the severity of the flood, it may still be possible to salvage most parts of the print head.
Minor damage
In case of a minor print head flood, there will be some material around the heater block of the print core. If no other parts are damaged, this can be quite easy to resolve.
Caution: The following steps require heating up the print cores and working with a hot nozzle. Protective (thermal) gloves are advised.
- Via the Configuration menu, heat up the affected print core to the printing temperature of the last used material. Wait for the print core to reach the target temperature.
- Fully open the fan bracket so you can access the print cores and wait for the accumulated material to soften.
- Use tweezers or pliers to carefully remove parts of the material that has accumulated around the heater block.
Caution: Take extra caution if there is material around the heater and sensor at the back of the heater block. Only remove material that has softened sufficiently to prevent damaging the wires. If one of the wires is damaged, this will lead to errors that prevent further heating of the print core, and the print core must be replaced.
- If most of the material was successfully removed, lower the print core temperature to 100 - 120 °C (depending on the material used). Wait for the print core to cool down to the target temperature.
- Use tweezers to remove the leftover material from the heater block. At this temperature, the material will pull away cleanly.
Carefully check all other parts for damage. It is possible or even likely that the nozzle cover is no longer intact. If the nozzle cover is damaged, replace it with a new one.
Severe damage
In case of severe damage, like in the image at the top of this article, it differs per case if the problem can still be resolved by replacing parts, or if the entire print head must be replaced.
You can try to salvage the print head by heating up the nozzle (if still possible) and/or using a heat gun to remove the majority of the material.
Caution: Never use a heat gun inside the printer. If a heat gun or blow dryer must be used to warm up the material, first take the print head out of the printer.
If this is successful, check all print head parts for damage. The parts listed below are most prone to damage in severe print head floods:
- Print core(s): If not all material can be removed, if the heater block is skewed or severed, and/or if the heater and sensor wires are damaged, the print core must be replaced.
- Nozzle cover: If the nozzle cover is torn or otherwise damaged, it must be replaced.
- Front fan bracket: The metal of the front fan bracket may have bent or deformed due to the accumulation of material. If the shape of the bracket cannot be restored, replace the front fan bracket assembly.
- Side fan bracket: The plastic side fan bracket may have deformed or cracked due to the accumulation of material. If this is the case, the side fan bracket must be replaced.
In very severe cases, it might be better to replace the entire print head assembly.
Note: Please contact support or your local reseller for additional advice and recommendations for resolving the problem.


