The Recommended printing mode in UltiMaker Cura is designed to provide a hassle-free printing experience for starting users or advanced users who quickly need to get their projects printed. Print profiles are available for each UltiMaker printer and optimized for your configuration, including print core or nozzle and material(s). These profiles are developed by UltiMaker's materials engineers and extensively tested to ensure great print quality and ease of use.
In the Recommended mode, you use one of the available preset profiles, but allows you to quickly and easily change certain settings to optimize your print.
The recommended mode works similarly for UltiMaker printers and other 3D printer brands. Profiles for third-party machines are not managed by UltiMaker but by the printer manufacturers or external contributors.
Tip: Learn more about printing profiles here: What is a printing profile in UltiMaker Cura?
Overview of the recommended mode
- Print settings panel. This panel shows the current printing strategy at a glance, click it to view the entire panel.
- Print profiles. The available profiles for the current configuration are visible. Selected UltiMaker 3D printers and configurations offer intent profiles, fine-tuned to meet specific needs.
- Print profile resolution. Most profiles have multiple resolutions or layer heights available to choose from.
- Altered print settings. If you have altered your print settings, either in the Recommended or Custom mode, it is displayed here. The reset button will undo your changes, the save button creates a new print profile
- Show Custom. This will open the Custom mode to manually fine-tune printing profiles.
- Strength. The strength settings adjust the overall model strength by altering the infill and shell parameters.
- Support. Enable or disable automatically generated support structures. When support is enabled, additional options appear. This includes support type, extruder selection, and placement.
- Adhesion. Enable or disable additional adhesion for your model. When disabled, a skirt will be printed around the model. When enabled, a brim or raft is added. The type of adhesion is automatically set by the print profile.
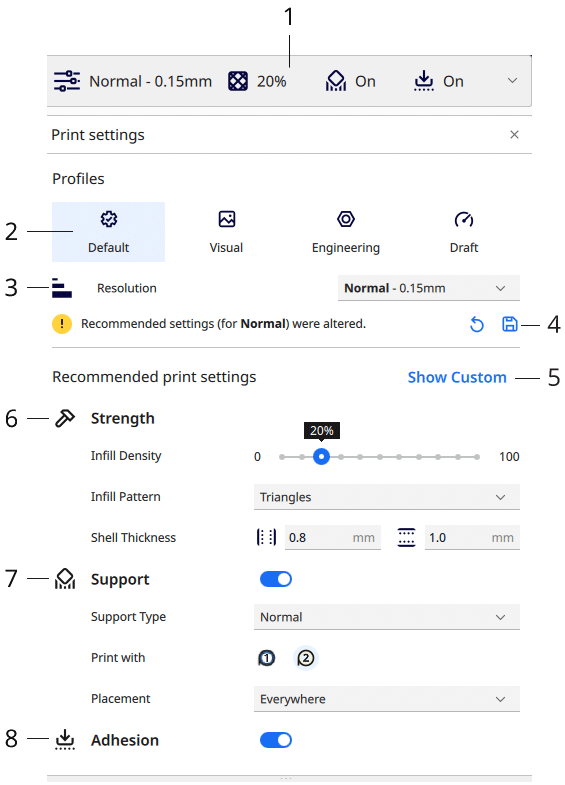
Using the recommended mode
Simply go through the available parameters from top to bottom. At each step, consider the following:
- Print profile. The print profile is the base of your 3D printing strategy. Each profile, indicated by the available layer heights, is designed with the intention of the user in mind. Profiles with thin layers print slowly and precisely, while profiles with thick layers print quickly and appear rougher. Consider which profile suits the current application. For selected UltiMaker printers, one of the intent profiles can be selected for specific applications.
- Strength. The strength of 3D prints has two primary functions: ensuring the top parts of 3D prints close correctly as they are supported by the infill and defining the overall strength of the 3D print. An infill percentage of at least 15% is recommended for standard applications. Increase the value to strengthen the 3D print.
- Support. Support structures are important for 3D models with sharp overhangs and completely floating parts. Ensure to enable the feature and, when working with printers with multiple extruders, select the correct extruder to print the support structure.
- Adhesion. It is almost always recommended to enable additional adhesion unless there is a clear use case to benefit printing without it. The additional adhesion parts generally do not add much extra material cost or print time, but do add to the 3D print reliability.
Tip: If the settings in the Recommended mode are not sufficient to optimize your printing strategy, open the Custom mode. Here, you can change hundreds of settings. Learn more about the Custom mode here: How to use the custom print settings in Ultimaker Cura


