UltiMaker Cura is designed to prepare 3D models for printing. However, Cura also contains a built-in feature to convert a 2D image to a 3D file. By default, Cura will print darker parts of the image with more layers, so this can be used to print lithophanes. Because this is a standard feature, printing 2D images is very simple, but this article contains a few tips and tricks to improve your results.
Note: Cura generates a flat model which will be placed horizontally on the build plate. This gives the highest chance of a successful print. The level of detail will be higher if the image is printed vertically, however, the model will be quite unstable when placed upright. You could add custom supports, or instead use a lithophane generator to make a curved model.
Select and prepare your image
Start by choosing which image or photo you want to 3D print. Please note that not all images may print as nicely. Take the limitations of the printer and the technique into account. Images will be printed in a single color (by default), and the level of detail that can be achieved depends on the nozzle size and contrast in the image.
Tip: Some types of images that work well with this technique include portraits, animals, landscapes, and ultrasounds. This feature can also be used for height maps, but this article will focus specifically on photos as some settings are different for height maps.
You can load the image into Cura straight away, but depending on the application of the print, some image editing may help to give better results. You can use any image editor application you prefer. See some tips below:
| Black and white | Because the printed part will be monochrome, desaturating the image will give a better indication of what the end result will look like. Tones of certain colors will look almost the same in grayscale. |
|---|
| Adjust contrast | Adjust the contrast, exposure, and levels of the picture until you are satisfied with the result. For the best results, you may want to increase the contrast of your photo. This depends on the photo of course, but a (slightly) stronger contrast will increase the lithophane effect of the printed photo. |
|---|
| Crop and size | Crop the image to exclude any unnecessary details and think about the size and ratio that you want your print to be. Note that very large and detailed images may take very long to slice in UltiMaker Cura and the printer is not capable of printing extremely fine details. |
|---|
| Add a border | For a sturdier print, you can add a black border around the image. If the outer edges of the image are light, this can make the print feel flimsy. Also, this makes it more difficult to remove the print from the build plate without damaging it. A uniform border is also recommended if you want to use the print in a lamp or picture frame, for example. |
|---|
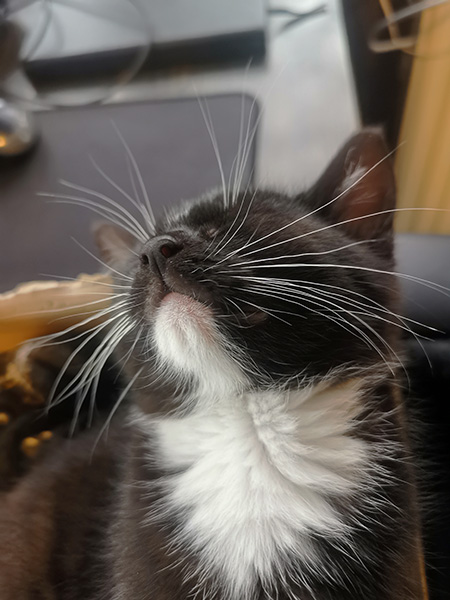 | 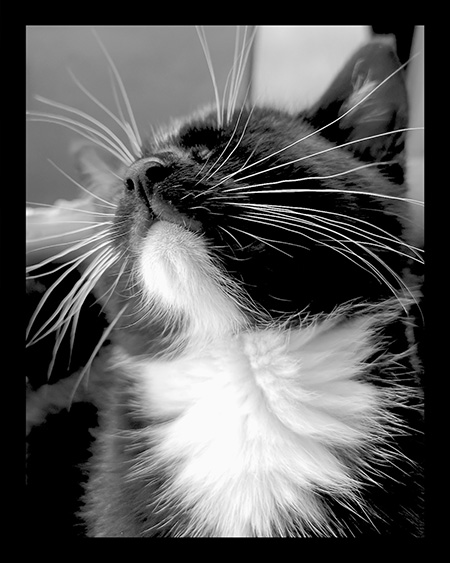 |
|
The left is the original image. On the right is the edited photo (cropped, desaturated, increased contrast, and with a border).
|
Convert image
When you are finished editing your picture, load it into Cura. A popup window will appear to convert the image for 3D printing. Here, you can adjust a number of settings as necessary:
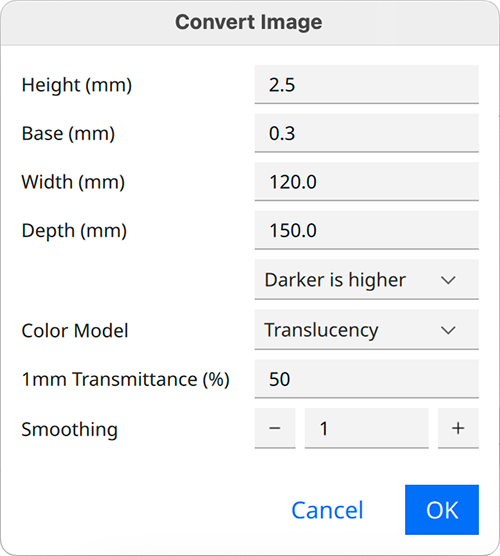 |
- Height. This is the total height of the print minus the base. A higher value will create more detail, but will also reduce the transparency of your print. If you want to retain some transparency in the thicker parts of the print, a height of 2 - 3 mm is recommended.
- Base. The base height from the build plate. These layers will be fully solid. It is recommended to have at least 1 - 2 solid layers, but too many base layers will reduce the contrast and transparency. The Cura setting Initial Layer Height affects the number of base layers.
- Width and depth. The total X and Y dimensions of the print. Changing either value will affect the other; the model is always scaled uniformly in this popup window. You can also scale the model later using the Adjustment tools but note that this can reduce the quality.
- Lighter / darker is higher. This setting determines which parts of the print will be thicker. For lithophanes, use Darker is higher. Dark pixels correspond to thicker locations to block more light from coming through.
- Color model. Choose between Translucency or Linear. For lithophanes, a simple logarithmic model for translucency is available.
- 1 mm transmittance. This setting influences the percentage of light penetrating a print with a thickness of 1 mm. Lowering this value increases the contrast in dark regions and decreases the contrast in light regions of the image.
- Smoothing. Choose a value between 0 and 100. Higher values create smoother edges but will reduce the contrast and potentially the accuracy of the print.
|
When you are satisfied, click OK to convert the image.
Configuration and settings
Think carefully about your printer, material, and profile configuration:
| Nozzle size | For the most accurate and detailed lithophanes, choose a smaller nozzle size. A standard 0.4 mm nozzle will give decent results, but a 0.25 mm nozzle allows more detail (but also much longer print times). A 0.6 or 0.8 mm nozzle is not usually recommended for lithophanes, unless the images are large and not very detailed. |
|---|
| Material type | Next, choose your material. Any filament optimized for visual quality works best, such as PLA. Engineering materials such as Nylon or polycarbonate have other great properties, but may not print as nicely. |
|---|
| Material color | Also consider the color of your material. For lithophanes, the purpose is that light shines through the object, so lighter colors such as white, pearl-white, or light grays work best. Note that the material itself does not have to be translucent! Actually, translucent materials may even reduce the lithophane effect. |
|---|
| Base profile | Choose a base profile with high accuracy and detail. Thinner layers will give more detail. The availability of preset profiles depends on your chosen configuration. For selected UltiMaker 3D printers and configurations, intent profiles are available, in which case you can choose the Visual Fine (0.1) or Extra Fine (0.06) profile. |
|---|
| Adjust settings |
For the best results, some settings should be tweaked. Open the Custom mode and find the settings below:
- Layer height. As mentioned above, thinner layers increase the accuracy. It is best to choose this value by selecting a base profile as other print settings depend on the layer height. Don't deviate too much from the profile value for reliability.
- Initial layer height. This should not be too thick for the highest accuracy, but build plate adhesion is key. Depending on your base profile, choose a value of 0.1 - 0.2 mm. Note that this value affects the base height!
- Line width. Smaller line widths will create more detail and higher quality. Because there are most likely few flat areas in the object, especially the wall line widths are important. Keep this close to the nozzle size.
- Infill or top/bottom. For the lithophane effect to work, it is important that your print is made solid and does not contain any infill patterns. Either set your infill to 100% (this will automatically change the infill pattern to one that supports solid fill, such as zigzag) or set the top/bottom thickness to at least half the print height.
- Speed. Slower print speeds prevent under-extrusion and give better results, but the travel speed should be higher to prevent oozing.
- Build plate adhesion. To ensure a reliable adhesion to the build plate and to prevent warping, using a brim is strongly recommended.
|
|---|
When you have finished slicing, always check the slicing result in the Preview mode. In the layer view, you can ensure that (at least) the first layer is solid and that no infill patterns are generated.
Pre and post print
Before you start your lithophane print, there are a few things that are recommended to ensure the highest quality results.
| Printer configuration | First, ensure that your printer configuration matches your Cura setup. If necessary, change the material and print core or nozzle. |
|---|
| Clean the printer | Lithophanes are generally printed in light colors. It would be a shame if the print was affected by color mixing or specks or degraded material. Ensure that the extruder path is completely clean. For UltiMaker printers, clean the feeder, the Bowden tube, and perform a cold pull. |
|---|
| Prepare the build plate | A successful build plate adhesion is the most important factor. Accurately level the build plate and ensure the surface of the build plate is completely cleaned first. To improve adhesion, uniformly apply a layer of glue or a spray such as 3DLac, or apply an adhesion sheet. |
|---|
Now it's time to start the print! It is strongly recommended to observe the first layer to make sure that the build plate is leveled perfectly.
After printing, carefully remove the print from the build plate. When using a heated build plate, let it cool down completely before removing the print to prevent deforming or damaging it.
Tip: There may be some strands of oozing left on the print. Carefully remove these with a sharp knife.
When you're finished, hold your lithophane print up to the light to see the full effect! You can also place your print in front of a lightsource, but be careful that the temperatures are not too high.


