UltiMaker TRACE (Technical Reporting And Certification Engine) is an enterprise-grade validation and quality assurance platform integrated into the firmware of Factor Series printers. By transforming raw sensor data into actionable insights, TRACE provides a comprehensive digital report for every print job. This report simplifies validation and quality assurance before parts are deployed, proving the UltiMaker Factor Series printers to be powerful tools for any operation prioritizing uptime, accuracy, and repeatability in their 3D printing processes.
TRACE is included with the Factor 4 Plus and can be purchased as an additional premium feature for the Factor 4. For both printer types, the license must first be activated via subscription.ultimaker.com.
Note: UltiMaker TRACE was available as 'Print Process Reporting' on Factor 4. This will be renamed in a future firmware update.
What is UltiMaker TRACE?
The reliability of the print process has been greatly improved in the UltiMaker Factor Series printers. This is due to several factors that create a stable and consistent environment while printing. Because this process is so stable, any deviations in the process are notable. TRACE notes these deviations per print in a report. This report is in HTML format and can be downloaded from the printer via the TRACE icon in the taskbar.
How to activate TRACE
Each UltiMaker Factor 4 Plus includes a free TRACE license. The Factor 4 comes with a trial license, and extensions can be purchased separately. Activation and extension of the TRACE licenses are done via the UltiMaker subscription portal. Take the following steps:
- Go to subscription.ultimaker.com.
- Log in with your existing UltiMaker account, or create a new one.
- In the Active subscriptions section, click the Enter Product Code button.
- In the pop-up window, enter your TRACE activation code and click Continue.
Tip: Your trial or permanent license activation code was included with the printer. Purchased licenses are provided separately.
- In the next window, confirm the product details and click Select Printer.
- Select your printer. How to do this depends on whether or not the printer is connected to the UltiMaker Digital Factory:
|
Connected to Digital Factory
If the printer for which you want to activate TRACE is already set up in your Digital Factory workspace, select it from the list.
|
Not yet set up in Digital Factory
If the printer is not yet set up in the Digital Factory, you can set it up first, then return to this license activation afterward. Click Learn how to connect a printer to get more information about connecting printers to your Digital Factory workspace.
|
Non-connected printer
If you do not want to connect your printer to the Digital Factory at all, select Enter Printer ID. The 32-character printer ID can be found in the printer menu. In the Options menu (gear icon), go to Settings → Show printer ID. Enter this in the pop-up window and press Continue.
|
- Confirm your printer and product details, and click Activate Product.
- Click Download Printer Activation File and save it to a USB drive.
- Insert the USB drive into your Factor Series printer.
- In the Options menu (gear icon), go to Settings → Premium Features and tap Unlock Feature.
- Select the file from the USB drive.
Note: If you have multiple Factor Series printers, this process must be repeated for each individual printer.
What does TRACE measure?
UltiMaker TRACE checks for deviations in a number of control loops in Factor Series printers. These include:
- Extrusion factor
- Nozzle temperature
- Build volume temperature
- Build plate temperature
Extrusion factor
The extrusion factor is calculated by the printer during the print as it monitors the extrusion process. It is crucial for mechanical properties, as voids or over-extrusion artifacts will create weak points in the part. A part will always break at its weakest point, so the extrusion factor is a direct measurement of mechanical property issues in a part.
Nozzle temperature
The nozzle temperature control loop directly controls the temperature of the extruded material. This influences layer bonding:
Lower nozzle temperatures will result in faster solidification of the printed thread, reducing layer bonding but improving visual quality. Too low nozzle temperatures can lead to flow issues, as the material gets more viscous at lower temperatures. Higher nozzle temperatures will keep the thread molten for a bit longer, increasing layer bonding but reducing visual quality. Too high nozzle temperatures can lead to degradation of the printed material.
Build volume temperature
The build volume temperature loop directly controls the temperature to which the printed material will cool down during a print. For uniform prints, the build volume temperature should be as stable as possible. Higher temperatures will reduce stresses in the part (reducing warping/non-uniform shrinkage) but will also reduce extrusion reliability and visual quality.
Build plate temperature
The build plate temperature is used to heat the build volume. This means that deviation in the bed temperature will directly affect the build volume temperature control loop. Additionally, large build plate temperature errors on the initial layers can result in adhesion issues.
Note: All of these control loops are monitored for deviations. If one occurs that is significant (but not significant enough for an error) then it will show up in the TRACE report.
The TRACE report
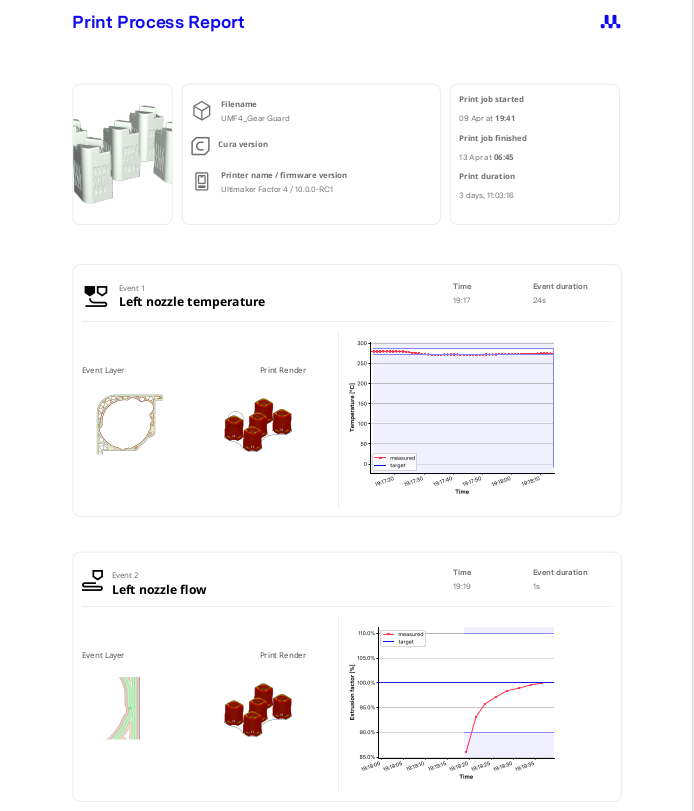
A TRACE contains a number of elements. At the top of the page, the metadata on the print job can be found. Below that can be any number of events. In case there are no events, everything in the print process went as expected. If there are print process events where control loops went outside the bounds, these contain 4 components:
- Metadata on the event (When did it happen? What type of control loop? How long was the event?)
- A top-down image showing where in the print job the event occurred
- A 3D image showing where in the print job the event occurred
- A graph showing the data around the event
Tip: See an example of a TRACE report with a few events below:
How to interpret the TRACE report?
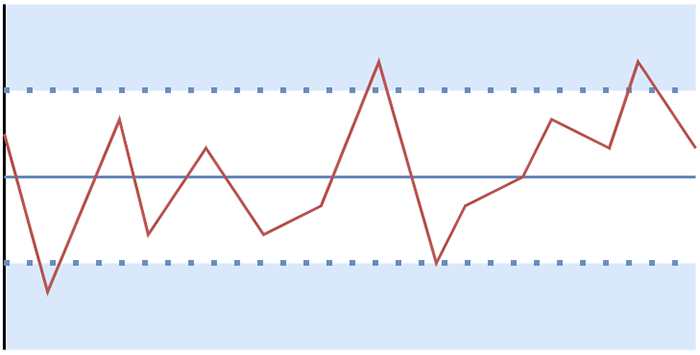
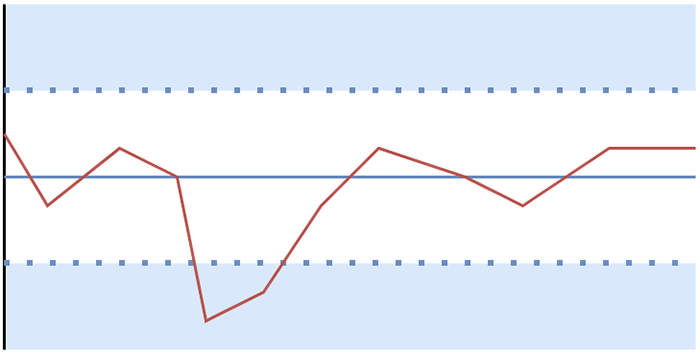
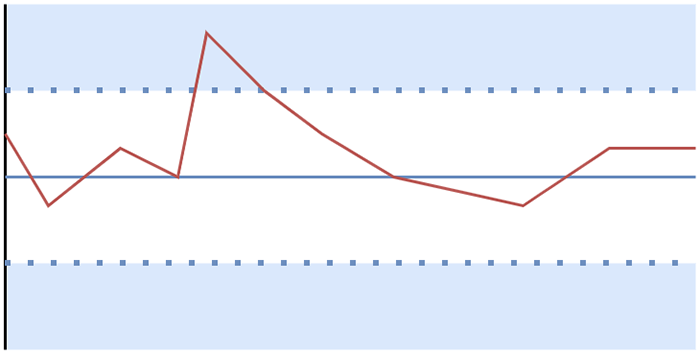
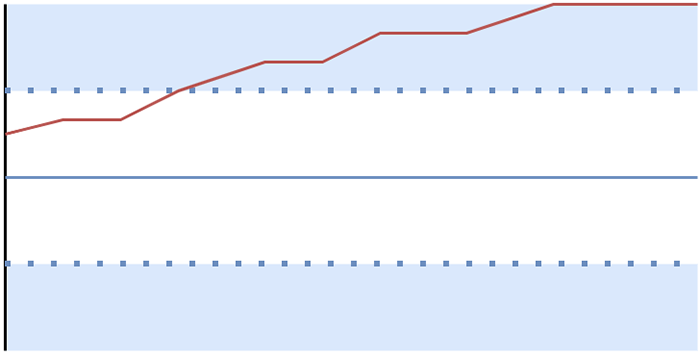
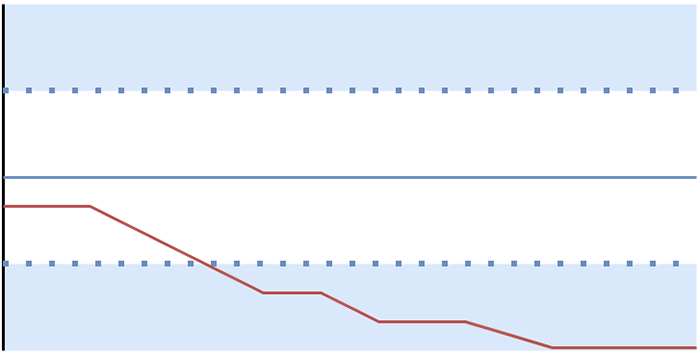
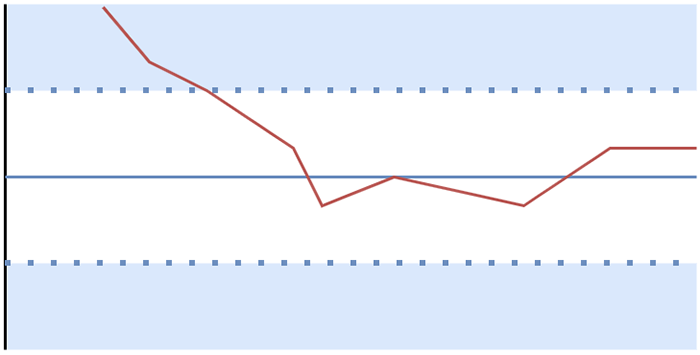
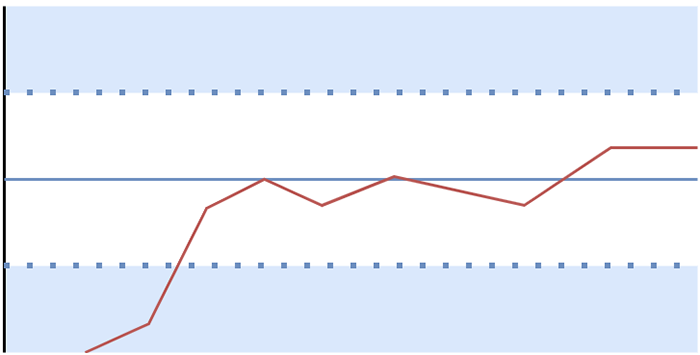
The TRACE report is a powerful tool for troubleshooting. As mentioned above, an event always includes a graph of the data during such an event. These graphs can have different failure modes that indicate something that might have happened with the control loop. These failure modes are shown in the table below, with possible failures that could have occurred.
Note: If an event does not match any type in the issue list, please contact support. Please also contact support or your local reseller if you need additional help interpreting the report or any events listed.
| Type | Schematic | Potential issues |
|---|
|
Noisy
|
|
- Extrusion factor: Very challenging print profile settings can make the extrusion factor unstable. This should not happen when using the default UltiMaker profiles.
- Nozzle temperature: A bad connection between the print core and print head (a physically damaged print core can introduce noise).
- Build volume temperature: A bad connection between the build volume temperature sensors and the rest of the printer.
- Build plate temperature: A connection issue in the build plate heater can cause a noisy signal.
Note: In case of noisy data in the TRACE report, please contact support. The printer may need service or maintenance.
|
|---|
|
Peak
|
|
- Extrusion factor: A temporary blockage at the nozzle either by the print being too close or by a clog in the nozzle can cause a downward peak.
- Nozzle temperature: Nozzle overshoots or undershoots during nozzle switching can lead to a peak in temperature.
- Build volume temperature: If the door sensor detection is turned off this can cause a downward peak in temperature when opening the door during the print. Blocking the filter fan airflow for a short time (for example by placing something on top of the exhaust) can cause an upward peak.
- Build plate temperature: A connection issue in the build plate heater can cause an upward or downward peak.
|
|---|
|
Drift
|
|
- Extrusion factor: A drift downwards could mean the nozzle is slowly getting blocked. Either by a clog or the print itself. Material jamming/buckling in the extruder could lead to a downward drift.
- Nozzle temperature: The nozzle temperature can drift down when the nozzle is no longer insulated by the silicone nozzle cover.
- Build volume temperature: Blocking the filter fan airflow (for example by placing something on top of the exhaust) can cause an upward drift. Operating the printer outside of the specified ambient operating conditions can also lead to drifts.
|
|---|
| Settle |
|
- Extrusion factor: Loading material can cause the extrusion factor to be off due to being out of range during purging.
- Nozzle temperature: Nozzle overshoots or undershoots during nozzle switching can lead to an error when starting with printing
- Build volume temperature: With the door sensor detection disabled: Resuming a print after the door has been opened during pausing can cause the temperature to be too low.
|
|---|
| Oscillation | 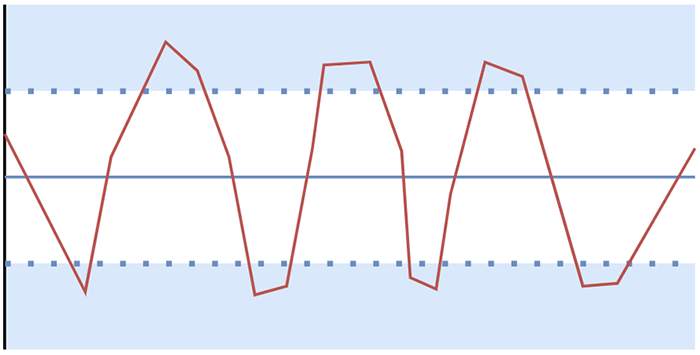 |
- Extrusion factor: A warped print can cause these types of oscillations.
- Nozzle temperature: Very short layer times and bad thermal behavior (such as a damaged or missing nozzle cover) can lead to oscillations.
|
|---|


