This article contains information about annealing parts printed with PPS CF. Annealing is a heat treatment process for 3D printed parts that involves heating the object and then cooling it slowly. UltiMaker PPS CF already has unique qualities and high temperature resistance, but its properties can be further improved by annealing.
Introduction
There are two main benefits of annealing your PPS CF parts:
- The mechanical properties will slightly increase, and it will ensure maximum intrinsic properties such as chemical resistance and flame retardance.
- Temperature resistance under high load (1.8 MPa) increases from HDT A of ~ 104 °C to a HDT A of ~ 137 °C. HDT under low load (HDT B, 0.455 MPa) is already >230 °C after printing. Annealing basically transforms your PPS CF to a fully semicrystalline state.
Annealing instructions
Here, you can find instructions for correctly preparing your model with annealing in mind, and the annealing process itself.
Print preparation
A downside of annealing is that your printed part will shrink slightly. In UltiMaker Cura, this shrinkage can be compensated for by slightly enlarging your part. This is done automatically when choosing the annealing intent profiles.

Note: Claims on dimensional accuracy of PPS CF on Factor 4 are for non-annealed printed specimens.
Make sure to select a support material, as this will prevent sagging of your part during printing and annealing. When the printed part is going to be annealed, the use of self-support (PPS CF) is strongly recommended.
Annealing oven
Place your PPS CF parts still attached to the build plate in the Binder (or other brand) oven. It is crucial that the parts have the same orientation in Z as during printing (so do not rotate or flip the parts in the oven). This will negatively affect the shrinkage.
Tip: Professional programmable annealing ovens such as Binder FP115 and Memmert UFP75plus are validated by UltiMaker and therefore recommended.

To determine the annealing time, measure the thickest section of your part. The annealing time in hours is the thickness in mm / 2. Let's say your part is 4 mm thick, then you would need to anneal the part for 2 hours at the annealing temperature.
Program your oven
A verified annealing profile for a PPS CF sample of 4 mm thickness is depicted below. It is recommended to have a minimum of 10 hours at the maximum temperature (120 °C) to achieve increased crystallization of the printed parts. Different annealing temperatures (Tc) can be decided upon based on property preferences, but it is advised to maintain heating/cooling ramps for optimal results. High-temperature annealing will therefore result in longer annealing times.
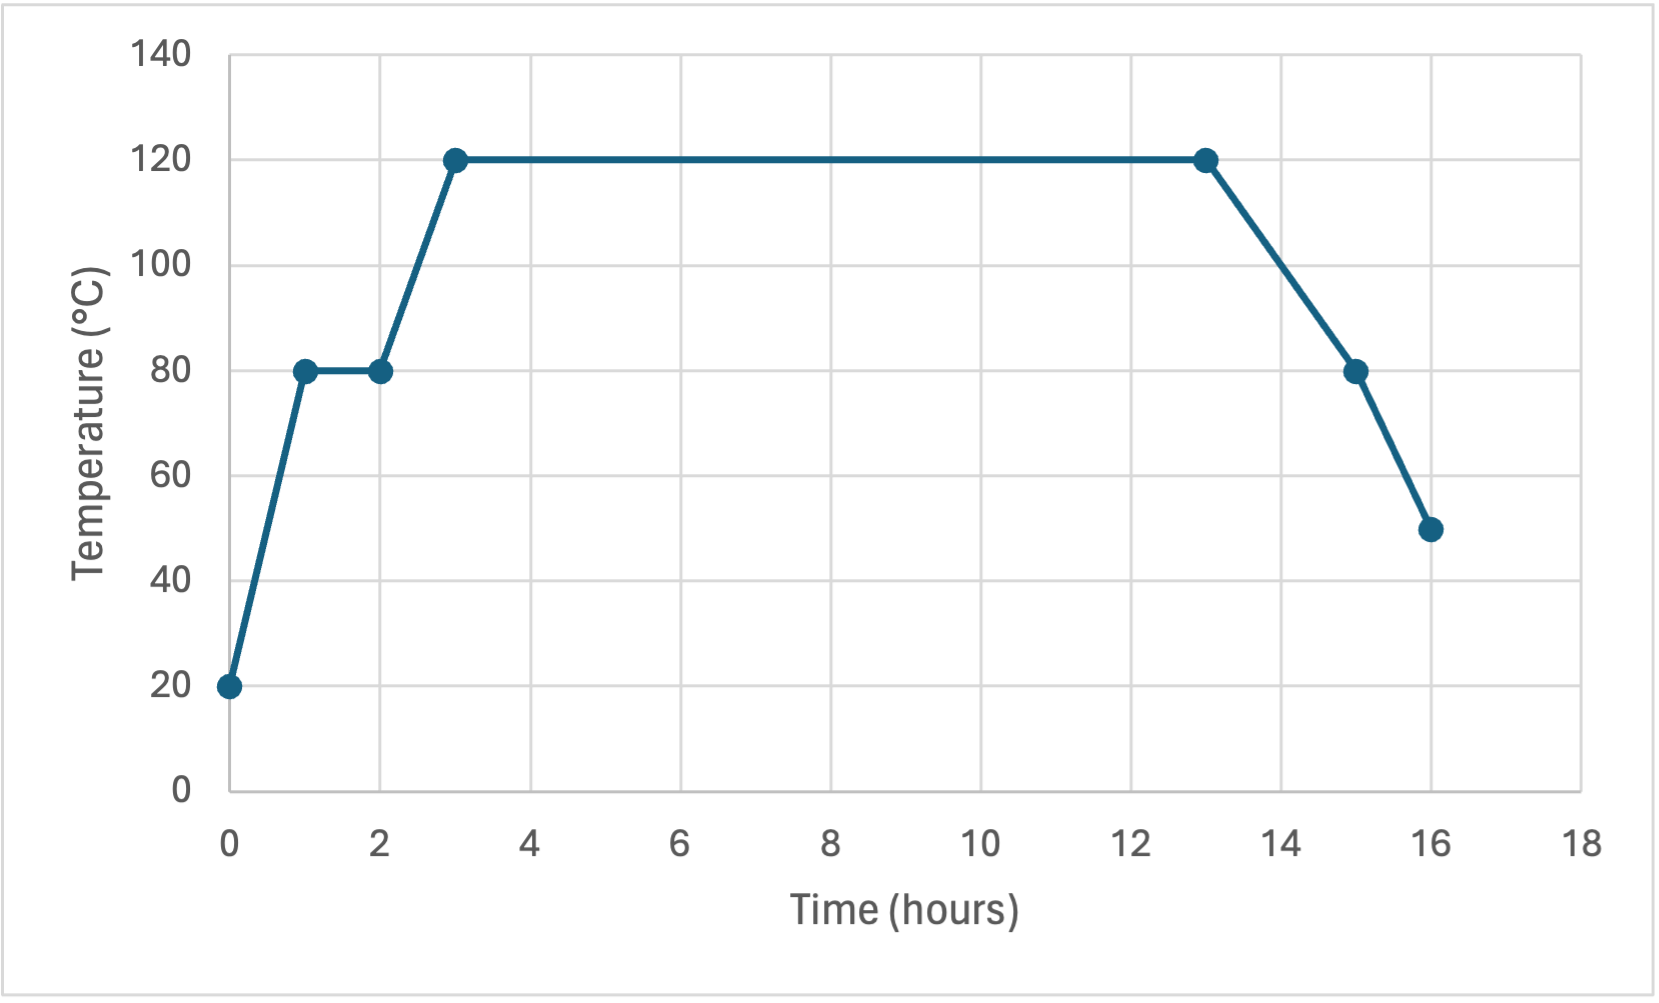
| Process | Duration (h) | Temp (°C) | Ramp (°C/h) |
|---|
| Start | (N/A) | 20 | (N/A) |
|---|
| Heat to Tg | 1 | 75 | 55 |
|---|
| Unstress | 1 | 80 | 5 |
|---|
| Heat to Tc | 1 | 120 | 40 |
|---|
| Anneal | 10 | 120 | (N/A) |
|---|
| Cool to Tg | 2 | 80 | - 20 |
|---|
| Cool to RT | 1 | 50 | - 30 |
|---|
| Total | 16 |
|---|
Once the object is cooled down and retrieved from the oven, the annealing process is completed, and the part is ready for use. Regular post-processing methods like sanding, polishing, and coating can be applied if desired.


