The information in this article applies to the UltiMaker 3, UltiMaker 3 Extended, UltiMaker S3, and UltiMaker S5. Although the fans on the other S series printers (S6, S7, and S8) are similar, their connections are different. Due to their reversed orientation, failure of the fan is also less likely.
The axial fan at the front of the print head spins when one of the print cores is above 40 °C. This helps to prevent the heat from the nozzle from traveling too far upwards. Without this fan, the filament could get soft above the heater block, which leads to extrusion and print quality issues.
This fan could get blocked by small filament strands if not cleaned regularly, according to the maintenance schedules of the UltiMaker 3 and S series printers.
If the fan is not spinning, it is recommended to replace it before starting a new print. The following steps describe how to correctly replace the front axial fan.
Note: This guide applies to multiple printer models. Any differences between the UltiMaker 3 and S series print heads are highlighted in the instructions with an * and additional instructions.
Caution: Make sure the print cores have cooled down, the printer is turned off, and the power cable is disconnected before you start the replacement.
Requirements
| Part(s) | 1× Axial fan (available as part nr 80-227102) |
|---|
| Tool(s) | Hex 2 mm screwdriver, pliers (optional) |
|---|
| Time | 20 minutes |
|---|
Disassembly
First, remove the old fan from the print head. Take the following steps.
Tip: This repair can be done with the print head still mounted in the printer; this procedure is described and shown in the images below. If you want a little more space, you can remove the print head from the gantry by clicking the print head shafts out of the sliding blocks and taking the shafts out of the print head bearings. The print head is still attached with the Bowden tubes and print head cable, but you can handle it more easily.
 |  |
|
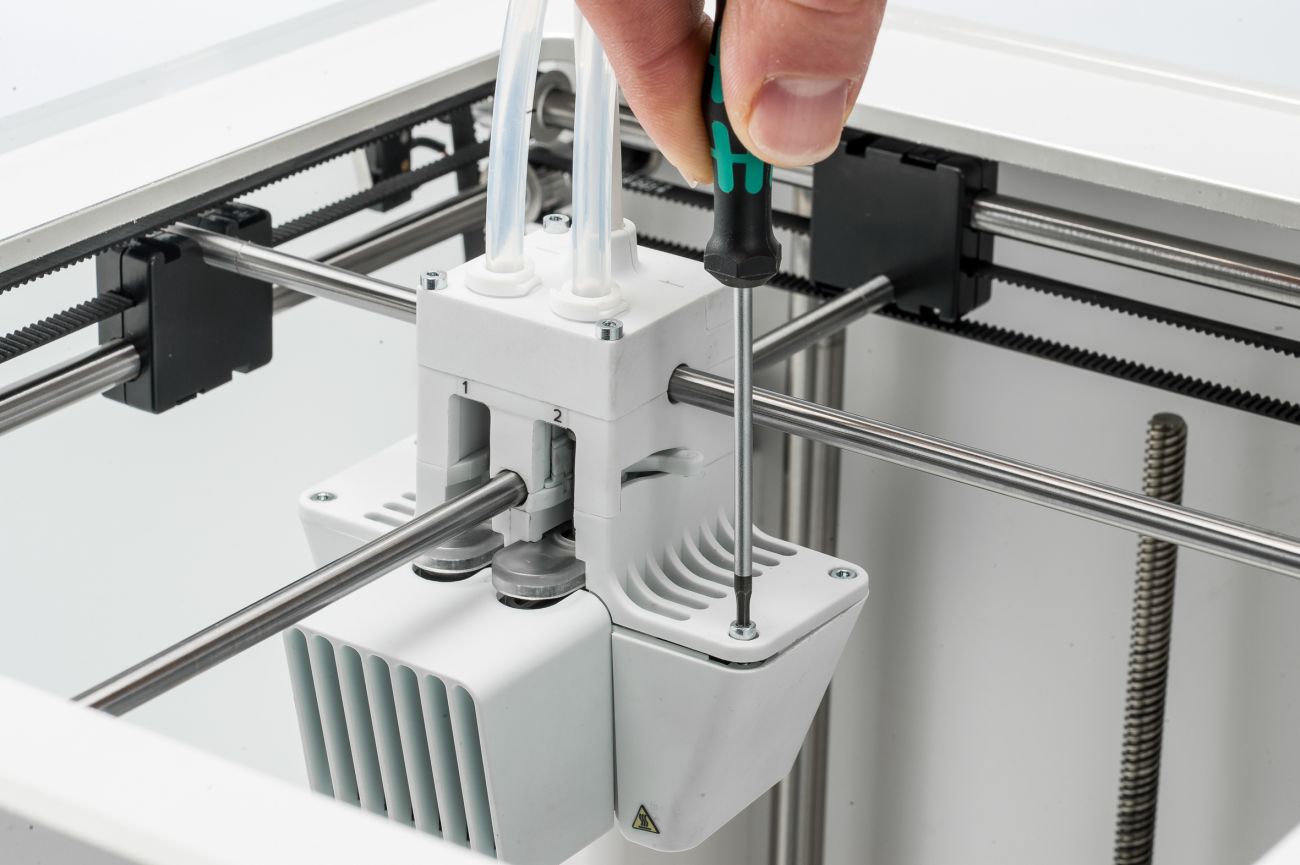
1. Loosen the side fan bracket
Place the print head in the middle of the printer for easier access. Use the Hex 2 screwdriver to remove the four screws that hold the side fan bracket.
|
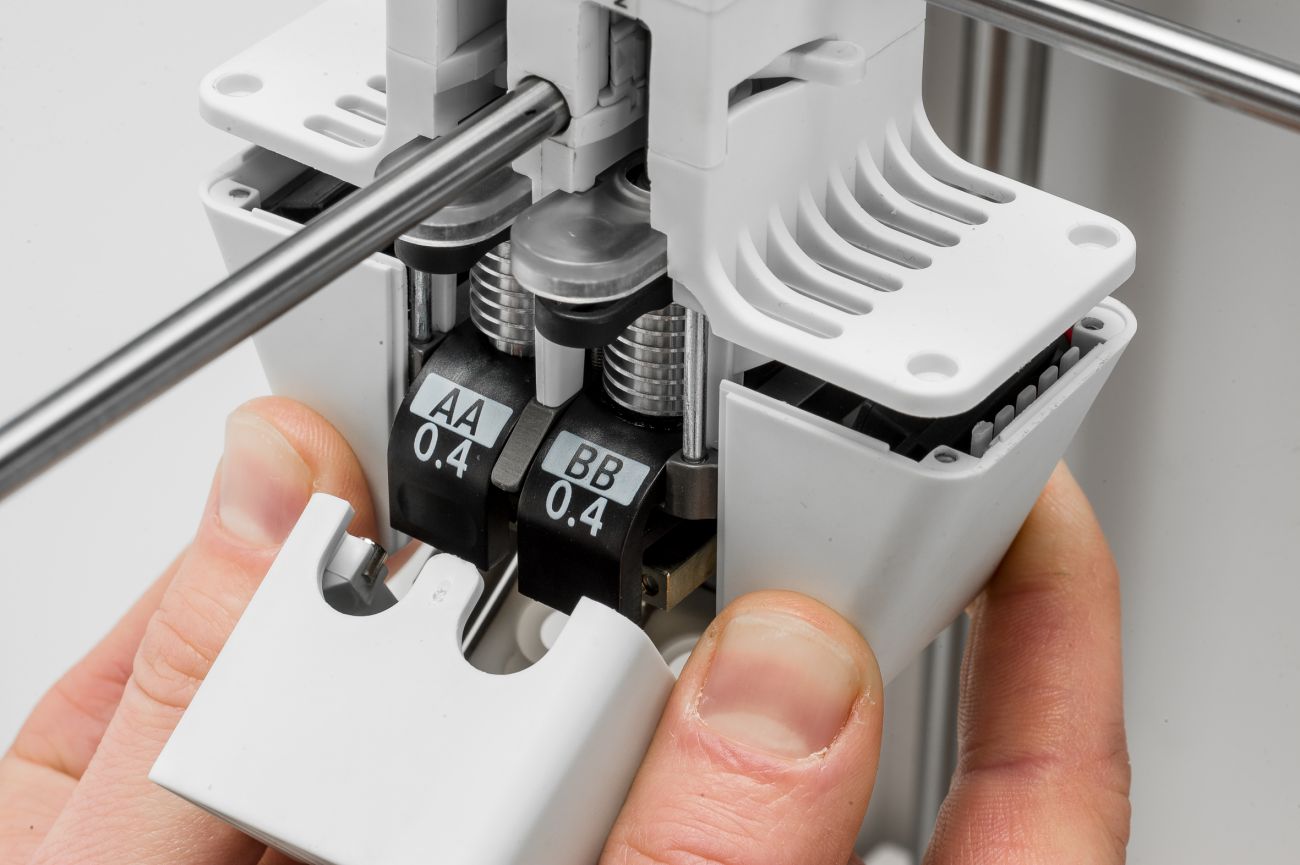
2. Move the fan bracket down
Slightly open the front fan bracket and move the front and side fan bracket assemblies down to create some room.
|
 |  |
|
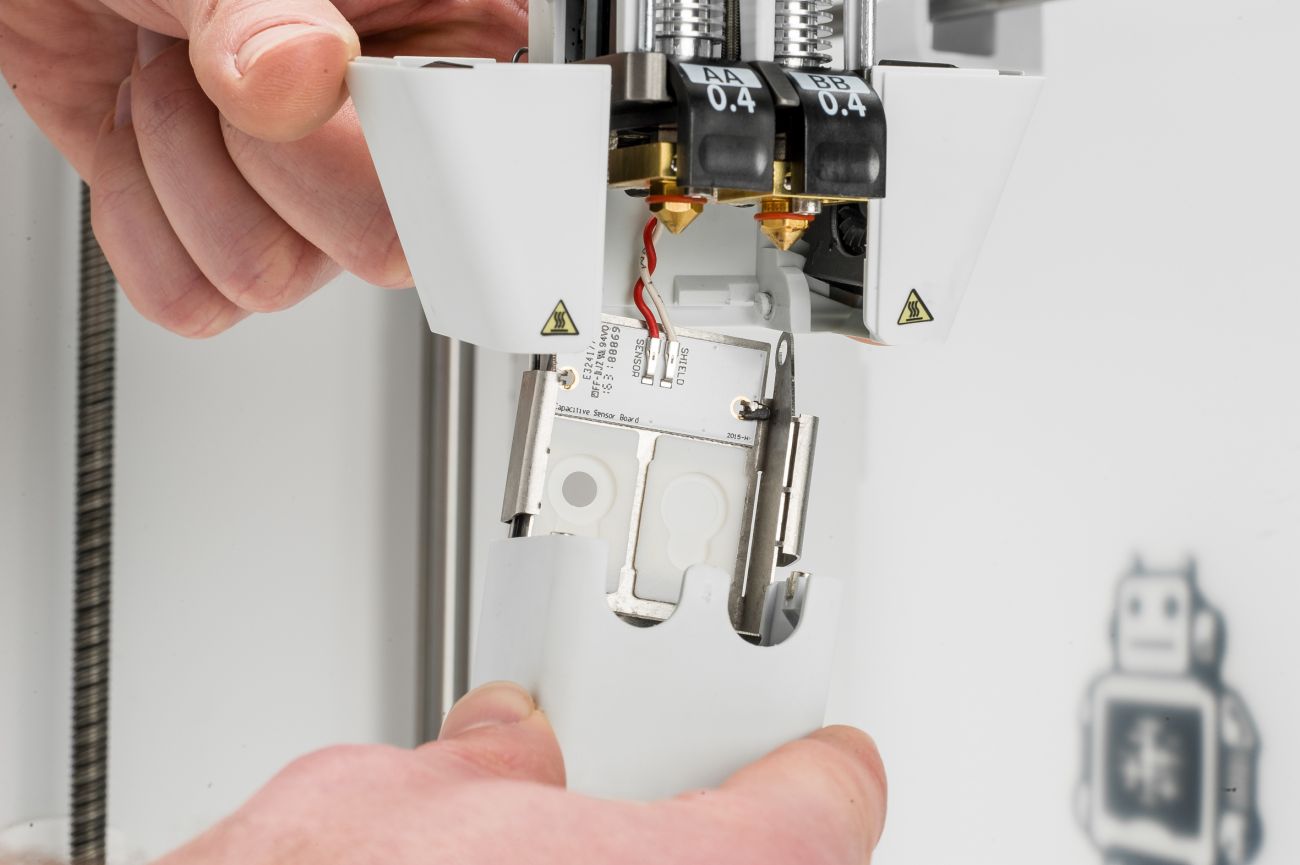
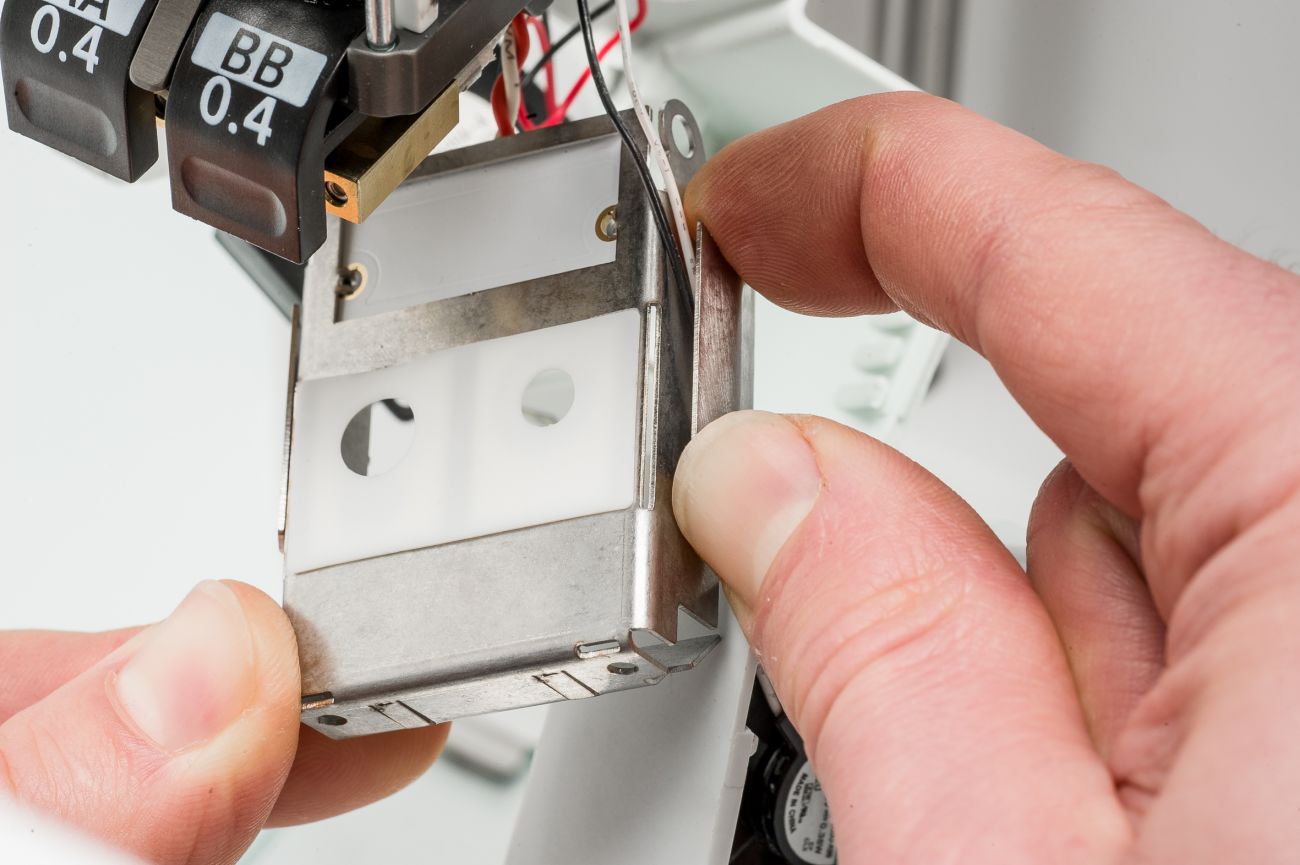
3. Loosen the front fan bracket
Slightly bend the side fan bracket open. Loosen the front fan bracket by dislodging the holes in the front fan bracket from the tabs in the side fan bracket.
|
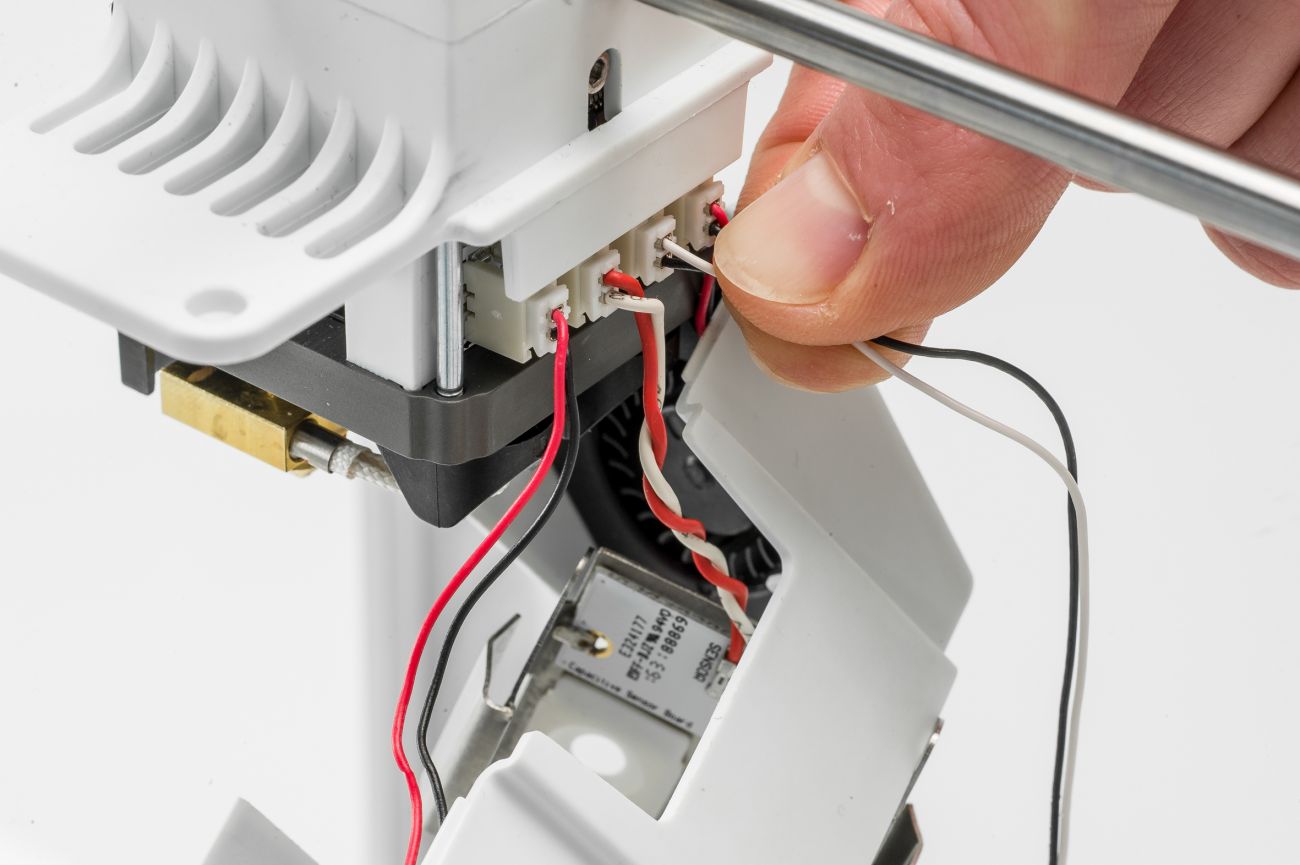
4. Disconnect the fan
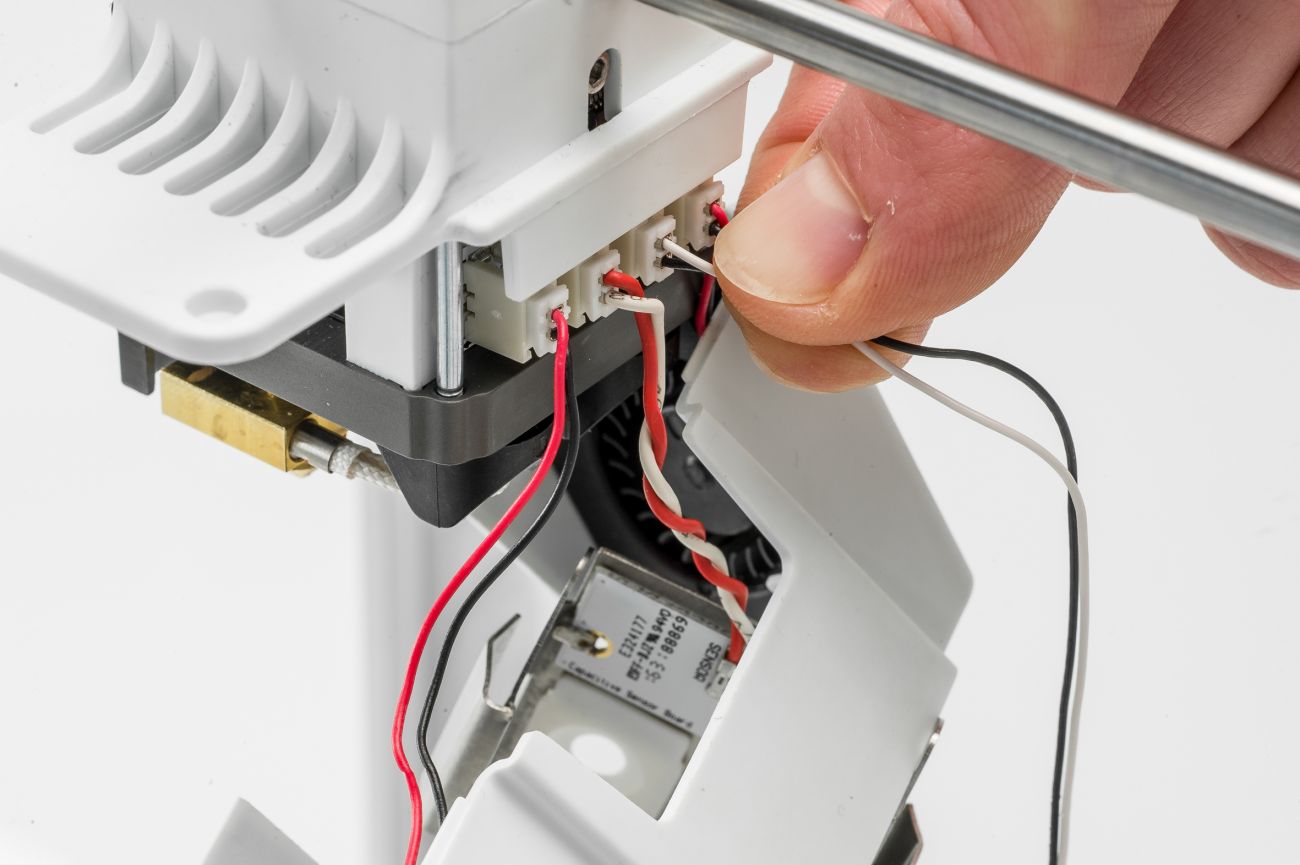
Disconnect the axial fan at the back of the print head. The front fan has black and white wires and is connected to the second connector from the right (as seen from the back).
|
|
Note: For the UltiMaker S3 and S5, as well as for the UltiMaker 3 print head with the transparent nozzle cover, it may be easier to remove the complete front bracket from the print head. This is because of how the fan wire is secured (see note below). Also disconnect the capacitive sensor wire (red/white) from the second connector from the left (as seen from the back).
|
 |  |
|
5. Loosen the front fan cover
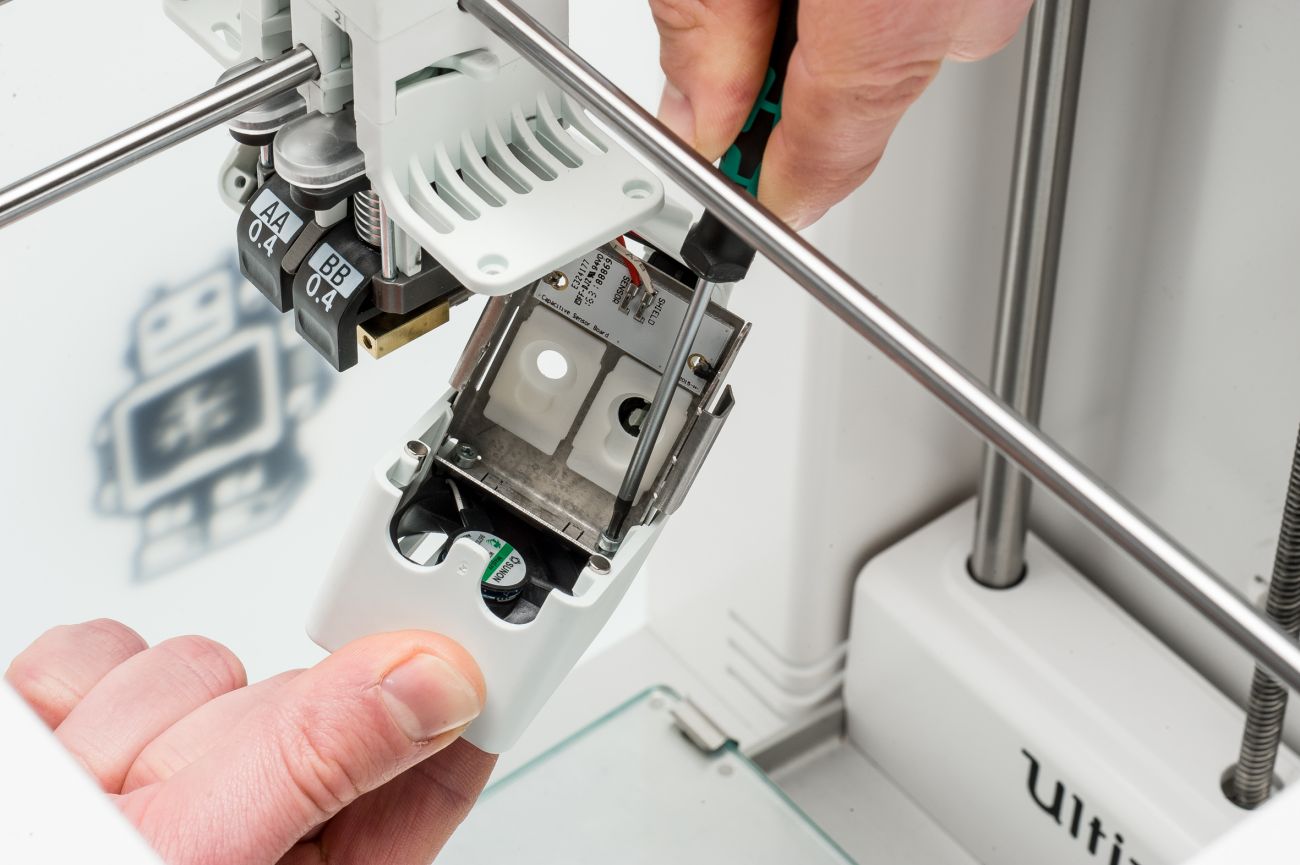
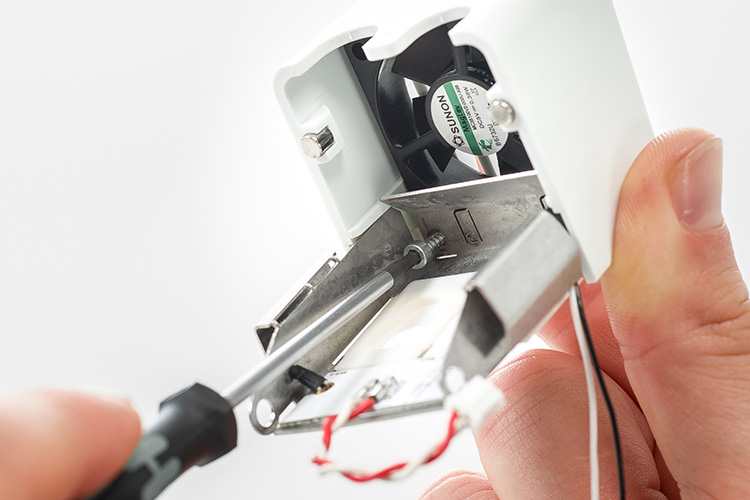
Put the side fan bracket out of the way. Use the Hex 2 screwdriver to remove the two screws that secure the metal bracket to the plastic front cover.
|
6. Remove the fan from the cover*
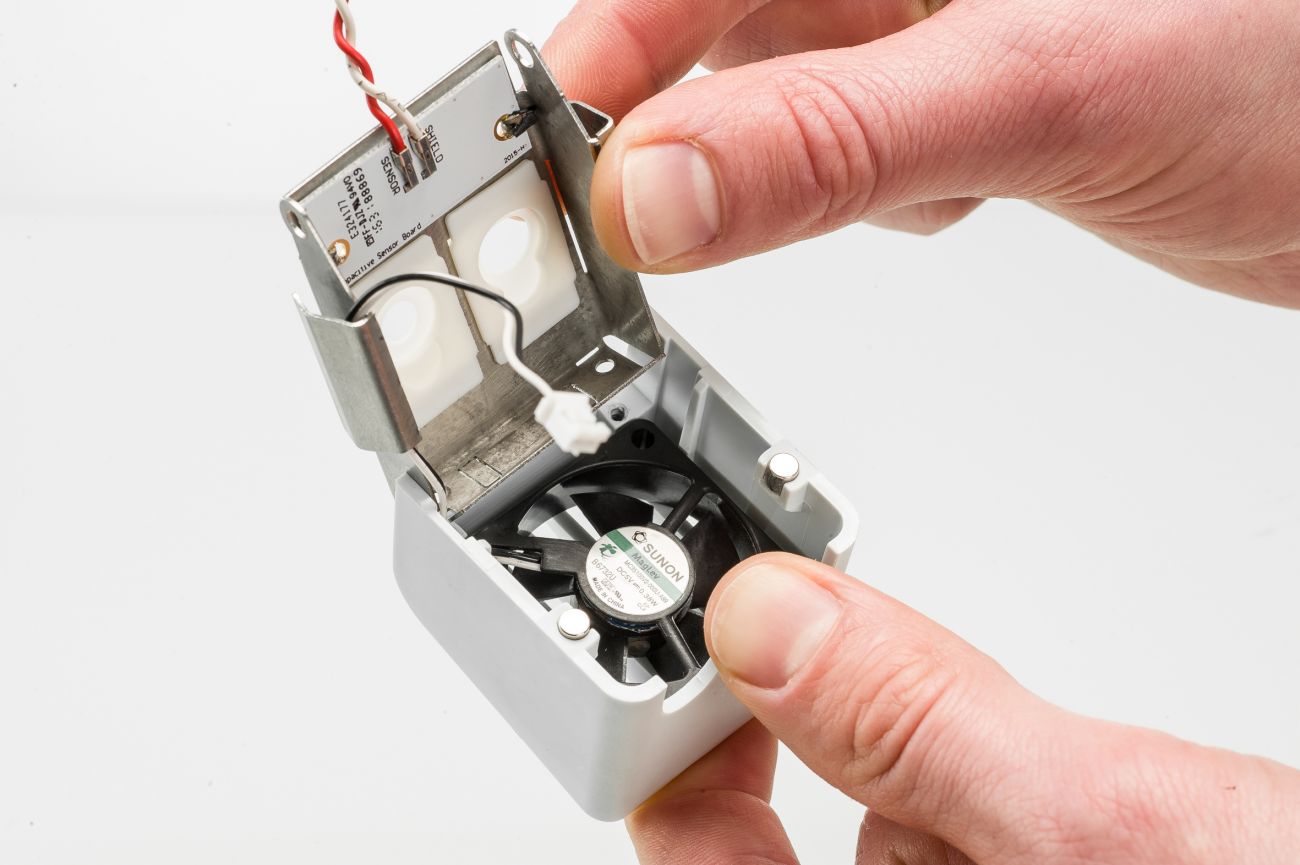
Carefully bend open the metal tab that covers the fan wires (open it only slightly). Move the fan wires out from underneath the tab and take the fan out of the cover.
|
|
Note: The images above show the (older) UltiMaker 3. The fan brackets for the newer UltiMaker 3 print head and S series are slightly different.
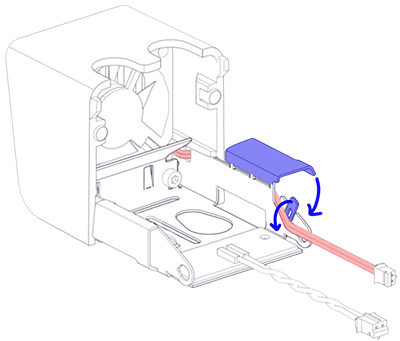
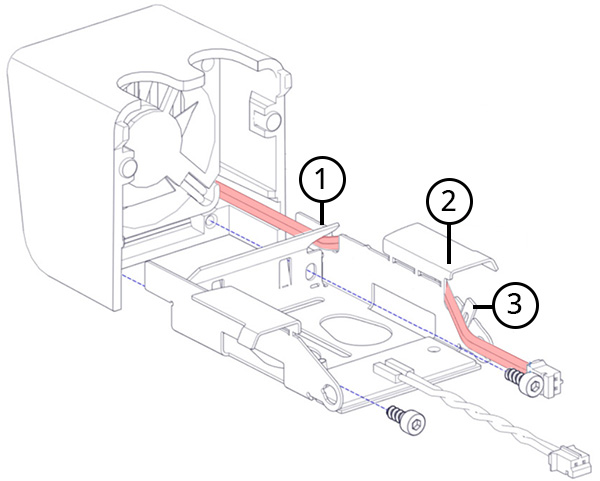
The front fan wire is secured under the side tab (similar to the photo above), as well as a smaller tab on the inside of the fan bracket.
Gently fold open both metal tabs, only as far as is needed to remove the wire. Use pliers, if needed, to open the small tab, and be extra careful not to damage the shrink sleeve that is around this smaller tab.
|  |
Reassembly
Follow the steps below to correctly install the replacement front fan.
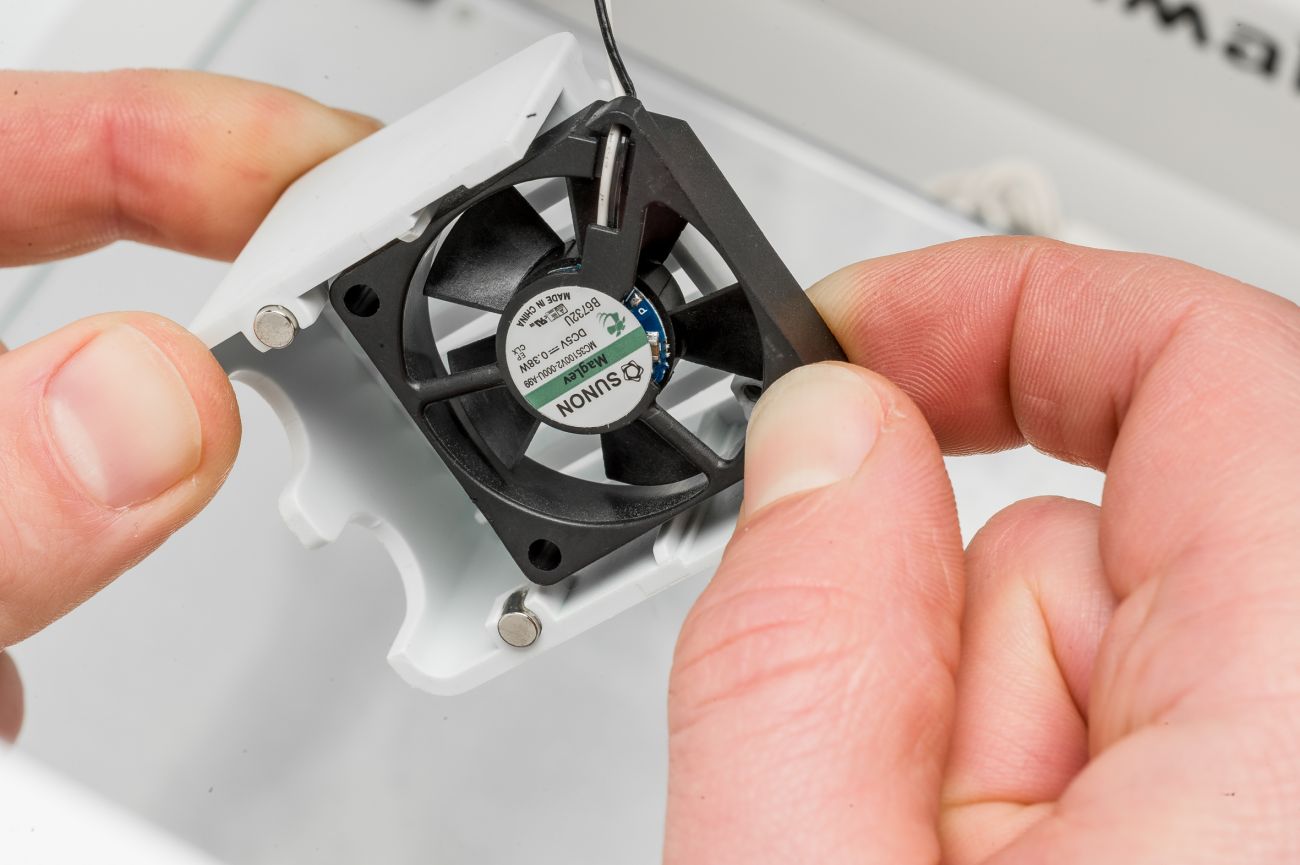
Tip: To install the fan in the original orientation, the sticker faces toward the inside of the print head. This way, the fan takes in air from the front and blows it at the print cores. To extend the fan's lifespan, you can also install it in the reverse orientation (sticker on the grille side). This way, the fan pulls air through the print head and blows it out the front. This still cools the print cores, but reduces the chance of filament strands getting stuck in the fan.
 |  |
|
1. Place the fan in the fan cover
Take the new fan and place it in the front fan cover. See the orientation note above. Ensure that the wire is on the left side (as shown), and that the fan sits completely flat in the cover.
|
2. Align the cover and bracket*
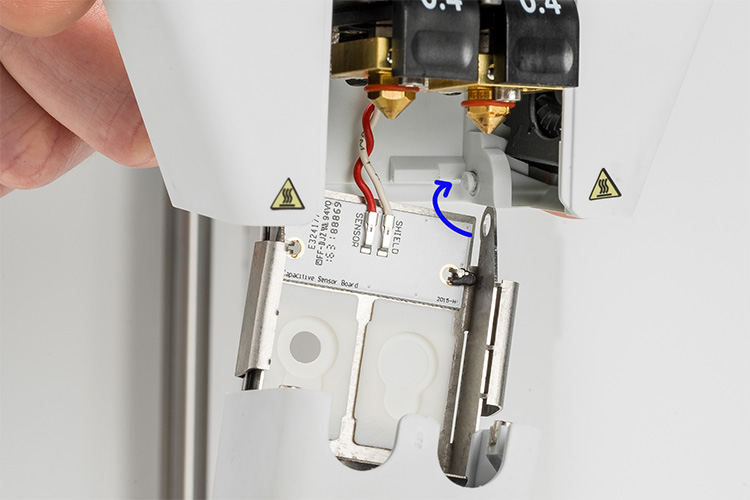
Bring the front cover with the fan and the metal bracket together. For the (older) UltiMaker 3, guide the fan wires on the outside (left) of the metal bracket, underneath the tab. For the newer UltiMaker 3 and S series print heads, see below.
|
 |
Fan wiring note:
For newer style UltiMaker 3 print heads (with transparent nozzle cover) and for S-line printers, pay special attention to the cable routing for the axial fan. The front fan bracket and the cable routing are slightly different.
- Make sure the fan's wires go on the inside of the tab closest to the fan, then through the opening.
- Guide the fan's wires through the tab at the side and press it shut.
- Secure the wire under the small tab next to the capacitive sensor board. This should have a small shrink sleeve around it to protect the wires.
|
 |  |
|
3. Secure the bracket and cover
First, ensure that the fan wiring is correct and the metal tab(s) is/are secure. If so, use the Hex 2 screwdriver and the M2.5×6 screws that you removed earlier to secure the metal bracket to the cover.
|
4. Connect the fan
Connect the black and white wires of the front fan to the connector at the back of the print head. The front fan goes into the second connector from the right (as seen from the back).
If you removed the complete bracket, also reconnect the capacitive sensor wires to the second connector from the left (as seen from the back).
|
 |  |
|
5. Attach the front to the side bracket
Slightly bend the side fan bracket open. Align the holes in the front fan bracket with the tabs in the side fan bracket and click it in place.
|
6. Check / place the side fans
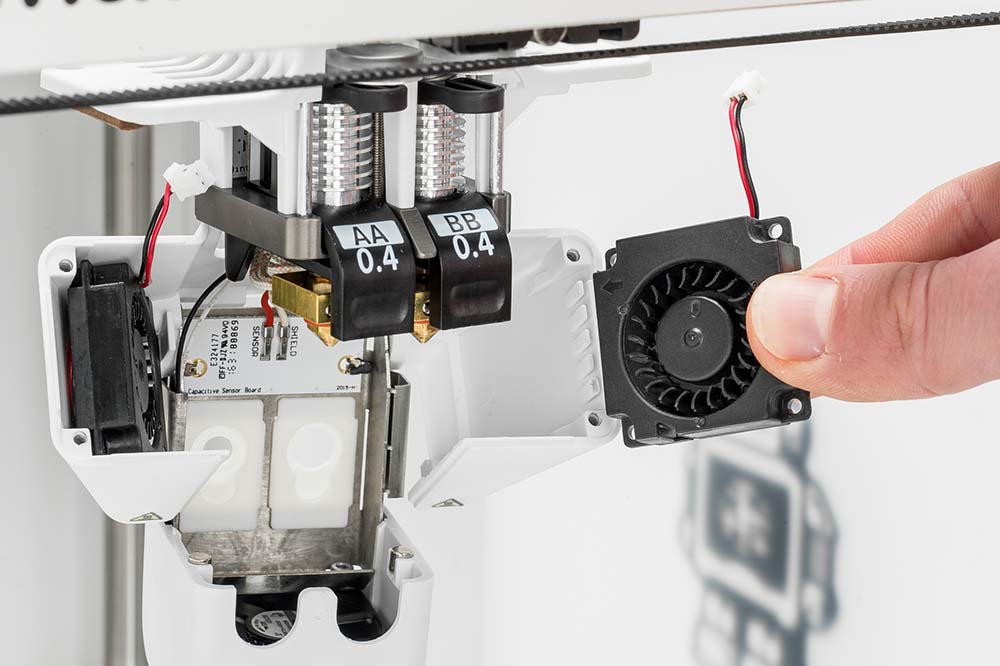
Ensure that the side fans are still correctly placed in the side fan bracket. If they have come out, place them back with the excess wire looped at the back. The fan should face to the inside of the print head, and the open side must be at the bottom (note the small arrow).
|
|  |
|
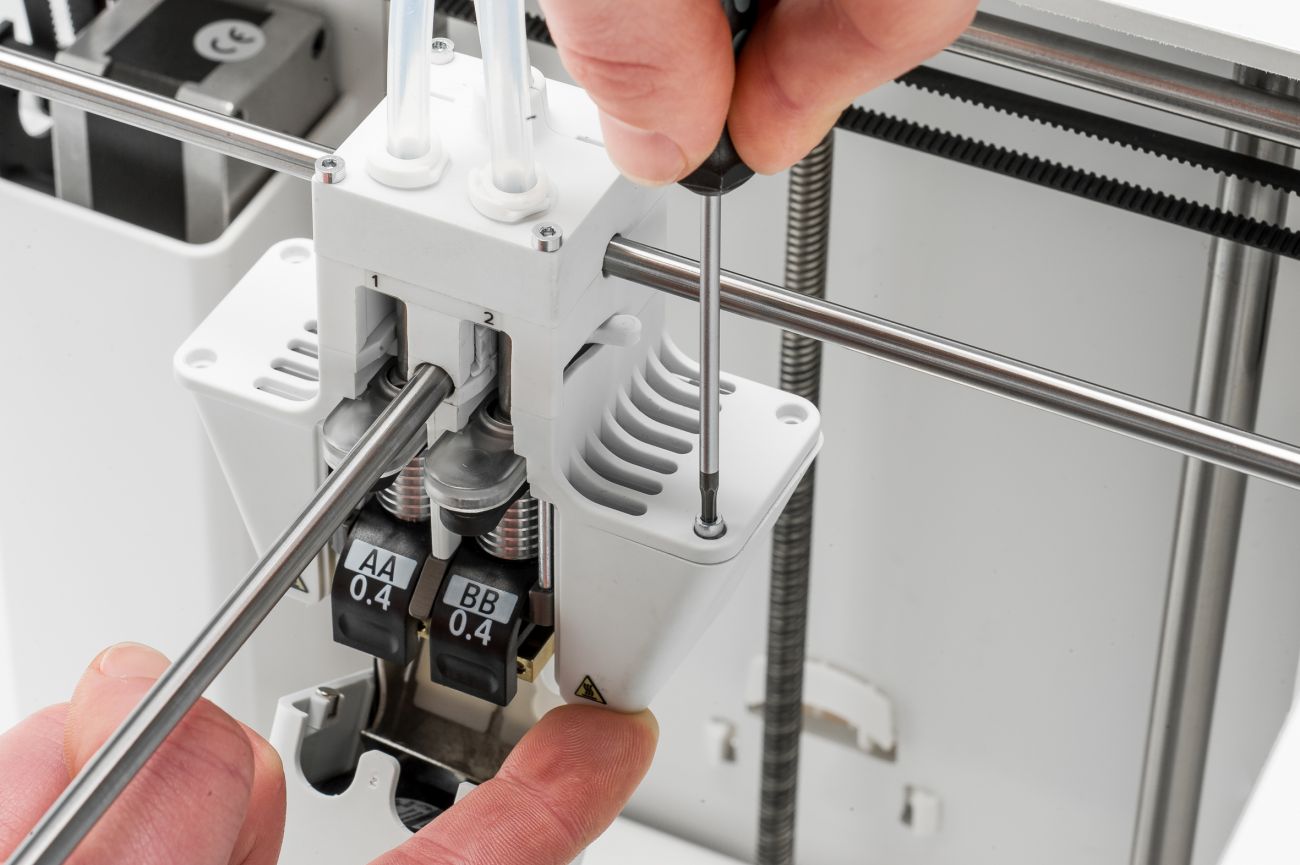
7. Align the side fan bracket
Move the side and front bracket up to align it with the header bracket. Ensure that all wires are correctly placed at the back before fully pushing the side bracket up into position, to prevent wires from getting pinched.
|
8. Secure the side fan bracket
If the bracket is correctly placed, insert the four M2.5×6 screws from the top through the header bracket. Use the Hex 2 screwdriver to secure them. Again, ensure that no wires have gotten stuck or pinched between the parts.
|
Finished!
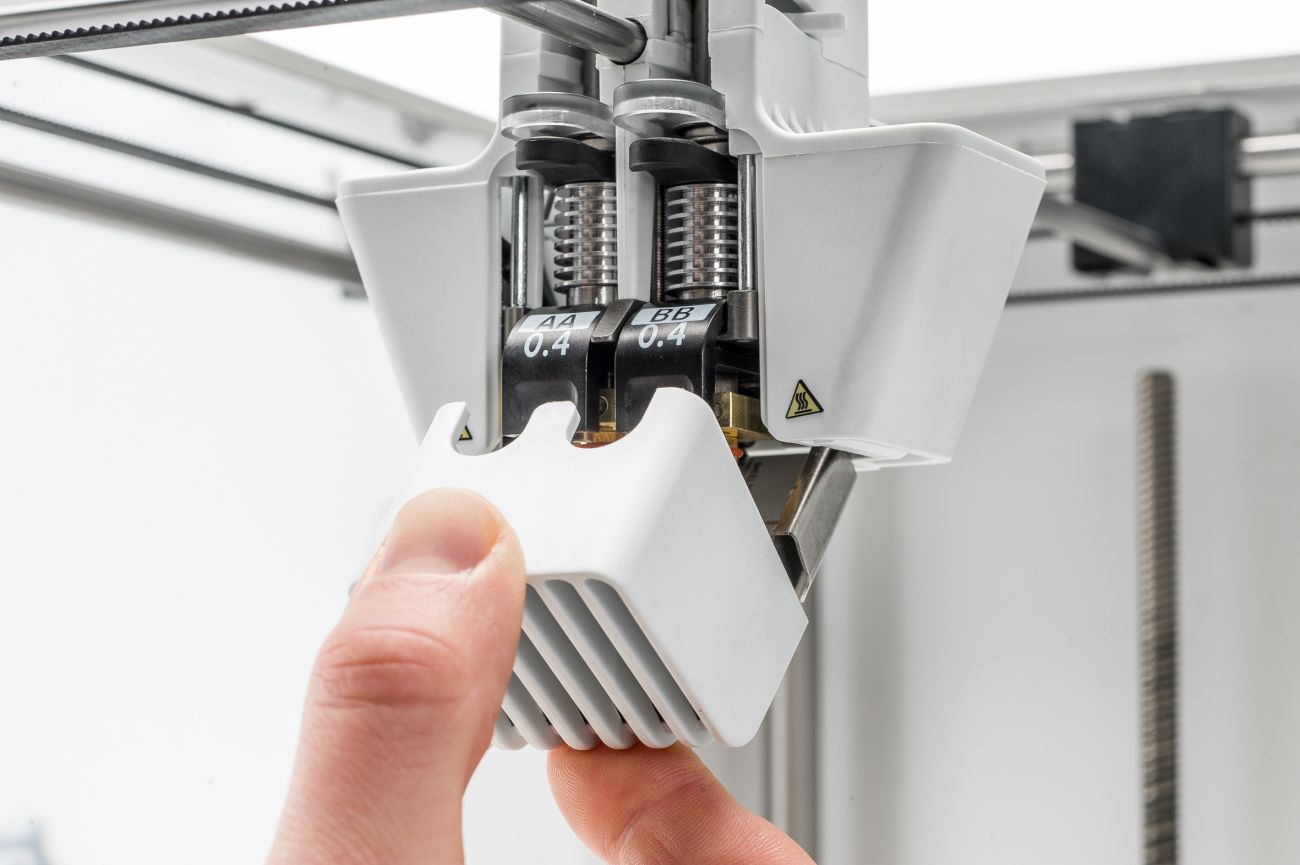
You can now close the front bracket again.
Tip: Before you turn on the printer and resume operation, check that the front bracket opens and closes smoothly, it is properly aligned, and it stays firmly shut. If not, you may need to relocate some wires or fix the connection to the side fan bracket.
Download PDF version
UM3 - Repair manual - Axial fan.pdf


