This article describes the various build plate adhesion settings in UltiMaker Cura. These settings are available when opening the Custom mode.
Most materials benefit from cooling during printing. This ensures that the new line of extruded material retains its shape. However, for other materials, too much cooling can cause layer-bonding issues and excessive shrinkage. Cura contains preset profiles for many materials, but cooling settings can be tweaked as necessary.
Enable print cooling
With this setting, you can enable or disable the print head fan(s) during printing. The print head fans ensure that the material is cooled properly before the next layer is printed. For layers with a short layer time, and those with bridges or overhangs, cooling will increase the print quality.
Fan speed
When the print head fans are enabled, you can adjust certain parameters. One of these is the fan speed – the speed at which the fans spin. A higher speed allows for better cooling and reduces oozing, but can also increase the shrinkage of the material. This is why the speed may be different for different materials. The preset material profiles on the UltiMaker already contain the default values for UltiMaker materials.
This setting is divided into the following parameters:
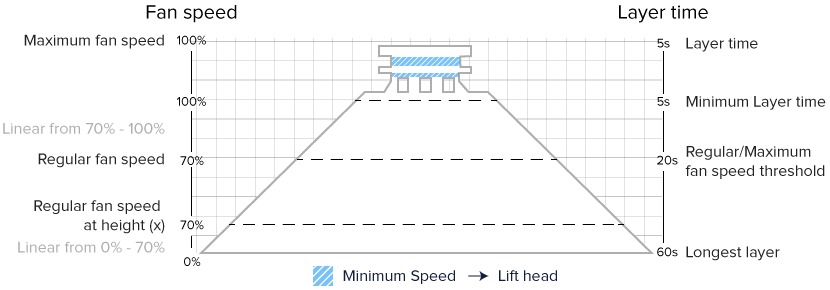
- Regular fan speed: The speed at which the fan spins before hitting a threshold. When a layer prints faster than the threshold, the speed gradually increases towards the maximum fan speed.
- Maximum fan speed: The speed at which the fan spins on the minimum layer time. The fan speed gradually increases from the regular fan speed to the maximum fan speed after the threshold is hit.
The image below depicts an overview of common cooling settings combinations, projected onto a pyramid model:
Regular/maximum fan speed threshold
This setting defines the layer time at which the fan will switch between regular fan speed and maximum fan speed. Layers that take longer to print than this time use the regular fan speed. For faster layers, the fan speed gradually increases towards the maximum fan speed.
Initial fan speed
This controls the fan speed on the initial layer only, which adheres to the build plate. This fan speed is often lower to prevent too much cooling of the printed layer and build plate, and a lower setting (or even 0%) will improve build plate adhesion. After this initial layer, the speed then increases to the regular fan speed, which is achieved once it reaches the height setting for the regular fan speed.
Regular fan speed at height / layer
This is the height at which the fans will have increased to full speed. In the layers below, the fan speed will gradually increase from the initial fan speed to the regular fan speed.
It is also possible to change this parameter by adjusting the layer number at which the fans should be at full speed.
Using a higher value increases the adhesion to the bed, but can also lead to oozing and a reduced print quality. Printing with the fans on full from a height of 0.5 mm is usually sufficient, but this depends on the material, the layer height, and the initial layer height.
Minimum layer time
The minimum layer time determines the time it should take to print one layer. If a layer would normally take less time than the set value, the printer slows down, so that the minimum layer time is reached. This allows the printed material to cool down properly before printing the next layer.
Lower values will decrease the print time, especially for smaller and more detailed objects with short layers, but can also decrease the print quality due to deformation of the material.
Minimum speed
This is the minimum speed at which the printer is forced to print, despite slowing down to the minimum layer time. When the printer slows down too much, the pressure in the nozzle is too low which results in a bad print quality.
For example, if a minimum layer time of 5 seconds requires the printer to print at a speed of 8 mm/s, it will only do that if at least 8 mm/s is set as the minimum speed. If the minimum speed is set at 10 mm/s, this means that the printer will not print slower than 10 mm/s and that the layer time will change accordingly, and would then be shorter than 5 seconds.
Lift head
By enabling this setting, you allow the print head to move away from the print during printing, while at the minimum speed, but when it has not yet reached the minimum layer time. The print head will wait until the minimum layer time has passed and will then move back to the print to continue. This gives the printed material enough time to cool down while at the minimum speed.
Small layer printing temperature
This setting gradually reduces the printing temperature while printing at lower speeds due to the minimum layer time.
Tip: Continue learning about all UltiMaker Cura custom settings. The next section is Support.


