This article describes the various material settings in UltiMaker Cura. These settings are available when opening the Custom mode.
The material settings include various parameters that control how the material will be printed. These settings can vary a lot for each type of filament, due to the different material properties. Many of the settings in this category relate to temperature, as this is one of the most important factors for the printability of the material.
Tip: These settings will automatically be updated in the preset profiles when a different material type and/or profile is selected.
Note: Depending on your printer type, available features, and number of extruders, not all settings might be visible to you.
Build Volume Temperature
Some printers include control loops in the build volume that can monitor the internal build volume temperature, or, in some cases, even heat up the air in the build volume. For the printers that support this, the setting Build Volume Temperature sets a target or maximum value for the internal air temperature.
Note: For printers that do not have build volume heaters or sensors, this setting will not be visible.
Some materials may benefit from a higher build volume temperature. Because the transition between the nozzle temperature and the surrounding air after printing is smaller, the material cools down at a lower rate. This reduces sudden shrinkage which could lead to warping. Additionally, this will increase layer bonding as it anneals the plastic, leading to stronger prints especially if the material is crystalline. Certain high-temperature materials, such as polyoxymethylene (POM), a warm build volume is essential for successful printing.
Higher build volume temperatures will reduce the effectiveness of the model cooling fans. This reduces overhang quality and causes sagging.
Caution: Always take the limitations of your printer and the selected material into account. Printing with a too high build volume temperature may cause print failure and/or damage to the printer. For UltiMaker printers, such as S series and Factor 4, hard limits are implemented in Cura, which cannot be overruled.
Default Printing Temperature
This is the printing temperature of the selected material. It is part of the material properties which can be found in the material manager (in the Preferences overview). This setting is not normally visible in the print settings, but can be changed in the material manager.
The actual printing temperatures throughout the print will be calculated based on this setting and additional extrusion parameters at various stages in the printing process.
Printing Temperature
This refers to the temperature of the nozzle while printing. The printing temperature is one of the most influential settings because it affects how the material behaves during printing. Even a small difference in temperature can have a large effect on how the plastic flows. The Printing Temperature setting controls the underlying settings (Printing Temperature Initial Layer, Initial Printing Temperature, and Final Printing Temperature), but these can also be adjusted separately (see below).
All filament types have a specified temperature range, rather than just one fixed recommended temperature value. This is because many profile settings have an effect on what the optimal extrusion temperature should be.
Tip: When using a material that is not preset in Cura or available in the Marketplace, you can usually find the recommended printing temperatures on the box and/or in the technical data sheet.
Increasing the temperature generally makes thermoplastics more fluid. This allows the printer to extrude material faster, because the internal friction is lowered. When printing with thicker layers, wide lines, a high flow rate, or high speeds, the temperature needs to be toward the higher end of the recommended temperature range. However, hotter printing also makes the material harder to cool, so this causes overhang to sag more (requiring more support) and causes more stringing.
With lower temperatures, the material can be more accurately controlled. The outer surfaces of the print, and especially overhangs will look better because the filament flows and sags less. If the printing temperature is too low (in general, or for the selected settings), this can cause the material to skip in the feeder, or the feeder will start grinding into the material. In both cases, this will lead to under-extrusion. Additionally, lower printing temperatures lead to weaker bonds between the lines of filament that are deposited, both horizontally and vertically.
Caution: Setting the temperature too high causes the material to degrade while printing. This can clog your nozzle and potentially damage your printer. Additionally, some materials may release dangerous gases if they degrade. Always stay within the recommended temperature range and consult the safety and technical data sheets for more information.
Printing Temperature Initial Layer
This is the printing temperature of the first layer of the print, that adheres to the build plate. Printing the first layer at a slightly higher temperature increases the adhesion between the build plate and the model. Because the material flows more at higher temperatures, this slightly increases the contact area. This will reduce warping.
Initial Printing Temperature
This setting is only used in dual extrusion machines. In dual extrusion prints, the active extruder is at the Printing Temperature while the inactive extruder is at the Standby Temperature (set in the material properties). When the extruders switch, one will cool down while the other heats up. As the idle (soon to be active) extruder heats up, it will increase the temperature to the Initial Printing Temperature. This is slightly lower than the Printing Temperature. This speeds up the heating and switching process and reduces oozing during the extruder switch.
Final Printing Temperature
This setting is only used in dual extrusion machines. When switching nozzles, the nozzle that becomes inactive has to cool down. Just before the nozzle switch, the nozzle is allowed to cool down to this temperature while continuing to extrude. It will start cooling down at such a moment that the nozzle is expected to reach the Final Printing Temperature exactly when the extruder switch happens. After that, it will continue cooling down towards the Standby Temperature. This reduces oozing during the switch and when in standby mode.
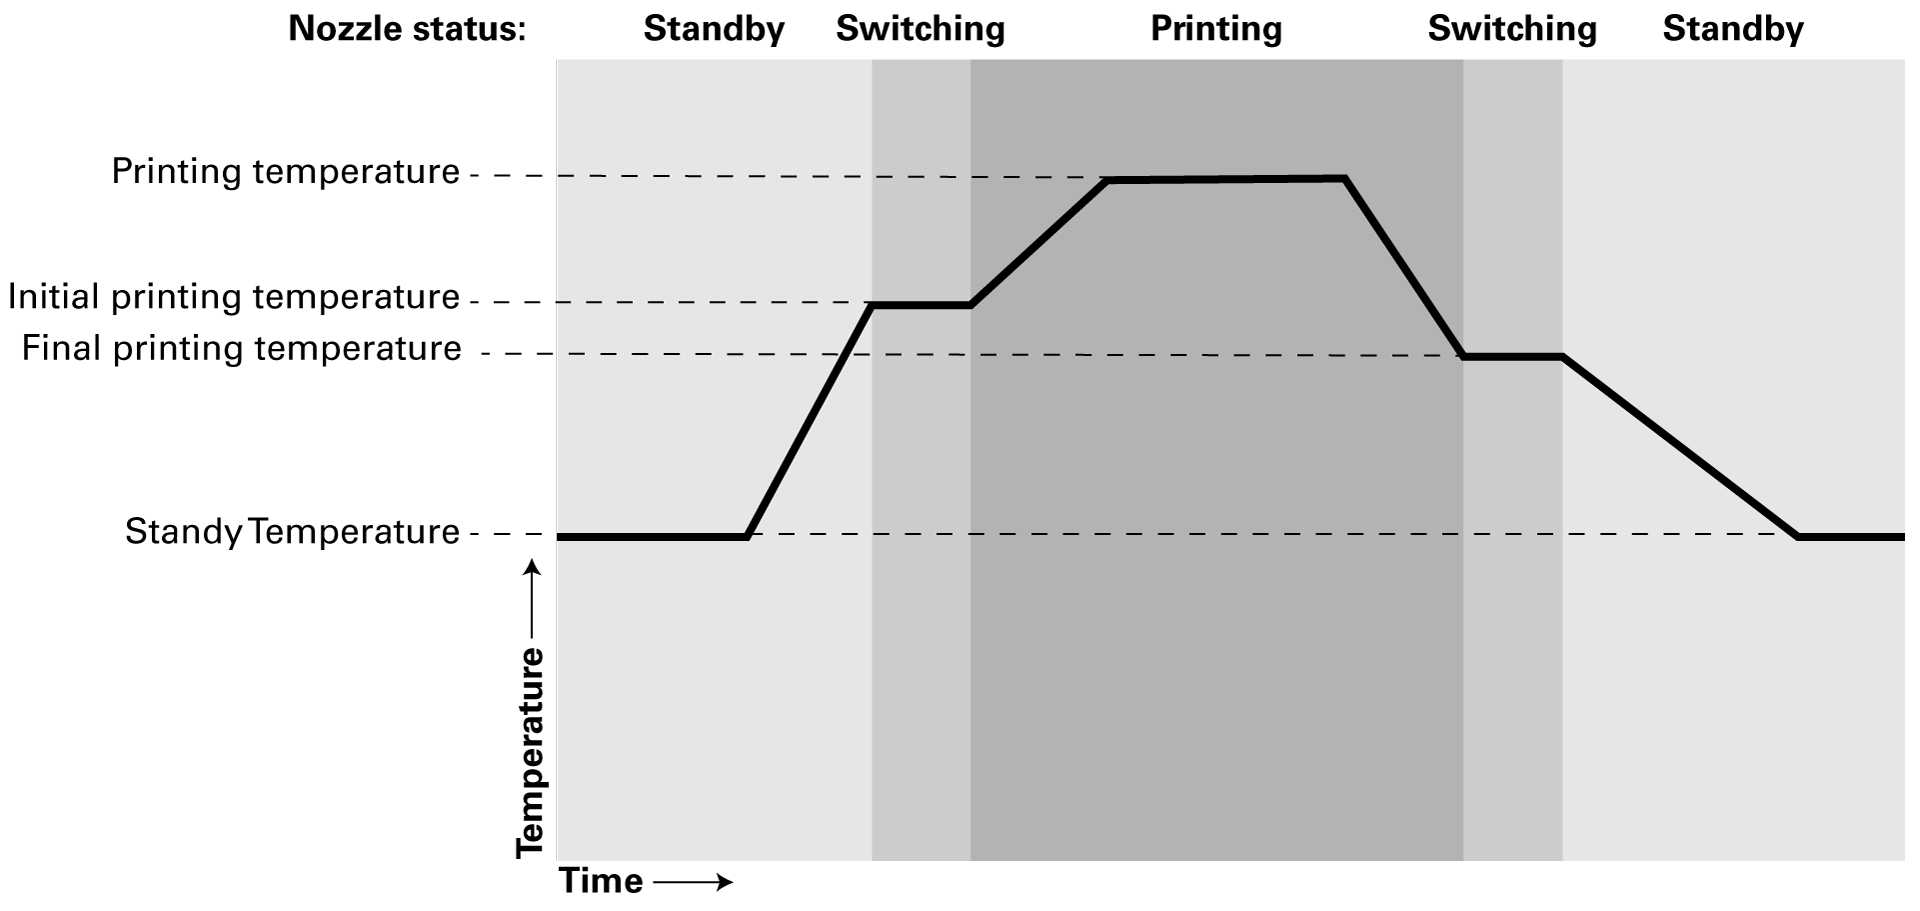
Image above: This shows the various temperatures in the nozzle before and after extruder switches. From the standby temperature, the nozzle heats to the initial printing temperature just before the switch. During printing, it heats up further to the printing temperature. Just before becoming inactive, it cools down to the final printing temperature, which it has reached during the switch. It will then cool down further to the standby temperature.
Extrusion Cool Down Speed Modifier
This setting indicates how fast the nozzle cools down when extruding and is compensated by this value.
When the material is heated up inside the nozzle chamber, this takes away heat from the nozzle. Extruding material faster tends to drop the temperature more. If the sensor probe is not exactly at the tip of the nozzle, this causes the nozzle to have a slightly lower temperature while extruding material than when idle; even with a good PID controller. This setting describes how much heat is lost in the nozzle while printing. The extra heat lost by extruding will then be compensated for by increasing the desired printing temperature from the g-code. The setting's value depends on the nozzle design, the heat capacity of the printed material, and the extrusion rate.
Default Build Plate Temperature
This is the preferred build plate temperature for the selected material. It is part of the material properties which can be found in the material manager (in the Preferences overview). This setting is not normally visible in the print settings, but can be changed in the material manager.
The actual build plate temperatures throughout the print might be different based on the printer properties and selected profiles. When printing with multiple different materials, the highest of the build plate temperatures will be selected.
Build Plate Temperature
If your selected printer has a heated build plate, this setting controls the temperature of the plate during printing. This setting is based on the Default Build Plate Temperature as set in the material manager and the selected profile.
A heated build plate significantly improves adhesion for most materials. The ideal temperature for the build plate is usually around the 'glass transition temperature' (Tg) of the selected material. At this temperature, the material is not completely hard and solid. It keeps the printed material of the first layers warm and somewhat sticky. This prevents significant shrinkage and warping of the material.
However, if the build plate is kept too hot, the print will be very fluid where it touches the build plate. This causes the material to sag a bit, causing elephant's foot on the bottom side of the print. This can be compensated for with the Initial Layer Horizontal Expansion setting, but affects dimensional accuracy. Heating the build plate will also create a temperature difference between the material which is resting on the build plate and the material higher up in the model, which can cause some deformation when the material in the higher parts of the model shrinks.
Note: If this setting is set to 0°, Cura will not output any commands to change the build plate's temperature, as the room temperature will be higher than 0°.
Build Plate Temperature Initial Layer
This is the temperature of the build plate when printing the first layer. A slightly warmer build plate during the layer reduces the chance of warping as the heat from the printed material dissipates quicker through the build plate than through the surrounding air. After the first layer is completed, the build plate temperature will be adjusted to its normal setting. However, note that if there are big differences between the two temperatures, it may take a while for the temperature to reach its new target value.
Scaling Factor Shrinkage Compensation
This setting takes into account the dimensions your 3D model will have after printing and cooling of the 3D printed material. This allows dimensions to come even closer to the expected final result. As materials have different shrinkage factors, the values here depend on the material loaded in your 3D printer.
This setting effectively scales the model automatically before slicing. The aim is to compensate for any shrinkage that happens when the print cools down to room temperature. By making the print slightly bigger than desirable, the final result could be more accurate to the original dimensions of the input model. This scaling factor is applied equally to all dimensions (X, Y, and Z).
A factor of 100% will not cause any scaling. A scaling factor of slightly more than 100% is appropriate for many materials, such as PLA or PETG. A scaling factor of less than 100% prints the model smaller than its actual dimensions, which would increase shrinkage.
Tip: Cura will indicate the scaling factor around the footprint of the model. This helps to prevent placing objects too close to each other, to the prime tower, or to the edge of the available build plate area.
This setting has two sub-options:
- Horizontal Scaling Factor Shrinkage Compensation. This scaling factor is only applied to the X and Y directions. Typically, horizontal shrinkage is greater than vertical shrinkage because the lines are printed horizontally. This means that is where the internal stresses are greater. The horizontal factor can be slightly higher than the vertical scaling factor.
- Vertical Scaling Factor Shrinkage Compensation. This scaling factor is only applied to the Z direction. The vertical shrinkage is usually a lot less than horizontally because there is less vertical stress. The only shrinkage is of the material itself, which is usually almost negligible.
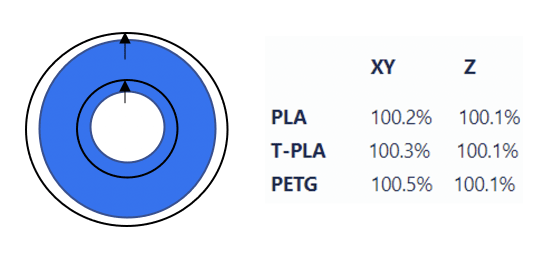
Image above: This shows an example of scaling factors applied horizontally and vertically for several materials.
Tip: The scaling factor is linked for all extruders. In dual-extrusion prints using different material types, the scaling factor will be set to the average value of the two materials.
Flow
The flow is the amount of material that needs to be extruded over a specific amount of time and is based on the filament diameter and print speed. Adjusting the flow directly adjusts how much material is placed down. Normally, the amount of material is calculated by Cura such that the material would fill the exact space in the line's width, height, and length, but this can be adjusted using the flow settings.
This setting can be used to compensate for under- or over-extrusion, filament slip, or variance in filament diameter. However, note that it is almost always better to resolve the actual problem rather than to apply changes in the flow settings. This is only a temporary fix and may not provide the desired print quality.
The Flow setting has the following sub-settings:
- Wall flow. This could improve problems with extrusion or dimensional accuracy, although in these cases it is better to optimize wall thickness or line widths or change the wall printing order. The Wall Flow can be adjusted separately for the Outer Walls and Inner Walls.
- Top/Bottom Flow. This can be adjusted to increase watertightness or improve the quality of top and bottom surfaces.
- Top Surface Skin Flow. Adjusts the flow during only the top surfaces of the model. This can help to resolve extrusion problems or make the top surface smoother.
- Infill Flow. The infill flow can be increased to make it stronger, or to compensate for flow losses to to infill pattern crossings. A better alternative is to change the infill pattern or apply a multiplier.
- Skirt/Brim Flow. Increasing the flow for the build plate adhesion helpers can make the model stick better, but over-extrusion could cause the nozzle to bump against the brim during the second layer.
- Prime Tower Flow. Increasing the flow for the prime tower can speed up the prime process and reduce the number of perimeters, but it can also cause blobs due to over-extrusion.
Initial Layer Flow
Like the other flow settings, this controls the amount of material deposited as a factor based on the line's width, height, and length, but only for the very first layer of the print. This can be adjusted to improve adhesion and to compensate for any inaccuracies in the build plate leveling. If the build plate is too close to the nozzle during the first layer, the flow can be decreased to prevent over-extrusion. If the build plate is too far away, increase the flow to ensure enough material is deposited for proper adhesion.
Note: In case of build plate leveling inaccuracies, it is always better to adjust the position of the build plate (if possible) instead of adjusting the flow rate.
Standby Temperature
This setting is only used in dual extrusion machines. If both extruders are used in the print, the inactive extruder will cool down to this standby temperature while it is not in use. This refers to the temperature of the nozzle when it is in standby mode, while the active nozzle is printing. The Standby Temperature is low enough to prevent oozing and protect the filament from degrading or clogging (even during long standby periods), but it should be high enough to quickly continue printing after an extruder switch.
Tip: This setting is visible and can be adjusted for individual prints in the Custom Print Settings, but it is also part of the material properties in the material manager.
Gradual Flow
When enabled, the flow is gradually increased/decreased to the target flow. This is useful for printers with a Bowden tube where the flow is not immediately changed when the extruder motor starts or stops. the Gradual Flow setting include Gradual Flow Max Acceleration and Initial Layer Max Flow Acceleration (both in mm3/s2) and Gradual Flow Discretisation Step Size (in s).
Tip: Continue learning about all UltiMaker Cura custom settings. The next section is Speed.


