Note: Creating a custom material profile is more complicated than it might seem at first. We advise reading the workflow described below very carefully.
A material profile contains a lot of information, which is not easy to (fully) configure from the front-end user interface that Ultimaker Cura offers. The following information is stored in a profile:
- Which printers (and print cores) are compatible with the material.
- Which print profiles should be available for this material.
- Which other materials are compatible to use in combination.
- Which additional (hidden) parameters affect printer functionality, such as leveling the build plate, (de)priming the nozzle, or performing a print core calibration.
Tip: Material profiles created via the workflow below are correctly recognized by the UltiMaker S series printers and the Material Station.
Which material to choose
Depending on your situation, the 'generic material profiles' do not match exactly. Here are two examples that help you identify the correct material to choose.
- Example A: The material you have physically is 'ASA'. There is not 'ASA' profile available. As this material comes closest to ABS, we choose the 'Custom_ABS' profile and adjust the printing settings later.
- Example B: The material you have physically is 'Lightweight PLA'. Although it prints at just 190 °C, the main component is PLA. Therefore, we choose the 'Custom_PLA' profile and adjust the printing temperature later.
Import a 'clean' base profile
Please download the material profiles attached in step 1 below. It contains all material types and configuration information that Ultimaker Cura needs to operate the custom material, as well as the information the Ultimaker printers need to perform various actions.
- Download the material base profiles and unzip the folder on your computer.
- In Ultimaker Cura, go to Preferences → Materials and select import.
- Select the material type from the available files that matches yours closest. See the section Which material to choose above.
- After importing, the material will be visible in the list of available materials, ready to edit.

Edit the profile to match your specific material
The material settings you have to provide are often easily accessible from the packaging of the filament or the website of the manufacturer.
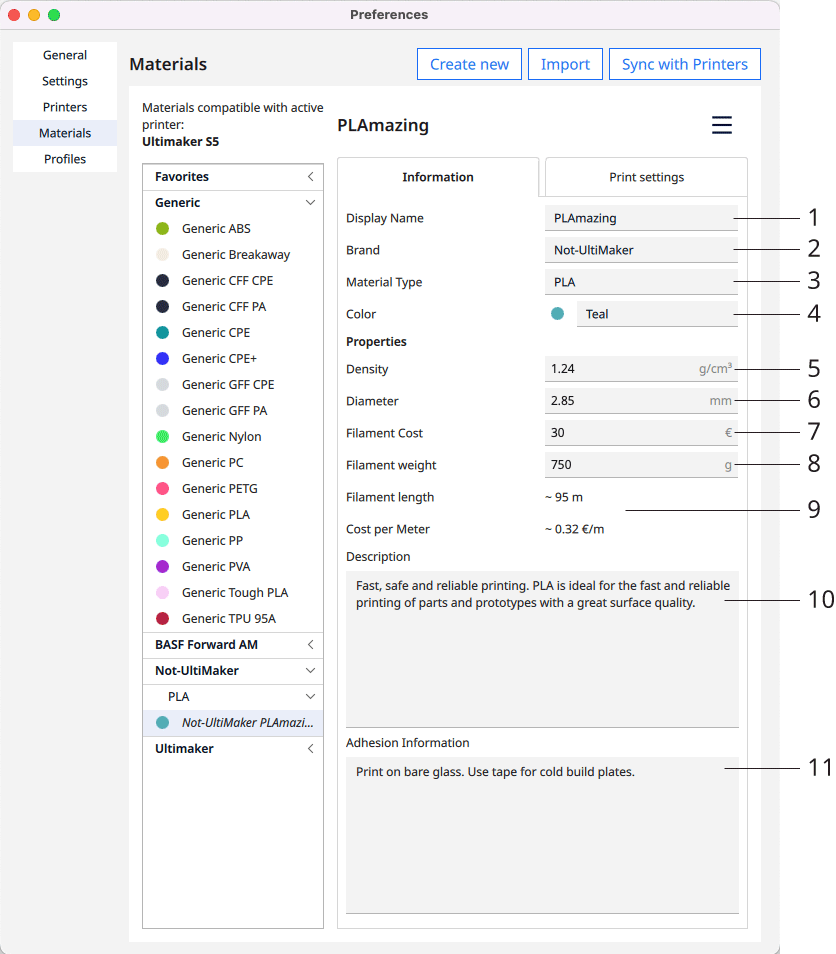
- Display name. Choose an easily recognizable name that represents your custom material.
- Brand. Enter the brand of the filament manufacturer.
- Material type. This value should be the same as one of the other available Generic materials, as the UltiMaker firmware needs this to determine the right temperatures.
Caution: When setting the Material type to a type unavailable in UltiMaker Cura, the software will not recognize it and all print profiles will be missing. For example: When using 'ASA' material, simply choose ABS, as it is the most similar material to ABS.
- Color. Select the square color icon to change it. Loaded models with this material will be displayed in this color on the build plate in the Prepare stage.
- Density. The weight of the filament in grams per square centimeter.
- Diameter. The diameter of the filament is usually 1.75 or 2.85 mm. UltiMaker 3D printers only support 2.85mm filament.
- Filament cost. Enter the cost of your filament spool. You do not have to add this, but it will help to calculate the cost per print with this material.
- Filament weight. Enter the weight of a single spool of filament. You do not have to add this, but it will help to calculate the cost per print with this material.
- Length and cost per meter. These are automatically calculated by UltiMaker Cura based on the previous settings.
- Unlink material. Unlinking the material is required for creating a new file to recognize the material and its settings on the printer.
- Description. This field allows to add useful information like filament characteristics and build plate adhesion tips.
Ensure your material profiles are unique and 'unlinked'
After importing a 'clean base profile' and editing it to match your material, you have the option to Duplicate this material profile. However, the materials will have the same GUID and are linked. Simply click the Unlink Material button in the material manager, to ensure the 3D printer and Cura understand these are two different materials.
| Step 1 - Duplicate the material | Step 2 - Unlink the material |
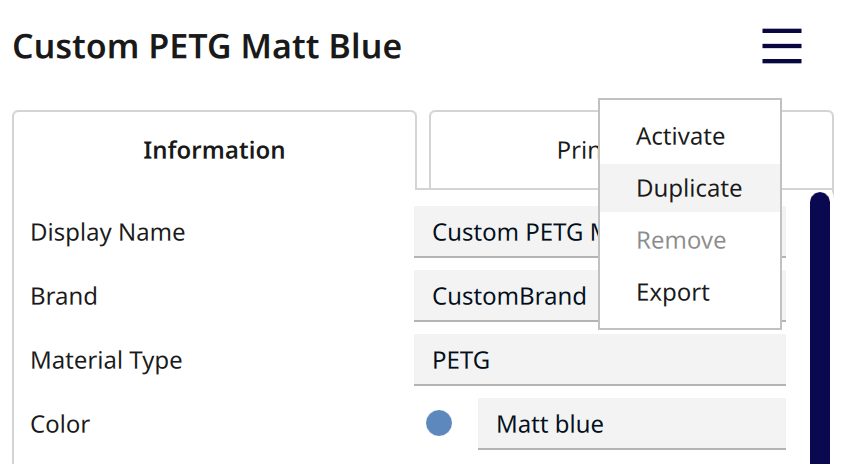 | 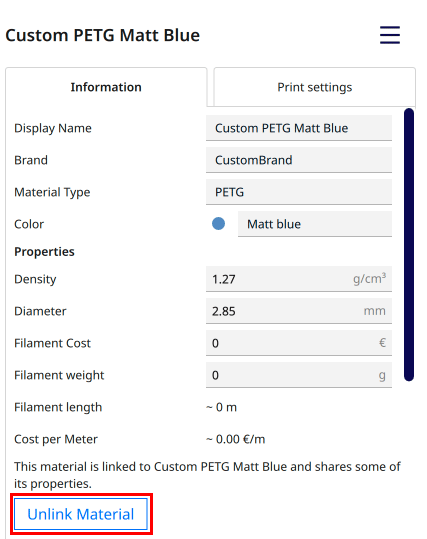 |
Install the profile on your UltiMaker printer
After you have successfully followed the guide above, it is time to synchronize your profiles to the UltiMaker printer. This will install the new material profile on your printer, which allows you to select the correct material type when loading a new spool and prevents configuration errors when starting a print. Follow the steps in this article:
How to synchronize custom material profiles via Cloud or USB drive?


