PET CF provides excellent strength, stiffness, and dimensional stability in the XY plane, but like all composite filaments, it displays strong anisotropy. This means that part performance varies significantly depending on build orientation. To achieve the best mechanical performance, especially under load, it is important to optimize the printing orientation and consider the material's fiber-reinforcement behavior.
Orientation
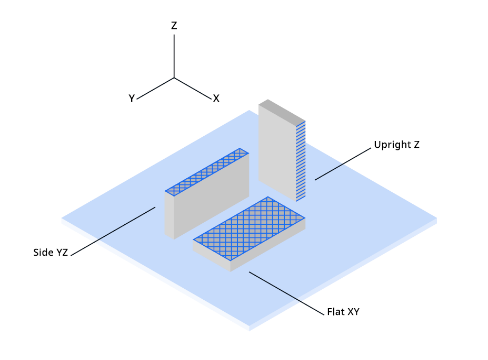
Composite materials such as PET CF contain short fibers aligned along the extrusion direction. As a result, printed parts are strongest within the XY plane, where fibers support the load. In contrast, Z-axis strength relies primarily on layer-to-layer adhesion, which is closer to the behavior of unreinforced PET.
To maximize strength:
- Orient your part so that the primary forces act in the XY plane, where reinforcement is most effective.
- Avoid critical load paths in the Z direction, as Z-axis mechanical strength is significantly lower.
- When possible, rotate the model in Cura so that tensile and bending forces align with the printed lines.
- Consider the trade-off between orientation and support needs. PET CF supports offer several options, so choose the configuration that maintains strength while still allowing clean removal.
Tip: Position the model so that the highest structural loads are carried in the XY plane. This helps ensure the continuous fiber orientation provides maximum reinforcement.
Additional recommendations
Other recommendations for improved Z strength:
|
Design guidelines
|
Design your 3D model for best performance. Wall thickness min. 2 mm, preferred 4 mm or more. See also the model design guidelines for tips on how to improve your part with e.g. adding ribs or gussets.
|
|---|
|
Air circulation
|
Avoid strong external air circulation (such as ventilation or air conditioning).
|
|---|
|
Fan speed
|
In UltiMaker Cura, set Fan Speed and Maximum Fan Speed to 0% or 5%.
Note: This reduces the dimensional accuracy somewhat.
|
|---|
|
Print sequence
| When printing multiple models with single extrusion, in UltiMaker Cura, set the Print Sequence to One at a Time. The second extruder must be disabled for this setting to be visible.
Note: This is only possible for models with a maximum height (Z) smaller than the printer's gantry height. This is 55 mm for S series printers and 35 mm for Factor 4.
|
|---|


