This article describes the XY calibration procedure on the Factor 4 and Factor 4 Plus.
The horizontal distance between the nozzles of the two print cores in the X and Y directions needs to be configured. A correct XY calibration will ensure that the two colors or materials align well. The print cores that are supplied with the UltiMaker Factor Series printers are already calibrated. For any new combination of print cores, an XY offset calibration must be performed. The printer will then store this calibration value internally.
Whenever the Factor Series printer detects a new combination, it will prompt a message on the display and guide you to start the calibration procedure.
Note: You can ignore the calibration warning on the printer and start printing with uncalibrated print cores. The XY offset will then default to 0. This may cause print quality issues and misalignment of materials in dual extrusion prints.
Note: Factor 4 firmware version 10.1.0 contained a bug that sometimes caused the unspecified error message ER999 when the calibration process was started from the prompt. This was resolved in firmware 10.1.1 and later. Always ensure to keep your printer's firmware up to date.
Requirements
For the XY calibration, the UltiMaker Factor Series printer will run a short print with both cores, after which you are asked to select the printed lines with the best alignment. The XY calibration will take about 10 minutes.
You will need the XY calibration sheet, which is included in the accessory box. If you no longer have this sheet, you can download it here. Print this file on an A4 paper at 100% scale, or simply use it as a digital reference.
Note: The UltiMaker Factor Series printers include a paper XY calibration guide. Unlike for printers with a glass build plate, for Factor 4 and Factor 4 Plus, this sheet cannot be placed under the build plate to align the grids. The sheet is meant as a reference for which the X and Y grids are, and which numbers the lines in the grids indicate.
Ensure two print cores are installed before starting the calibration, and there is at least one material pre-loaded for each extruder.
Instructions
Start this calibration when prompted, or, in the Options menu (gear icon), go to Maintenance → Print head → Calibrate XY offset and select Start calibration.
- After starting the calibration, the UltiMaker Factor Series printer will prepare for printing. This includes loading the required materials and preheating the print cores and build plate.
- A grid pattern will be printed on the build plate. Wait until it is complete.
- Once the build plate has cooled down, remove the flexible build plate from the printer.
- Find the best-aligned lines on the printed X grid and note which number corresponds to these lines. Enter this number as the X offset value on the display.*
- Find the best-aligned lines on the printed Y grid and note which number corresponds to these lines. Enter this number as the Y offset value on the display.*
* Tip: In some cases, it can be difficult to determine the best-aligned line. When in doubt between, for example, the lines corresponding to +1 and +2, enter +1.5 in the menu.
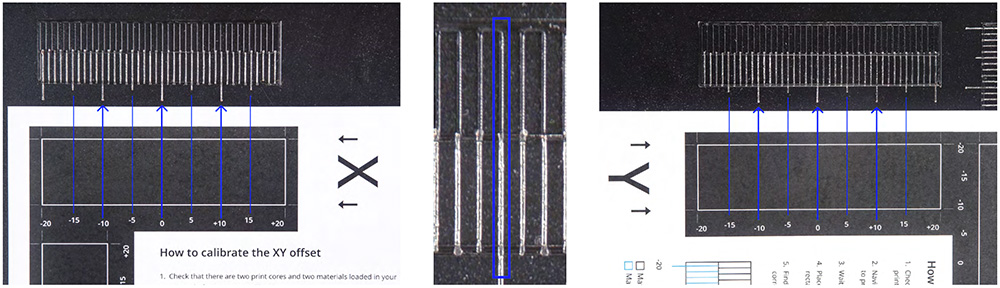
Note: It is important that the printed XY offset pattern adheres well to the build plate and shows no signs of under-extrusion. If it did not print well, repeat the calibration print.
After completing the XY calibration, clean the flexible build plate and place it back into the printer.
Tip: For more information and a general FAQ about the XY calibration procedure, please visit this article: UltiMaker XY calibration procedure


