The information in this article applies to the UltiMaker Factor 4 and Factor 4 Plus.
The nozzle cover shields the print cores from cold airflow from the fans, which helps the print cores maintain a stable temperature while printing. The cover also helps to prevent backflow of material into the print head when something goes wrong during printing.
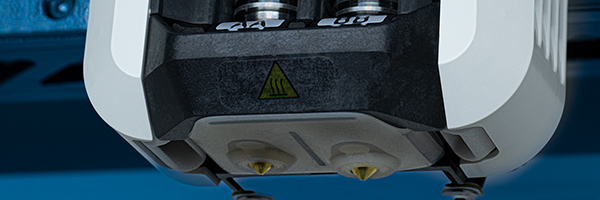
The heat of the nozzles may cause wear on the nozzle cover over time. It is recommended to check the quality of the cover at least once every three months, or 750 printing hours.
Tip: This may be necessary more frequently when printing with higher-temperature materials. When using CC or DD print cores, check the quality of the nozzle cover at least every 100 - 300 printing hours. When using the HT or CC+ print cores, especially in combination with PPS-CF, it is recommended to check after every print (or 50 - 100 hours).
Checking instructions
Caution: Make sure that the print cores have completely cooled down before starting this maintenance action. Ensure that the printer is not able to start a new print job sent remotely.
Examine the bottom of the print head to see if the holes where the nozzles come through are still round and if the cover still forms a good seal. Also gently open the fan bracket to check the other side of the silicone nozzle cover. If the nozzle cover looks burnt, frayed, or damaged, it is recommended to replace it. Follow the instructions below.
Note: Never start a print if the nozzle cover is not installed. This can cause temperature control errors or it can lead to backflow of material into the print head. The print head contains a sensor to prevent severe damage, but it will at least cause the print job to fail.
Replacing the nozzle cover
Note: If you also own an UltiMaker S series printer, ensure you keep the spare nozzle covers separate. Although they look similar, the nozzle covers for Factor and S series have different dimensions and are not interchangeable.
If the nozzle cover needs to be replaced, the cover bracket can easily be removed from the print head for better access and easier work instructions.
Tip: For an even quicker and easier process, replace the entire bracket. UltiMaker offers service packs with preassembled nozzle cover brackets. Contact support or your local reseller to inquire about spare parts.
To remove the old cover, first open the nozzle cover bracket. Slightly push the bracket to one side, and in a downward twisting motion, pull it out of the print head. Then, pull the old nozzle cover off the bracket and discard it.
To install the replacement cover, first ensure you hold it in the correct orientation below the bracket. The cover contains two sealing tabs and 'pockets' at the side to hold it in place. Take the following steps to install it correctly:
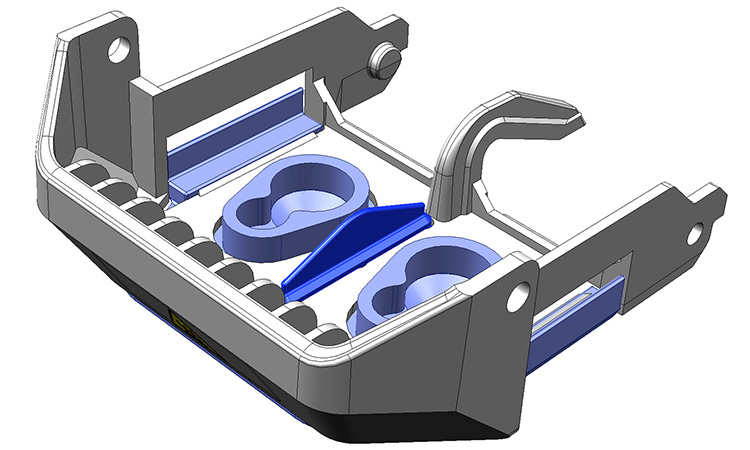 | 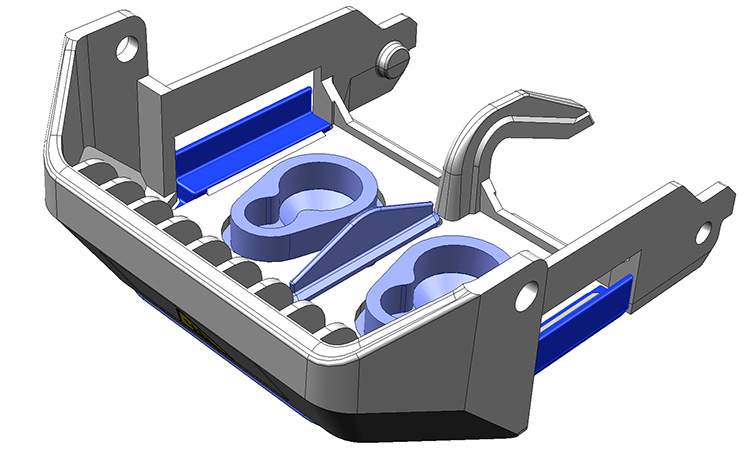 | 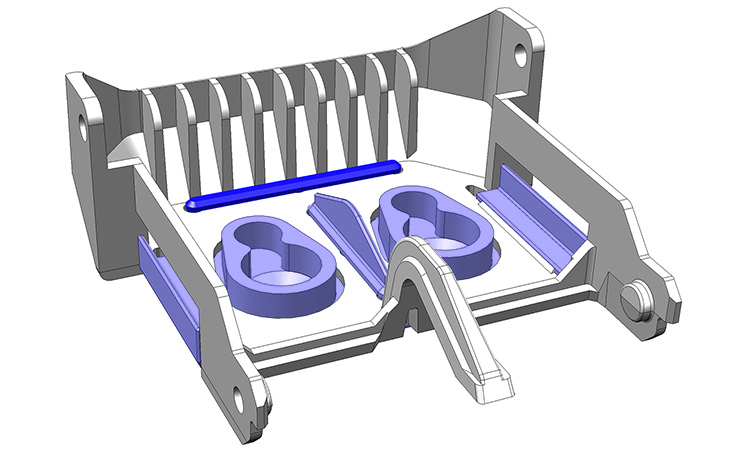 |
1. Middle tab
Insert the middle tab of the cover through the slot in the bracket, ensuring that the thicker part (seal) is fully pushed through. | 2. Side pockets
Fold the left and right sides of the cover over the edges of the bracket. | 3. Front tab
Push the tab at the front of the nozzle cover through the slot in the bracket and ensure that the seal locks it in place. |
When the nozzle cover is placed on the bracket, inspect it to make sure that the tabs and pockets are secure. If so, reinstall the cover bracket on the print head. Click the tabs at the back into the print head frame, and close the bracket.
Tip: After replacing the nozzle cover, manually lower and lift the second print core using the lift switch at the side of the print head to see if the cover is well-aligned with the cores.
You can continue printing again. Remember to check the nozzle cover regularly and ensure to keep enough spares at hand.


