The information in this article applies to the UltiMaker Factor Series 3D printers: the Factor 4 and Factor 4 Plus.
Several sets of Bowden tubes guide the material from the Material Station bays all the way to the print head. Over time, the tubes may become scratched, or material particles may accumulate inside the tubes. This is especially the case for the Bowden tubes above the print head, as these are closest to the feeding system. Additionally, these tubes must be disconnected regularly to perform the print core cleaning procedure.
Checking instructions
At least once a year, carefully check the quality of the Bowden tubes. Take the following steps:
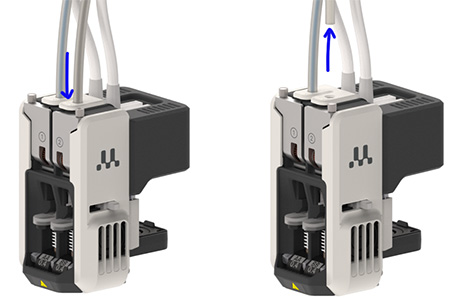
- Press the collet release clip at the top of the print head.
- While applying pressure, pull the Bowden tube up and out of the print head.
- Carefully inspect the tube:
- The outer surface must not be excessively scratched.
- The exit of the tube must be smooth, not frayed or damaged.
- The inside of the tube must not contain material particles from grinding.
Do this for both of the print head Bowden tubes.
|  |
Replacing the Bowden tube(s)
If the tubes must be cleaned or replaced, you must access the back of the machine.
Note: It is recommended that only Instructed or Skilled users remove the back panel. Normal users may also remove the back panel, provided they have carefully read and understood the instructions, the printer is powered off, and the power cable is removed.
This repair process requires access to both the front of the printer (with the build chamber door open) and the back (with the back panel removed). Ensure there is sufficient space around the machine. Take the following steps:
| Disassembly | Reassembly |
|---|
- Disconnect the Bowden tubes from the top of the print head as described above.
- Remove the cable clips that secure the Bowden tubes to the print head cables.
- At the back of the printer, remove the six bolts that secure the back cover panel and gently place the cover panel aside.
- Remove the clamp clip from the top of the decoupler and press down on the collet while pulling the Bowden tube out of the decoupler.
- Pull the Bowden tubes out of the machine.
|
- Insert one end of the new Bowden tube into the print head while applying pressure to the collet release clip.
- Push the other end of the Bowden tube through the corresponding opening at the back of the gantry.
- Secure the Bowden tubes to the corresponding print head cables with the cable clips and space them evenly.
- At the back of the machine, push the end of the Bowden tube into the decoupler. Ensure it is fully inserted, then secure it with the clamp clip.
- Align the back cover panel and secure it with the six bolts.
|
After reinstalling the Bowden tubes, you can connect the power cable, turn on the UltiMaker Factor Series printer, and reload your materials.


